PyCharm is the go-to IDE for Pythonists, no matter what the Python project is. From Django to Flask, PyCharm’s extensive support makes it an attractive out-of-the-box solution.
venv – or “virtual environments” – is a Python module that’s used to create a lightweight and isolated environment for running Python projects. It’s used to keep the dependencies required by different projects isolated from one another.
To create your own venv in Python, the general flow of command you would need to enter looks something like this:
| python3 -m venv /path/to/new/virtual/environment |
If you need help, run venv with the -h flag to get the list of available commands.
| usage: venv [-h] [–system-site-packages] [–symlinks | –copies] [–clear] [–upgrade] [–without-pip] [–prompt PROMPT] [–upgrade-deps] ENV_DIR [ENV_DIR …] Creates virtual Python environments in one or more target directories. positional arguments: ENV_DIR A directory to create the environment in. optional arguments: -h, –help show this help message and exit –system-site-packages Give the virtual environment access to the system site-packages dir. –symlinks Try to use symlinks rather than copies, when symlinks are not the default for the platform. –copies Try to use copies rather than symlinks, even when symlinks are the default for the platform. –clear Delete the contents of the environment directory if it already exists, before environment creation. –upgrade Upgrade the environment directory to use this version of Python, assuming Python has been upgraded in-place. –without-pip Skips installing or upgrading pip in the virtual environment (pip is bootstrapped by default) –prompt PROMPT Provides an alternative prompt prefix for this environment. –upgrade-deps Upgrade core dependencies: pip setuptools to the latest version in PyPI Once an environment has been created, you may wish to activate it, e.g. by sourcing an activate script in its bin directory. |
This is a good starting point and great for when you’re building a Python project from scratch. However, integrating it into your IDE’s workflow can require a bit of setup. In addition to this, different project types require different configurations of the venv. Fortunately, PyCharm comes with an easy-to-use integrated solution that makes managing dependencies easy and painless.
To create a virtual environment in PyCharm, you need to have Python installed on your computer.
To do this, go to the official Python download page and select the download package that is suitable for your specific operating system. Follow through with the OS-specific instructions to install Python on your machine.
If you are using Python 3.3+, you can skip Part 1 because the built-in venv module is used. However, if you are using a lower version of Python, here is how you can use venv for your project.
Is your knowledge of software development up-to-date?
It’s important to ensure that you’re knowledgeable about the most recent advancements and trends in software development. Staying informed about new technologies and practices will equip you with the necessary knowledge and abilities to excel in this constantly evolving industry. Discover how to utilize AI for optimizing your software engineering in 2023.

To set up and configure a virtual environment on PyCharm, head over to the status bar located at the bottom of your IDE. Click on the option Python Packages.

This will give you a popup screen that looks something like this:

In the search bar, look up virtualenv. The search panel will give you the virtualenv package for you to download and install. Click on the install button in the top right-hand corner.

Head over to your top navigation bar, click on File, and then Settings. In the left-hand panel, open up the drop-down that says Project:<yourprojectnamehere>. There will be an option called Python Interpreter.

Click on the little settings cog and select the Add option.

You will get a screen that looks like this:

If you are running lower than Python 3.3, you will need to select the dropdown for Base interpreter and find your downloaded venv package. If you are running Python 3.3+, then the option of your base interpreter is automatically chosen for you.
If this is an existing project and you want to import a pre-existing interpreter, you can do so by selecting Existing environment and then changing the Interpreter field to your settings.
Once you’ve done that, click on OK to create a new environment. You will get a progress bar in PyCharm’s IDE that updates you on the creation of the virtual environment.

Once completed, you will get a blank virtual environment with only pip and setuptools .

Every project requires some sort of dependency and packages to work. You have two options in PyCharm when it comes to installing dependencies and packages for your Python project’s virtual environment.
To do this, you can do so via the + sign in the Python Interpreter section, or via the Python Packages option at the bottom bar of your main IDE’s view.
Clicking on the + sign inside the Python Interpreter will give you a screen of Available Packages. You can use the search bar to find the package and dependency you need for your particular project. For example, if you’re building a Django project, you can search up Django and it will give you the latest option available.


Click on Install Package to install the package as part of your venv requirements. When you click on Install Package, you will get an update on the screen to tell you that it is installing.

Once it is completed, you will get a green notification bar at the bottom of your Available Packages view.

To uninstall any packages you do not need or want, you can do so via the minus – sign on the main Python Interpreter screen.

Once it has successfully uninstalled the package from your venv, you will get a green success message at the bottom of the view.

Look at the bottom of your PyCharm IDE and select the option Python Packages. This will give you a popup of the currently installed packages.

In the search bar, look up the package you want to install. Here’s an example of how to install Django.

Click on the install button to add it to your packages and dependencies list. The install button will change to a loading bar. This will disappear once you’ve successfully installed the package to your virtual environment as a dependency.

Once completed, if you click on the x in the search bar, you will see all the packages that are in your Python project’s venv.

To uninstall the package from your Python’s virtual environment and remove it as a dependency, select the package you want and select on the triple dots option to your right. Click on delete.

Once it has been deleted from your project’s dependencies, the package will be removed from the list.

Setting up and managing your virtual environment in Python with venv is pretty simple in PyCharm. There are no terminal commands needed. It is great for both beginners and seasoned developers looking to supercharge their workflow, especially with PyCharm.
Are you taking your first steps with Docker? You are not alone. Hit play and be ready to take notes as IBM Cloud’s JJ Asghar helps Yotam, our Developer Advocate to understand what Docker is all about, and how it is used to deploy projects seamlessly.
For those who missed this fascinating episode, here it is – Yotam, our Developer Advocate, and IBM’s very own JJ Asghar chat about AI, modern must-have dev tools, and… turtles
When it comes to Python, PyCharm seems to be the goto IDE for most professional Python coders. Sure, there’s Atom and Visual Studio. But you can’t quite compare them to the inbuilt intelligence of PyCharm from IntelliJ IDEA.
PyCharm is available in both a paid and a free version. For this guide, we will be focusing on the free version — also known as the Community Edition.
This is a beginner walkthrough guide and will not feature too much code. Rather, it will focus on the general setup and how to create your first Django app inside PyCharm. Before we begin, let us do some housekeeping prerequisites. You will need to have installed:
Let’s get started!
Prior to beginning, it’s important to ensure that you’re knowledgeable about the most recent advancements and trends in software development. Staying informed about new technologies and practices will equip you with the necessary knowledge and abilities to excel in this constantly evolving industry. Discover how to utilize AI for optimizing your software engineering in 2023.
To install Django, create and navigate to your project folder. Boot up your command line (cmd in Windows) and run the following command to create your virtual environment.
| python -m venv env |
venv is the command to create your virtual environment in Python. env is your environment name. In theory, env can be called anything you want but for this guide, we’re going to keep to the convention.
This will create an env folder for you with all the scripts and libraries required to run a Python-compatible virtual environment. To activate your virtual environment, run the following command:
| envScriptsactivate |
You will see (env) in your command line in front of your directory. For example:
| (env) C:Documentspython |
Once that is running, you can run the following command to install Django onto your local machine.
| pip install django |
You might get a warning to upgrade pip but this is not a requirement to continue. once that is completed, you can now create your first Django project. To do this, use the django-admin command:
| django-admin startproject pycharmtut |
You can replace pycharmtut with whatever you want. The above command will create a new Django project with the minimum required files and setup. Before we can run your new Django app? We need to set it up.
Launch your PyCharm Community Edition and open your newly created Django project folder. To do this, click on File, then Open, and select ‘pycharmtut’.
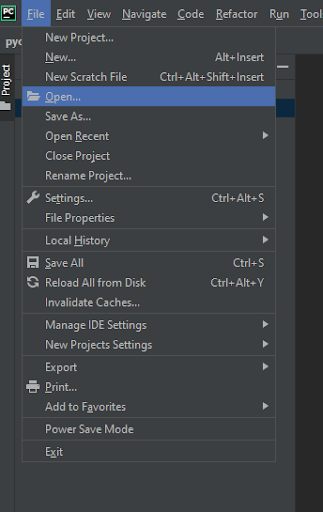
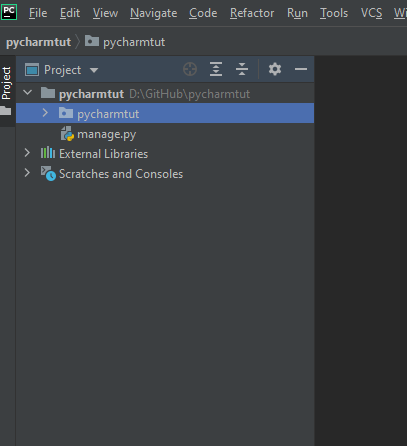
This will import the folder and its contents into the Project sidebar.
To start your Django app, go back to your command line and run the following:
| python manage.py startapp hello |
This command will run the manage.py file and create a new app called hello in your project’s folder. Here is a list of directories and what it looks like in PyCharm.

Inside PyCharm, go to settings.py (located inside your pycharmtut folder). Open up the file by double clicking on it. Scroll down to the part that says INSTALLED_APPS and add hello. hello is the app you just created via the previous command line.
INSTALLED_APPS should be around line 33. Here is what the final definition looks like:
| INSTALLED_APPS = [ ‘django.contrib.admin’, ‘django.contrib.auth’, ‘django.contrib.contenttypes’, ‘django.contrib.sessions’, ‘django.contrib.messages’, ‘django.contrib.staticfiles’, ‘hello’, ] |
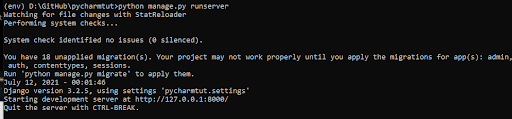
To see your Django app working, go back to your command line and run the following:
| python manage.py runserver |
This command will boot up your Django server for you. Inside your console, it will tell you where the server is located. In our case, it is http://127.0.0.1:8000
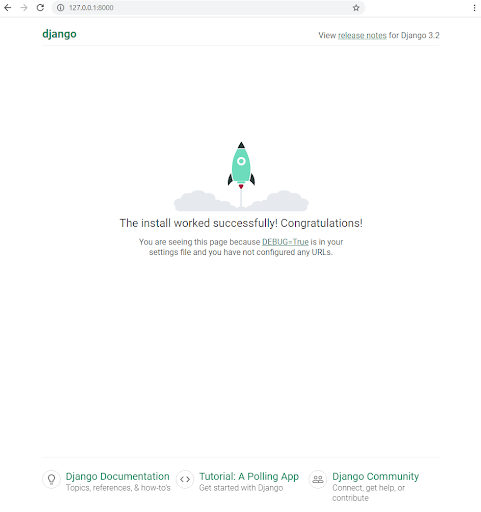
Paste http://127.0.0.1:8000 in your browser and you should be greeted with something like this:
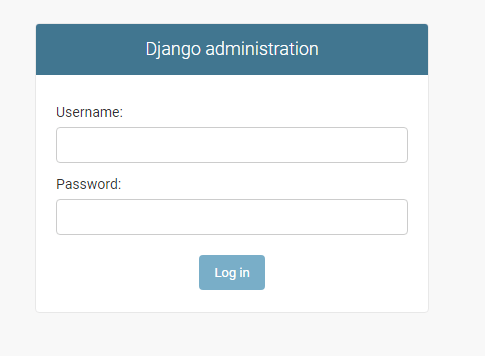
By default, Django comes with a pre-built admin panel that you can use. It is located at http://127.0.0.1:8000/admin and looks something like this:
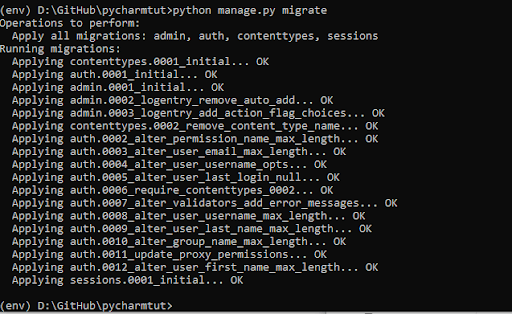
Before we can use it we need to add an admin user. To do this, you need to stop your Django app server by using Ctrl + c on your command line. Create a database for your Django project by using the following command:
| python manage.py migrate |
Your command line should look something like this:
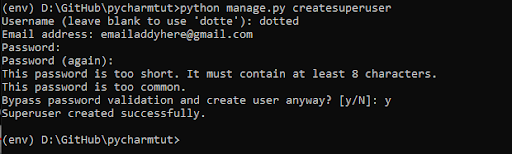
Now you can run the createsuperuser command to create a new user for your Django app. Here is the command for it:
| python manage.py createsuperuser |
In your command line, you can type in your username, email address, and then a password. As this is on your local machine, you can use a weak password, which will prompt a password is too common message. You can bypass this by typing y when prompted. Once that is completed, you will get a Superuser created successfully. Message.
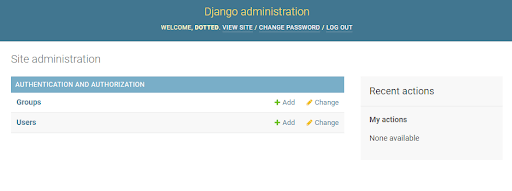
You can now run the server again using python manage.py runserver. Refresh your browser and you should be able to login using your credentials. Here is what the logged admin screen looks like:
Now that we’ve completed the basic set up, let’s get back into PyCharm and write some Python Django code.
Navigate over to your PyCharm folder and select views.py. This is where you will render your templates. Here is the starter code snippet for it:
| def index(request): return render(request, ‘hello/index.html’) |
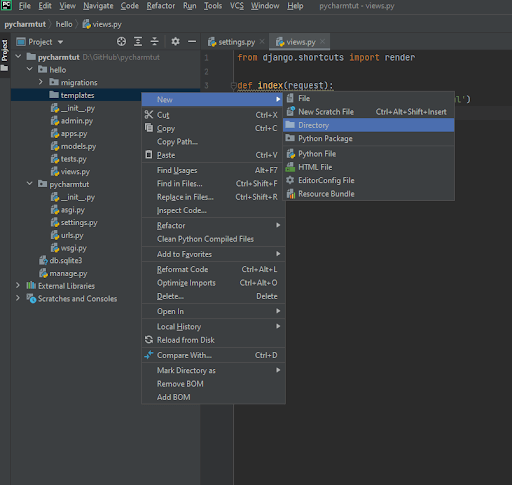
Create a templates folder with another folder inside it called hello. Inside the hello folder, create a file called index.html. To do this, right click on the root hello folder, hover over New and click on Directory.

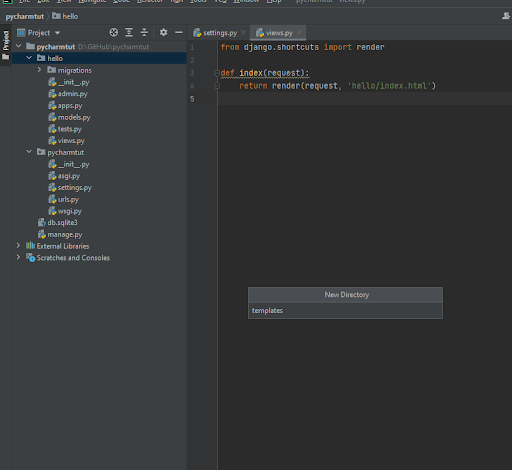
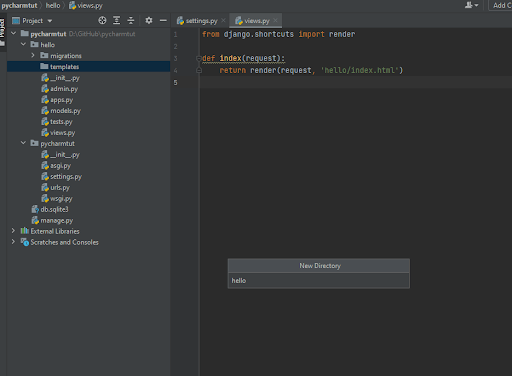
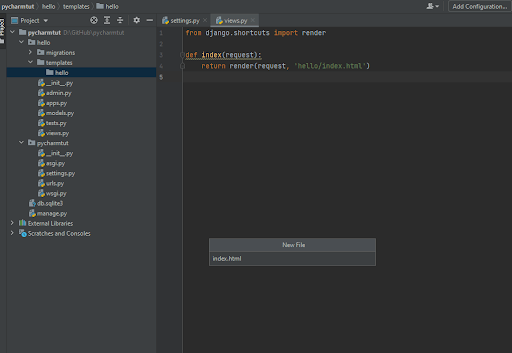
Here is what the final folder structure looks like in PyCharm:

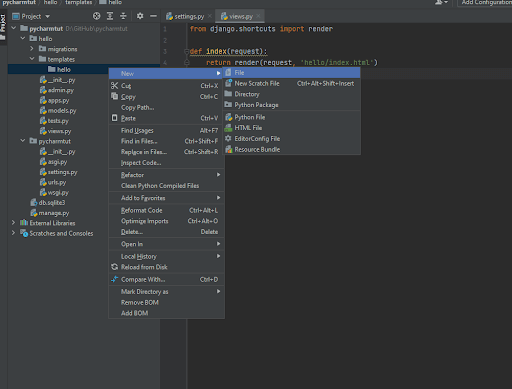
Now inside your index.html, you can create whatever code you want. We’re going to do a simple hello world. Write the following HTML in your index.html file.
| <h1>Hello World!</h1> |
Once that is completed, we need to set the url for this. Go to your urls.py inside your pycharmtut folder and import your newly created hello template.
| … from django.urls import path from hello.views import index urlpatterns = [ path(‘admin/’, admin.site.urls), path(‘hello/’, index) ] … |
Once you’ve saved this, you can now go to http://127.0.0.1:8000/hello/ and it will give you a view that looks something like this:
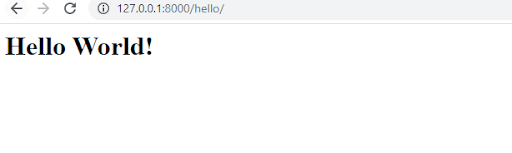
If you take away the hello path and leave it blank — so your path becomes path(”, index), it will run at the root domain and override the default Django greeting screen you saw earlier.
And that is the general basics of getting started with Django.
The above is a very simple introduction to Django, how to set it up and work with it in PyCharm. There are other parts of PyCharm that you can explore further in the Community Edition such as the graphical debugger and test runner, navigation and refactoring, code inspections and VCS support. Beyond that is PyCharm Professional Edition, which unlocks more features that help with web development, in addition to database and SQL support.
Everyone wants to get more done in less time. When it comes to software development, there are tools built to help you do just that. From automation to gamifying habits, productivity is more than just getting things done — it’s also about reducing the friction and creating environments that support productive tasks.
There’s more to productivity than just coding faster. Code quality cannot be determined by the number of code lines (or lack of it) either. When it comes to software development, productivity is ultimately a team effort. Tools that enable collaboration, communication, and good habits are vital to enhancing productivity.
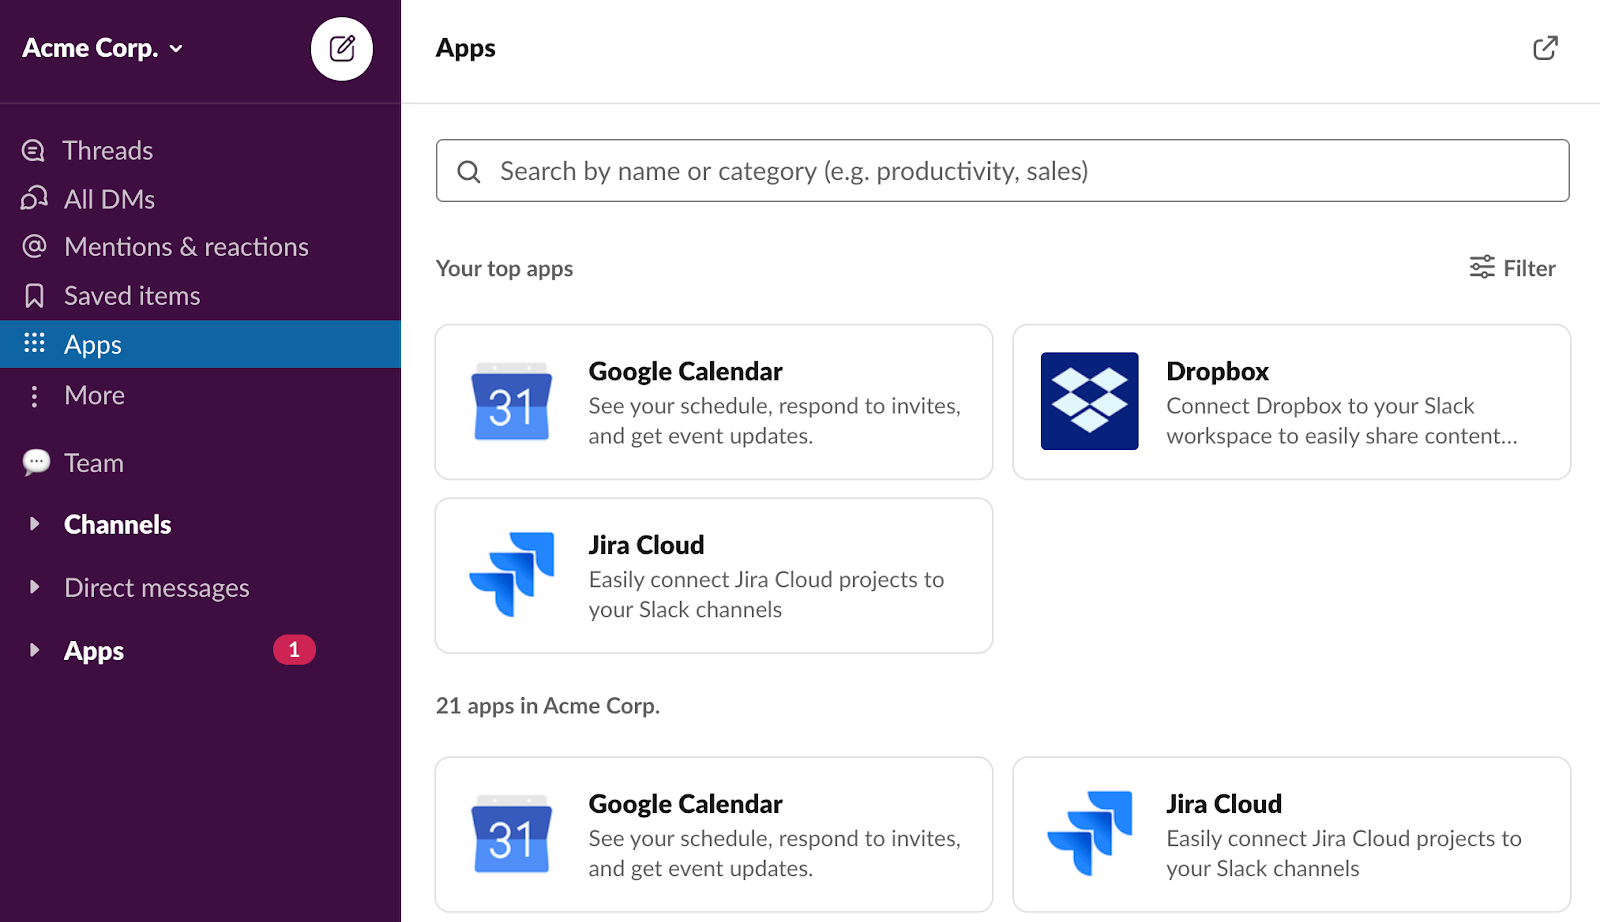
Slack is a staple for team communication, especially in software development. You can create chat channels – which act as rooms for topic-based conversations, share and collaborate information about the project with individual team members, create groups and sub-groups, and create one-on-one discussions.
Rather than dealing with multiple email threads and chains that come and go throughout the day, Slack lets you create time blocks in your hours and signify to others when you are available to talk based on your current status.
Why type everything out when you’ve got Tabnine?
But what is Tabnine?
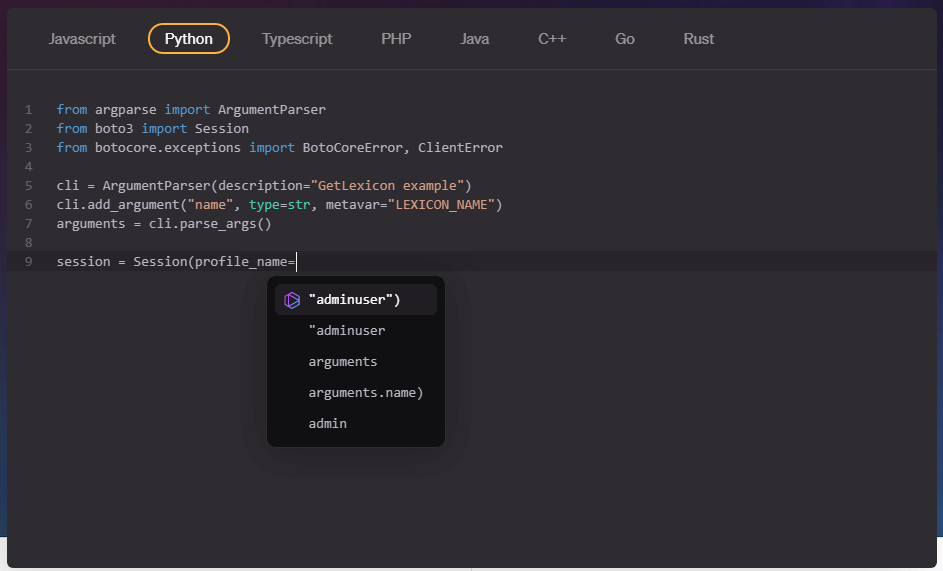
Tabnine is an AI-driven code completion tool. It has been downloaded and used by over 1 million developers in numerous languages such as JavaScript, Python, TypeScript, PHP, Java, C++, Go, and Rust.
Reduce your mistakes and discover best practices while you code. The best part about Tabnine is that it plugs right into all the most popular IDEs such as Visual Studio Code, Atom, Sublime, IntelliJ’s suite, and even Vim.
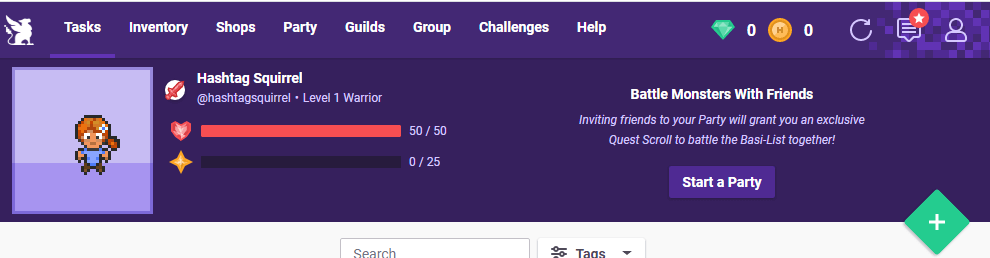
Generally, productivity apps can be pretty dry and typical. Habitica is a cross-platform app that encourages you to stick to your goals by gamifying your habits.
So rather than checking the boxes for your goals, you turn life into one big game—battle monsters by completing tasks. Get motivated and level up – literally.
You can also invite friends to join you on your quests, create accountability and win loot to spend on rewards.
Bugs are unavoidable. No matter how healthy you may think your software is, one will eventually find its way into the bug report.
Now the primary task becomes tracking down the logs and attempting to replicate the bug to figure out how to fix it. More often than not, there are no logs or not enough of them. Trying to reproduce the issue can also pose a problem, especially for serverless and distributed architectures.
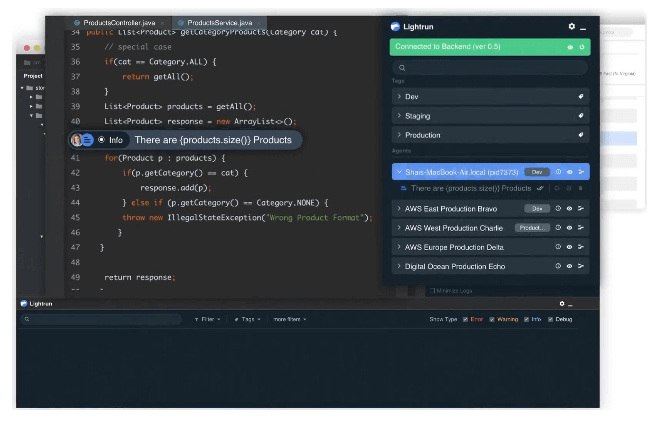
This is where Lightrun comes in.
Lightrun lets you add logs, metrics, and traces to your code – directly from your IDE or CLI in real-time and on-demand. It enables you to gain code-level observability without needing to deploy.
This capability saves your team time and works on monolith microservices, Kubernetes, Docker Swarms, ECS, Big Data works, serverless, and more.
Confluence is an Atlassian product that lets development teams create a centralized repository of knowledge. It is optimized for documentation and sharing development processes such as orchestrations and deployments.
On the surface, this sounds like a supercharged wiki — but it’s more than just that.
Confluence also lets you link to JIRA, use inbuilt templates for standardized documentation, set granular permissions on content, document management, versioning, and a suite of customizable add-ons.

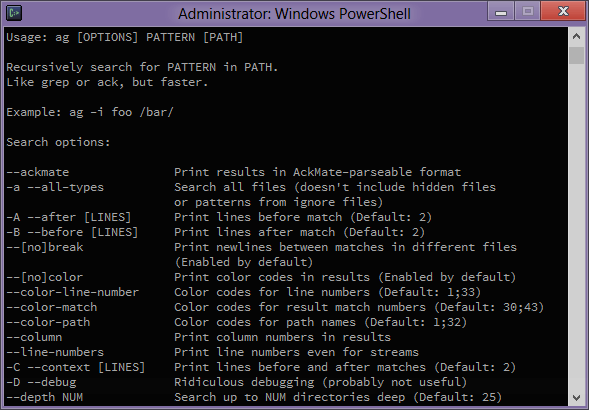
Why trawl through the gazillion files to find a specific piece of code in your repo when you’ve got the Silver Searcher?
The Silver Searcher is a grep-like search tool focused on speed that runs on Unix-like and Windows operating systems.
It started as a clone of ack (another popular code searching tool) but is speed-tested 5-10x faster.
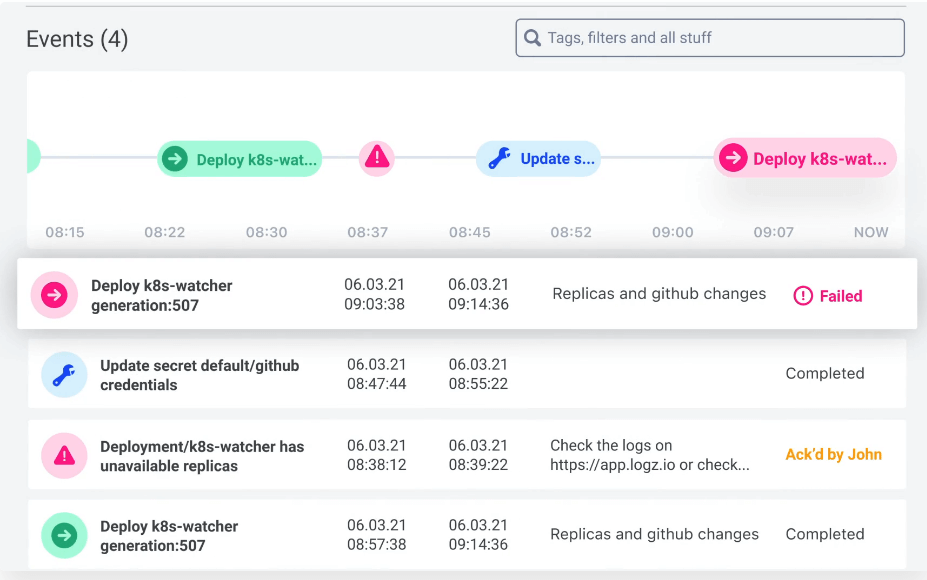
When it comes to software development, tracking processes, instance health, deployment statuses, and troubleshooting can be a hazy and disorganized space — if not distributed across multiple tracking boards.
Komodor centralizes this and gives everyone a birds’ eye view of everything and its current statuses.
It can be connected to Slack for alerts and help development teams troubleshoot faster by providing you with the ability to track your system from end to end.
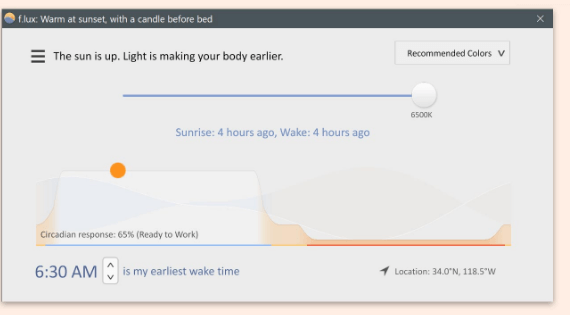
Do you ever find your screen too bright during certain times of the day? or too dim? or just not quite right?
Or perhaps you don’t notice anything at all.
As developers, we spend a good portion of our time in front of screens. The brightness of a screen can disrupt how our body naturally functions, especially when it comes to sleep.
F.lux is an automated color display application that changes according to your requirements and time of day. It does so by adjusting the color ratios of your screen, especially the amount of blue light you get from your devices.
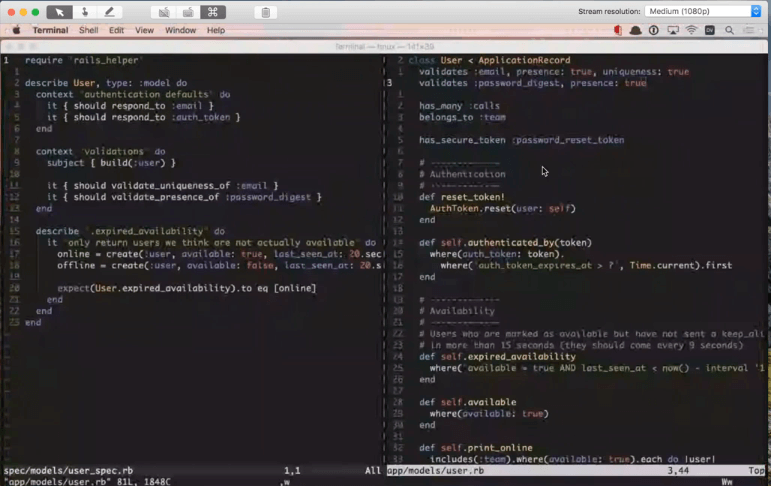
There is nothing more horrible than trying to pair program some code via video call. Tuple is an integrated remote pair programming app for macOS that lets you collaborate in real-time.
It lets you talk and code at the same time without eating your CPU.
Tuple also allows you to have both a mouse and keyboard each. This means that you don’t have to wait for your coding partner to finish what they’re doing so you can begin. You can code, collaborate, and chat all at the same time.
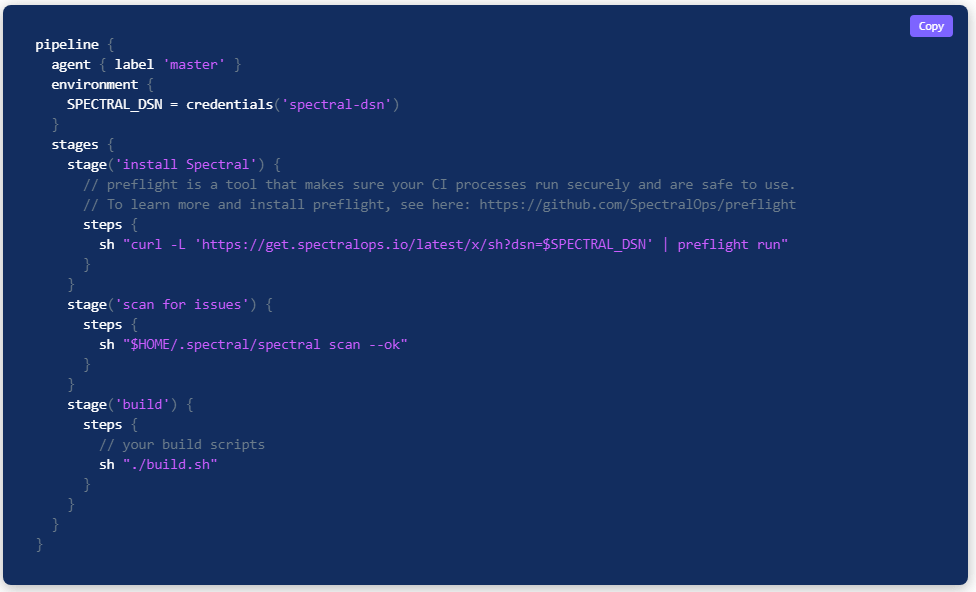
Code security is often cumbersome to maintain over time. So it usually gets pushed down the list of priorities.
However, a breach or leak can cost your business and risk leakages of private data. SpectralOps is an automated code security tool that lets you automate checks and scans to mitigate secret leaks caused by human error or bad practices.
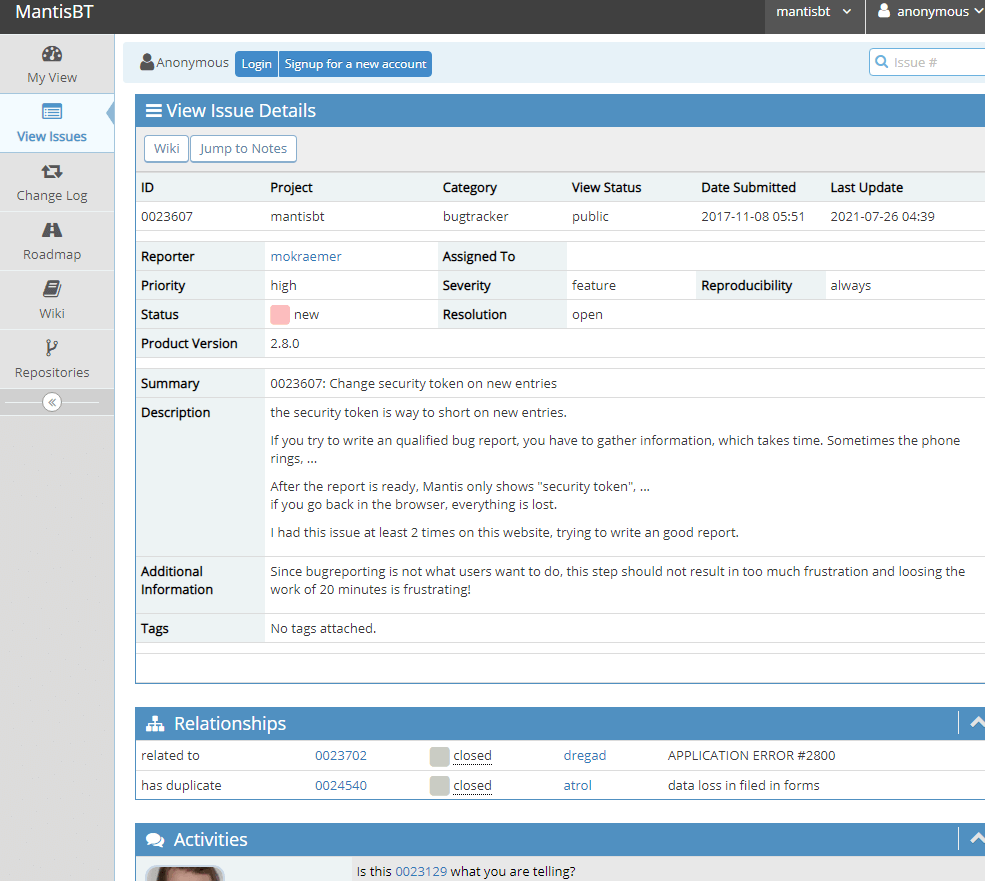
One of the things no one likes to do but needs doing is Bug tracking. There are many tools out there, but MantisBT focuses on simplicity.
The best part is that it is entirely open-source, customizable, with access controls based on project roles and users.
It’s easy to run a stopwatch on a task. But how much of that time is actually spent doing what you thought you did?
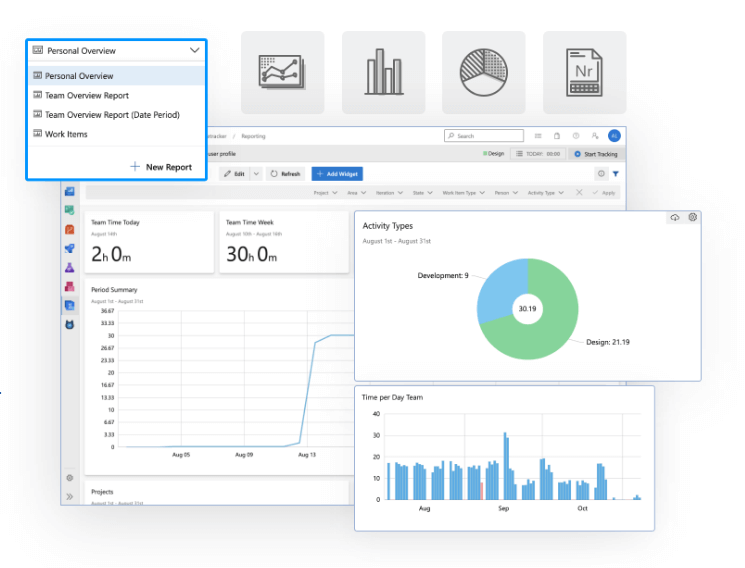
7pace Timetracker is a smart and fully integrated tool that’s made for developers to track and trace what they actually did and how long it took them.
The best part is that you can focus on how each part of the project progresses rather than chasing down team members for time logs.
Our laptops and computers are our portals to code and work. But it is also the portal to YouTube rabbit holes, Twitter feeds, Facebook scrolling, and random articles in which we find ourselves lost.
We tell ourselves that it’s only for a minute or two, only to find that it’s been an hour and now it’s lunchtime.
Cold Turkey is an app that blocks certain websites, games, and apps to help boost your focus and productivity. It forces you to be disciplined and on-tasked by eliminating access to the things that distract you the most.
Bonus
Software development teams are nothing (well, almost nothing) without the product teams that manage the products they develop. That’s where a solution like Craft.io‘s home for product management teams come in. Sure, there is Jira and other solutions like Azure DevOps but Craft.io is different in that is solely designed for digital product managers and creates a “safe” place where they can work on roadmaps and product strategy away from R&D teams.
The above list is a mix of code, team-based and personal tools that can help you accelerate your overall productivity.
Being a productive developer is more than just focusing on the code. It’s about finding the right tools and automation for your software development processes.
It’s also about improving yourself to be more disciplined and aware of your physical and mental needs.
Sublime Text Editor has been around since 2008 and has remained one of the most intuitive, free, and feature-packed code editors on the market. It’s great for new and seasoned developers alike, with features like multi-tab select, git integration, key bindings, file patterns, and a native command-line interface to make your workflow more efficient. On top of this, visual customizability allows the developer to create, import, and edit Sublime’s interface themes and color schemes.
By default, you can use it for any programming language, but its Python support is considered one of the best. Why? Because it’s written in C++ and Python. You might even say that Sublime Text is the best code editor to understand Python because it’s part Python.
But why, exactly, should you use Sublime Text for Python development?
It only takes three words to sum up the awesomeness of Sublime Text for Python: speed, interface, and customization.
Sublime Text is super fast. Unlike other IDEs that may take a bit of time to boot up and may bombard you with a few welcome messages and multi-tabs of text about the editor each time you boot it up, Sublime Text just opens.
Not only that, it opens and leaves exactly where you left off, including unsaved changes and code that may have been lost with any other editor. In a way, it’s like you never left. So there’s no worry about a low laptop battery or panic when Windows randomly forces you to restart midway through your work. You can close Sublime Text safely and know that everything will return intact and without any glitches.
Sublime Text’s interface is one of the cleanest interfaces for a code editor. With many IDEs, you’re bombarded with options galore, with side and bottom panels that often take up screen real estate. Sublime Text’s beauty lies in its minimalist approach, showing only what is necessary, which gives you the space to focus on your code.
Opening up a new project won’t close your current project either. Instead, it opens a completely new window for you to arrange as you wish on your screen. The separation can come in handy when you’re referencing multiple codebases.
Some IDEs and code editors only allow for one project at a time. Sublime Text preserves your open projects and keeps them separated from each other. You don’t need to worry about accidentally editing the wrong files when you’ve got more than a dozen files open.
Sublime Text comes with a core set of rich features such as key bindings, indentation preferences, spell checks, multi-select, and file patterns. The highlight of Sublime Text is the ability to extend the current functionality with a thing called Packages.
Packages can be anything, including plugins, syntax highlighting customization, menus, and code snippets. In a way, packages can be seen as extensions that are pluggable into Sublime to perform whatever task you want.
You can download Sublime Text at sublimetext.com. Once completed, run the .exe file to complete the installation process.
You also need to have Python set up on your computer. If you haven’t already done this, you can download Python from python.org. Select the version of your OS system and follow the installation instructions. If you’re on Windows, just run the .exe file and follow the wizard.
Sublime Text comes pretty complete and ready for you to code out of the box. However, if you want to leverage Sublime Text for Python, you should install and configure the integrated terminal.
Without further ado, let’s get to installing and configuring the Integrated Terminal.
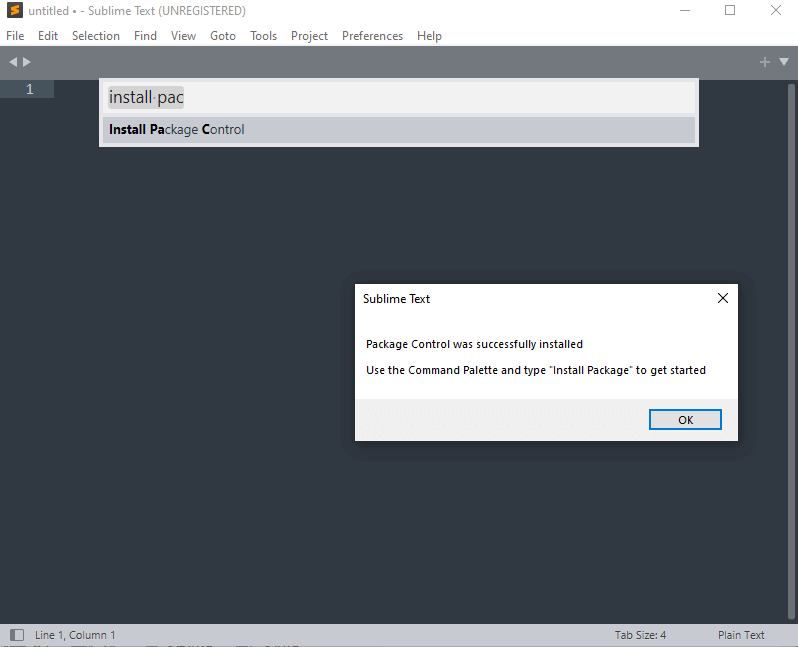
Go to Tools > Command Palette.

Type in Install Package Control and select it from the dropdown that appears. This will install Package Control on your Sublime Text editor.

If the installation went correctly, you’ll get a pop-up message like this:

The next thing to do is install Terminus. To do this, start typing in Package Control and select Package Control: Install Package from the drop-down list that appears. (If your search bar disappears, just get back into it by navigating to Command Palette again.)
This will give you a new drop-down list of available packages that you can install to enhance your Sublime experience:
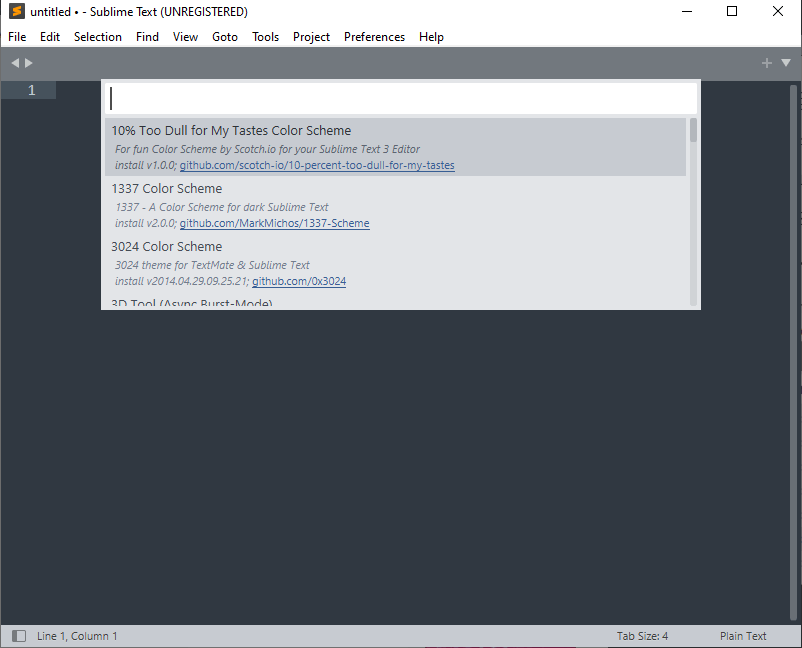
Look for Terminus and select it.
This will download the package. Once completed, it will appear under Preferences > Package Settings > Terminus.
You can open up Terminus by opening up Command Palette again and typing in Terminus. Select Terminus: Open Default Shell in Panel. This will open up your command line.
The last thing to do is set the syntax to Python by opening up Command Palette again and then typing in Python. Select the Set Syntax: Python option. This will ensure that your highlighting is based on Python syntax, making it easier to read your code.

Now all that’s left to do is run your first Python code. To do this, use your terminal as you would any Python project. In the example below, we have a simple “Hello world” Python script and used Terminus to run it.
Using Command Palette, you can install whatever packages you want to enhance your Python workflow. Here’s a short list of the top packages you need to get started.
Package Control is your main hub for installing packages. You need to install this first before you can install anything. Once installed, you will have the option to select Package Control: Install Package. This will open up a list of available packages for Sublime Text.
From here you can install any of the dozens of packages available. Navigate to Command Palette > Package Control: Install Package and search for the package of your choice and have fun!
Tabnine is the AI coding assistant that accelerates and simplifies software development while keeping your code private, secure, and compliant. It supports over 30 languages, including Python.
requirementstxt is a handy plugin that provides syntax highlighting, and easy version management for your requirements.txt files.
If you’ve played with requirementstxt and it’s not to your fancy, Anaconda is another good alternative. Anaconda turns your Sublime Text editor into a Python-ready IDE by including autocompletion, code linting, autopep8 formatting, McCabe complexity checker Vagrant, and Docker support.
AutoPEP8 is a package that will automatically format your Python code to PEP 8 style guide for you. This means with your chosen key binding, you can quickly lint spaces to the correct standard.
Linting is an automated checking tool that checks for style and potential errors in your code. SublimeLinter is a staple linting tool in Sublime Text that is highly supported and frequently updated to ensure that the latest standards are met.
Overall, Sublime Text is one of the fastest and most responsive free code editors available. When it comes to Python, you don’t need a large suite of packages to get started. Terminus is a handy package to have to give that IDE feel without the lag.
Coding Python in Sublime Text is a no-frills experience. The minimalistic interface makes it a distraction-free area. In addition to this, the large ecosystem of packages ensures that your every development need is met. All you have to do is install it via the Command Palette.

Tabnine is the AI coding assistant that accelerates and simplifies software development while keeping your code private, secure, and compliant. Boost engineering velocity, code quality, and developer happiness by automating the coding workflow through AI tools customized to your team.
[cta_btn url=”https://www.tabnine.com/pricing/landing” label=”Start a free trial”]
WordPress is everywhere. In fact, it powers 42.2% of all websites online. It is free, completely open-sourced, and has been around the block long enough to have an established community of developers and users.
Theme and plugin development are the two major components of WordPress development. Themes can be seen as the visual ‘skin’ of the website, while plugins extend the functionality of what WordPress can do.
At its most basic, WordPress is a content management system — mainly, in the form of pages and posts. At the complex end of the spectrum, it can be extended to support full-fledged eCommerce solutions with integrated payment options and more.
Whatever the case, if you can dream it? There’s a high chance that WordPress can do it. As long as you build it, of course. One of the tools WordPress developers frequently choose for that purpose is JetBrains’ PhpStorm. What is PhpStorm? Why should you choose it as your primary WordPress development IDE? And how do you set it up to be your one-stop-shop for WordPress coding? Let’s find out.
PhpStorm is an IDE developed by JetBrains. Unlike other IDEs on the market, it is a subscription-based IDE for a small monthly fee. However, the modest price opens up a suite of helpful productivity tools, and (if you’re hesitant about committing) comes with a free 30-day trial.
WordPress is written in PHP and PhpStorm makes the perfect IDE for development. Why? Because of the highly developed and native intelligent tools available. It comes with code completion, refactoring, and on-the-fly error prevention. Other features include built-in version control integration, remote deployment capabilities, database and SQL support, command-line tools, Docker integration, Composer, a slue of plugins, and a REST client.
While other IDEs out there offer good PHP support in general? They’re not built for WordPress development in the same way that PhpStorm is. It’s easy to get lost in PHP. Theme and plugin development can start off simple but grow into complex interfaces, a myriad of customizations, and integrations.
PhpStorm comes with smart code navigation and the refactoring tools that let you quickly rename, move, delete, extract methods, and update inline variables with ease. This, among the many inbuilt features to enhance your WordPress development experience.
Another handy feature that PhpStorm offers is the built-in HTML preview for PHP files. This can help speed up your workflow by reducing the need to navigate between tabs and screens to see the results of your code work.
In general, PhpStorm is a fantastic tool for PHP development. However, PHP itself is quite extensive in terms of libraries and frameworks. WordPress is a PHP-based CMS framework with multiple features and specialized requirements. So to prepare PhpStorm for WordPress development, there are a few things you need to do.
To work with WordPress, you’ll need to have WordPress set up on your localhost. To do this, you can set up a local webserver. If you don’t have a local web server, the easiest managed setup is to use XAMPP, which you can download here. Run through the installation and turn on Apache and MySQL in the control panel.

To install WordPress on your localhost, go and download WordPress.zip from wordpress.org. Once this is done, navigate to your XAMPP file, find a folder called htdocs and unzip your WordPress.zip there. This will give you an instance of a WordPress CMS to work with. You can find this installation at http://localhost:80/wordpress (wordpress in this instance being the folder into which you unzipped the installation).
Now that you have the foundations set up, you can start building WordPress themes and plugins in PhpStorm.
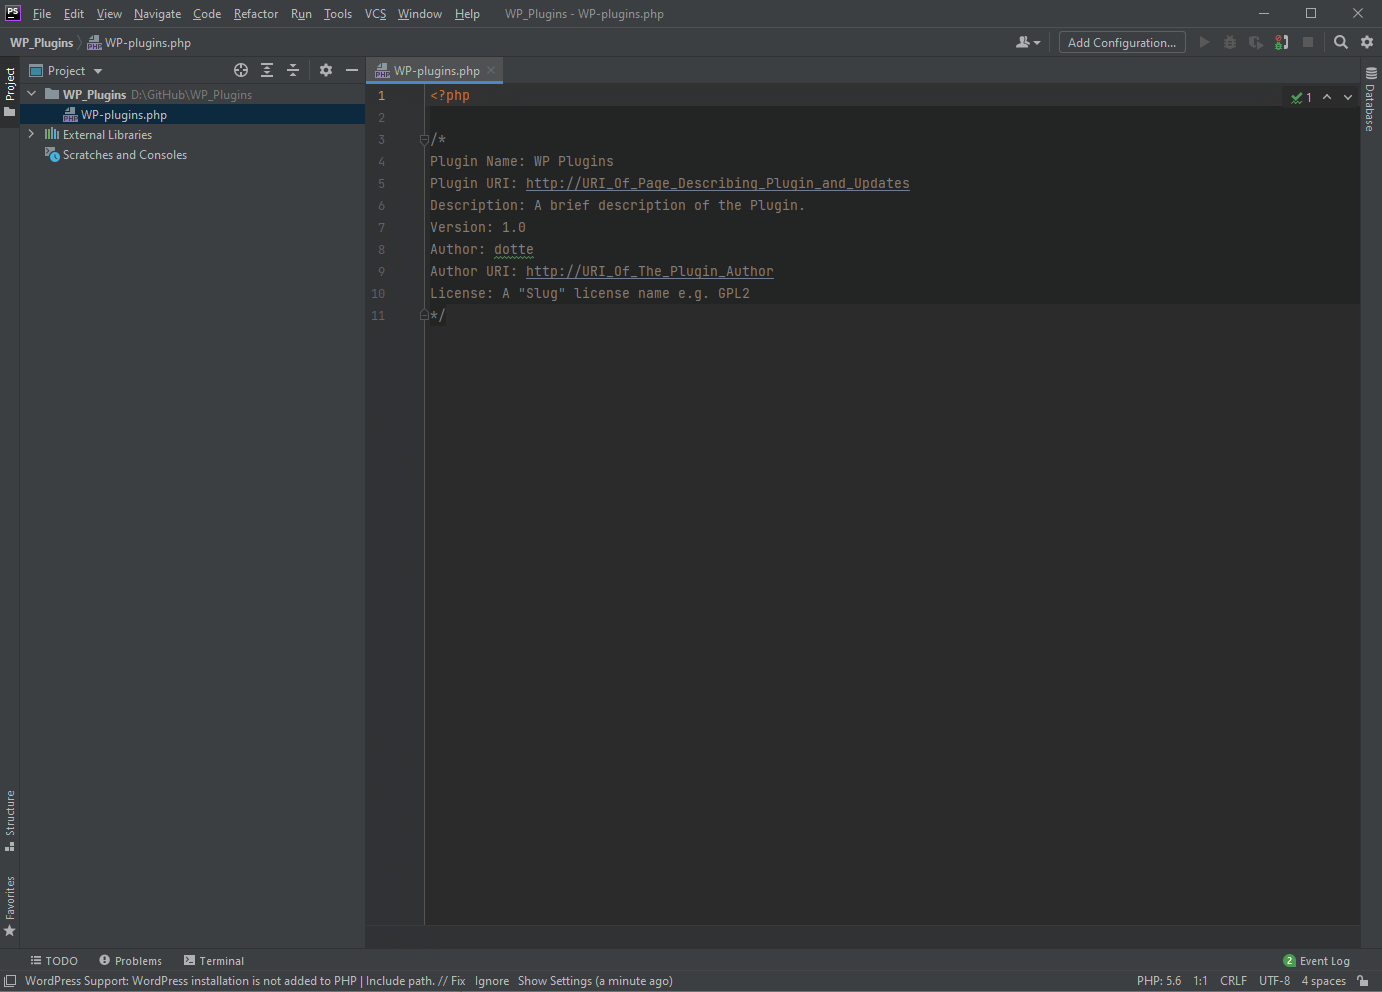
When you start a new project, you have the option to select WordPress Plugin on the left-hand side panel. Inside your project details, under New Project, select the folder location in which your actual code will live. You will also need to set the path to your WordPress installation.
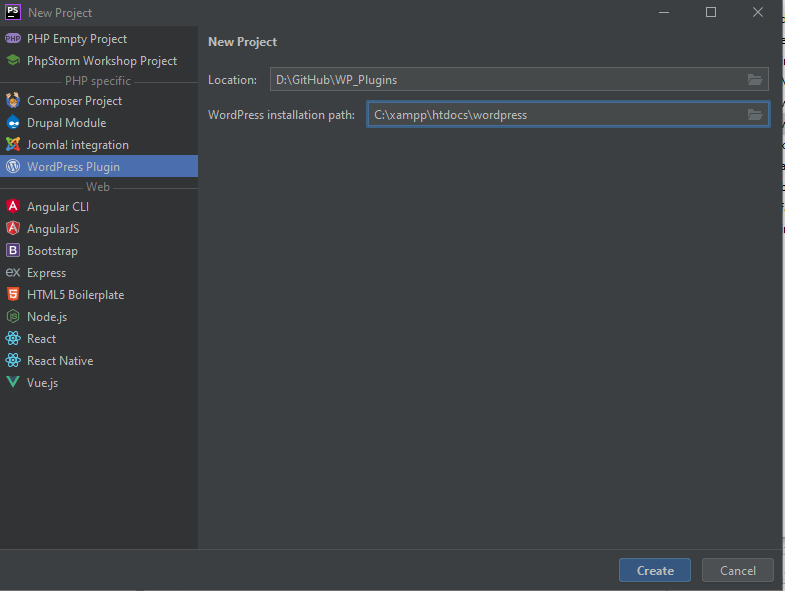
Once completed, you will be given the barebones for starting a WordPress plugin.

Now that we have the basics all ready to go, let’s get into configuring PhpStorm for WordPress development.
In PhpStorm, you can configure it to WordPress’ recommended coding style and standards. There are two main tools that can help you achieve this and they are PHP_CodeSniffer and Auto Formatting for WordPress development.
PHP_CodeSniffer had two main functions. The first is to tokenize PHP, JavaScript, and CSS files to check for violations against a particular standard. This is achieved through the phpcs script. The other part of PHP_CodeSniffer is phpcbf, which is a script that automatically corrects any coding standard violation.
To get PHP_CodeSniffer, you’ll need Composer, which is a PHP dependency management tool. To install Composer, run the following command in your terminal:
composer global require squizlabs/php_codesniffer wp-coding-standards/wpcs
To add WordPress’ coding standard into phpcs default, run the following command:
| phpcs –config-set installed_paths ~/.composer/vendor/wp-coding-standards/wpcs |
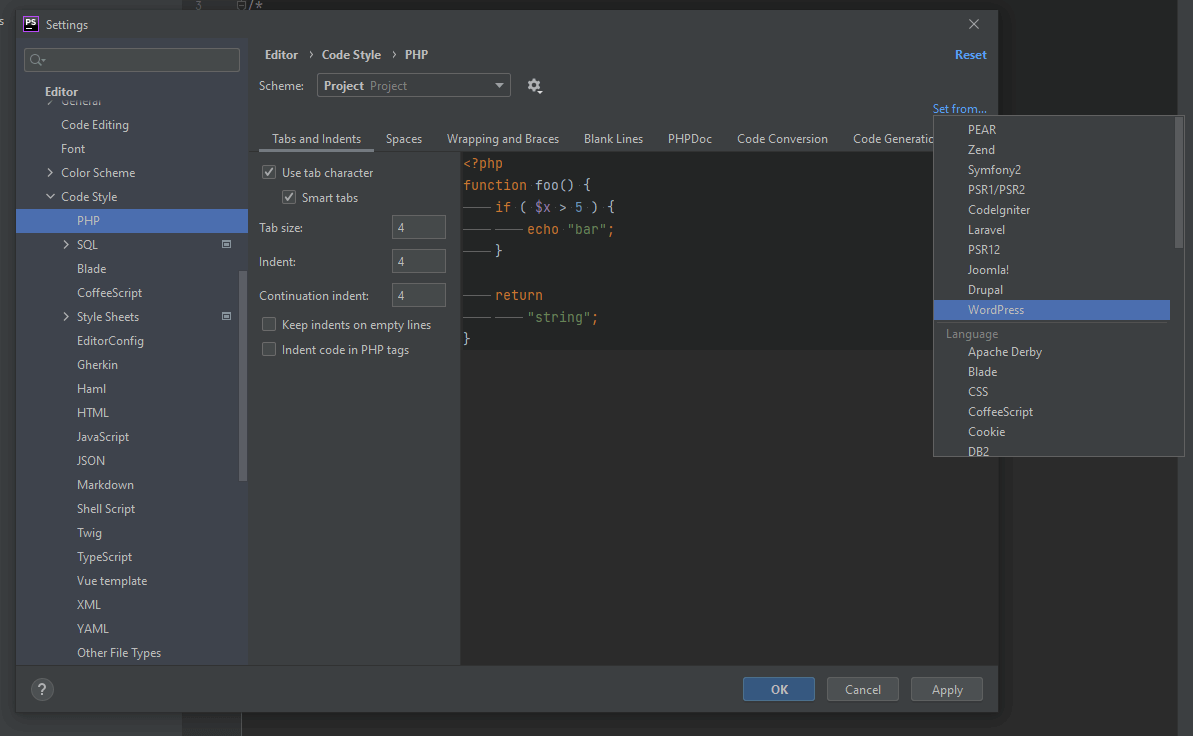
To configure WordPress code styling in PhpStorm, navigate to the following:
| PhpStorm -> Settings -> Editor -> Code Style -> PHP |
You see a screen that looks something like this:
Click on ‘set from…’ and select WordPress. This will set auto-formatting to WordPress standards. Once done, click on ‘OK’ and this will save your settings.
In WordPress, hooks are the interface to the CMS’ features and functionality. They are, in a nutshell, pre-built functions by WordPress to let you interact, create filters, and modify behavior without touching the WordPress core.
To tap into PhpStorm’s WordPress hooks support, all you have to do is start by typing add_action() or add_filter(), then press Ctrl+Space to start choosing the relevant parameter from the dropdown list.
Xdebug is a stand-alone PHP extension that comes with a range of features for debugging your code. It lets you perform step debugging, tracing, profiling, and code coverage analysis. Xdebug is a standard staple for developers when it comes to debugging PHP code.
To install and configure Xdebug for PhpStorm, follow the steps below.
| [XDebug] zend_extension=”C:xamppphpextphp_xdebug-3.0.4-7.3-vc15-x86_64.dll” xdebug.remote_enable = 1 xdebug.remote_autostart = 1 |
Please note that your zend_extension may be different from the above based on what the wizard gives you for your particular PHP version.
8. Restart the webserver
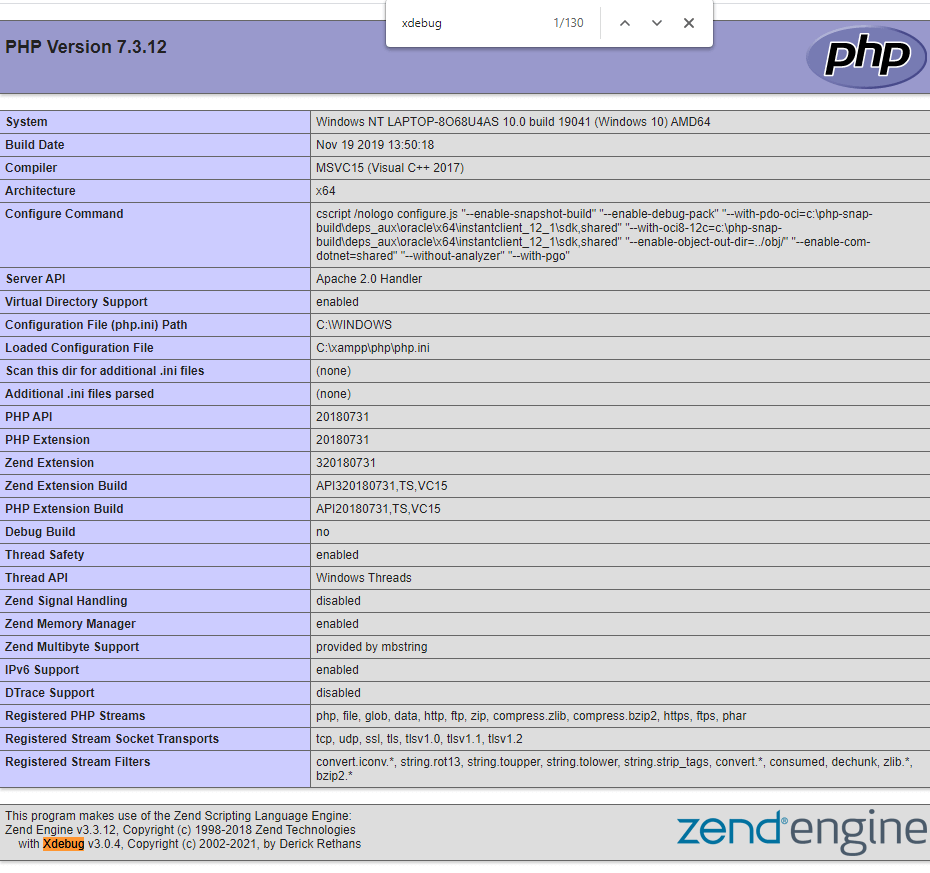
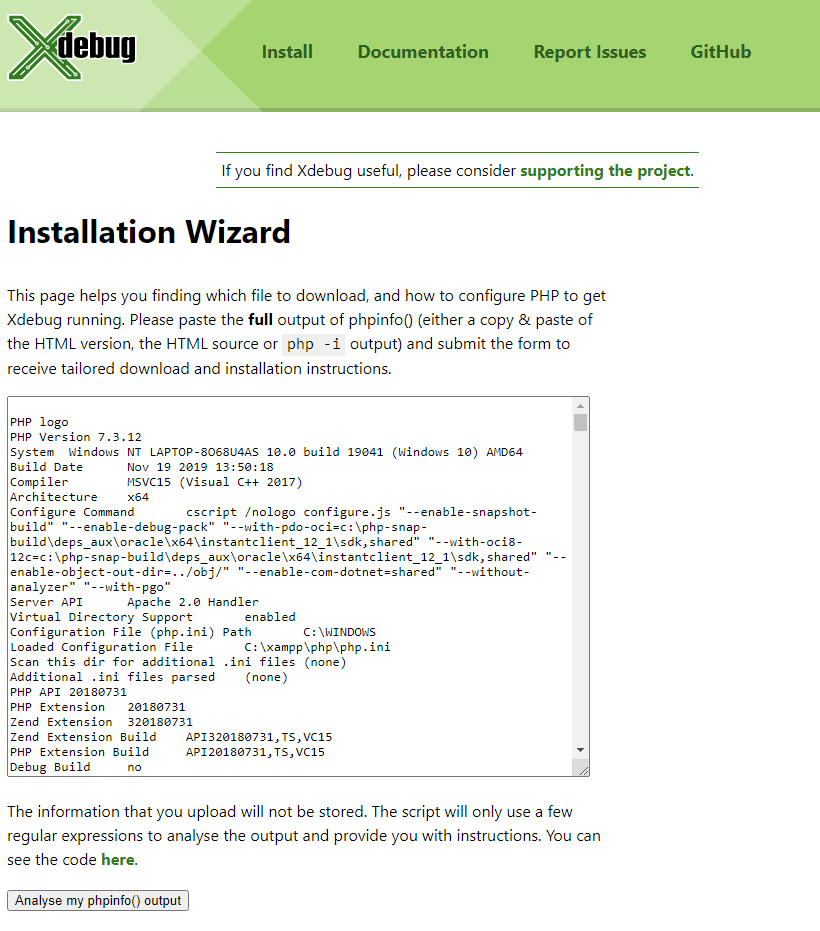
To check if Xdebug was installed correctly, go back to your http://localhost/dashboard/phpinfo.php and search for xDebug. It should show up as per the screenshot below:

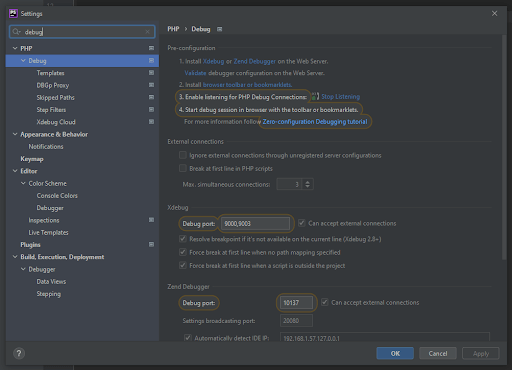
To add XDebug to PhpStorm, go to your ‘Settings’ panel, search for ‘debug’ in the search bar and then click on ‘start listening’. This will turn on your XDebug for PhpStorm. Now you can start adding breakpoints into your code.
While PhpStorm is a paid IDE, it is worth $8.90 per month. The best part? If you choose to keep developing with PhpStorm, the yearly costs get reduced over time. Think of it as your monthly coffee donation to the JetBrains team for developing awesome software.
PhpStorm works seamlessly out of the box for WordPress development. It comes pre-configured so that you don’t have to spend the time and hassle to get your workspace up and running. This makes PhpStorm even more versatile if you’re working on multiple workstations and need to be set up quickly.
All in all, PhpStorm is a powerful PHP development tool with fantastic WordPress integration. If you’re interested in extending PhpStorm further, here is a list of Top 17 PhpStorm Plugins that are 100% free.
Data science isn’t just about mining and analyzing data. A good data scientist needs to be able to present data to non-technical people in a way that they can understand. Sure, this could be done in a series of PowerPoint slides. However, there are tools out there specifically designed for this purpose
Jupyter Notebook is more than just a text editor. It is a tool that lets you run code inside a document and display the outputs. It can print text, draw graphs, and query data all within a single work-frame. Jupyter Notebooks is web-based, making it platform-independent and accessible from a wide range of devices.
The bare installation of Jupyter Notebooks has the core features you need to code and display your data analysis. However, a lot of efficiencies can be gained by installing a handful of extensions, transforming the authoring experience from being a tad tedious to a smooth ride. It can be a lot like writing code in Sublime Text after being acclimated to an IDE (Integrated development environment).
Installing Jupyter Notebook extensions is a simple and streamlined process. The first step is to install Nbextensions via the command line.
pip install jupyter_contrib_nbextensions
If your system does not recognize the pip command, you will need to install that first using the command line.
py -m pip –version
Once you have Nbextensions installed, the process for installing extensions is as simple as running Jupyter Notebook and navigating to the Nbextensions tab that will now be available.
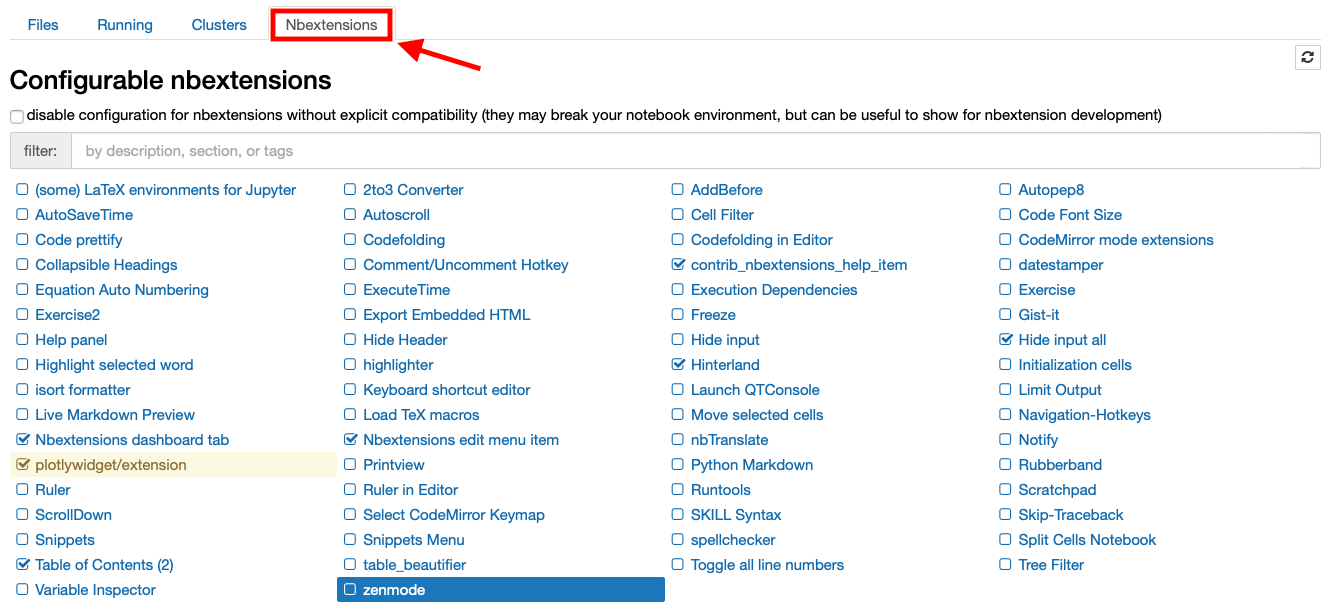
Simply tick the extensions you wish to install and the rest will be done behind the scenes.
At the time of writing this there are dozens of extensions available for you to install. But which are most likely to contribute to your productivity in working with Jupyter notebooks? We checked and picked the brightest dozen.
Keyboard shortcuts are great for improving efficiency. One of my favorite keyboard shortcuts when coding is moving a line up or down. This extension does the same but for moving a cell up or down. Once installed you can use Alt-up and Alt-down to move a cell.
Anybody that has ever used a plain text editor to write code when they are used to writing with auto-complete? Knows the pain of not having one installed. Tabnine takes it a step further and uses an AI to make smart, fast, and accurate auto-completion instead of giving you the entire list of possibilities.
Tabnine for Enterprise provides a secure coding environment that allows teams and organizations to host and train their own AI models. This feature facilitates collaborative autocompletion across IDEs and enhances code security by keeping the codebase and AI model on secure corporate servers. With Tabnine for Enterprise, your development team can enjoy the benefits of powerful AI code assistance, which promotes more productive and error-free coding, all while ensuring the confidentiality and protection of your company’s data.

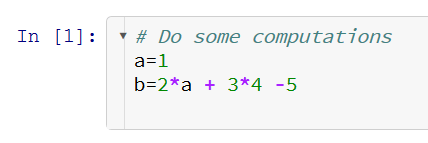
Quickly styling a section of code is not only useful for messy writers. Code prettifying is very useful when you modify existing code and leave some undesirable whitespaces. A Code Prettifier is a quick and easy way to get your code to look better and have more consistent styling.
You may need to install a few dependencies for A Code Prettifier to work, so if it doesn’t, check your dependencies. For the default python implementation run pip install yapf.
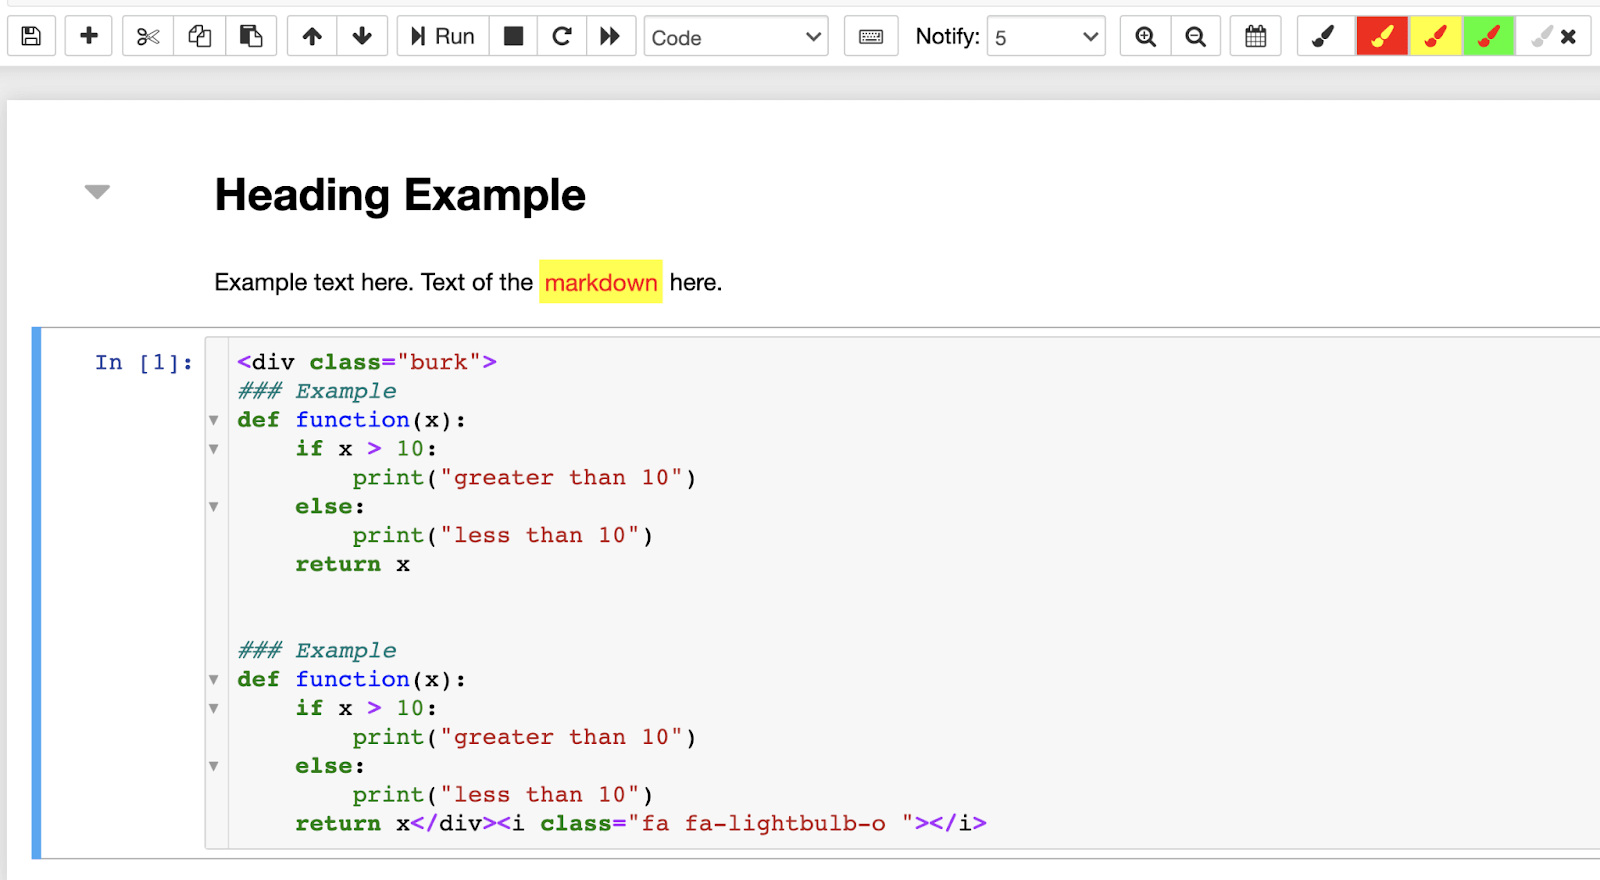
This nifty extension modifies the way headers can be displayed, allowing readers to collapse and expand them. Once installed, all your headers will be collapsible, but you have a variety of options on how the collapse will function. For example, you can have Mathematica-style groupings, grey bracketed ellipses, or a toggle control.

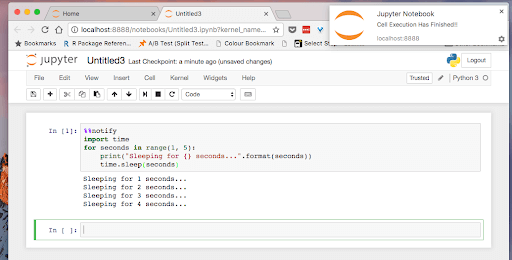
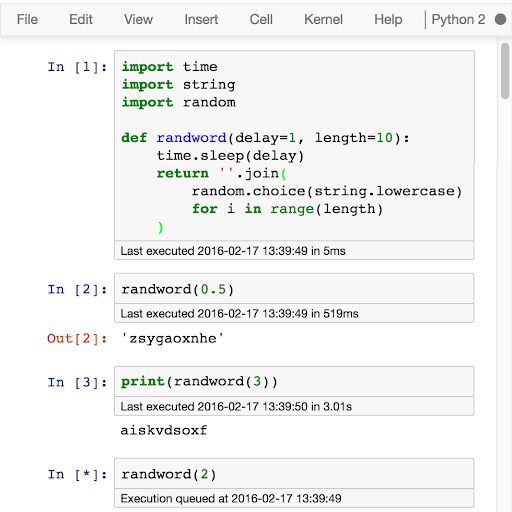
Sometimes code in Jupyter Notebook cells takes a while to run. Users may tab out of the browser window to do something else while the kernel processes the code and forget to check back. Notify solves this issue by sending a browser notification when a cell has completed running. It doesn’t automatically notify on all cells and allows user discretion about when to be prompted.
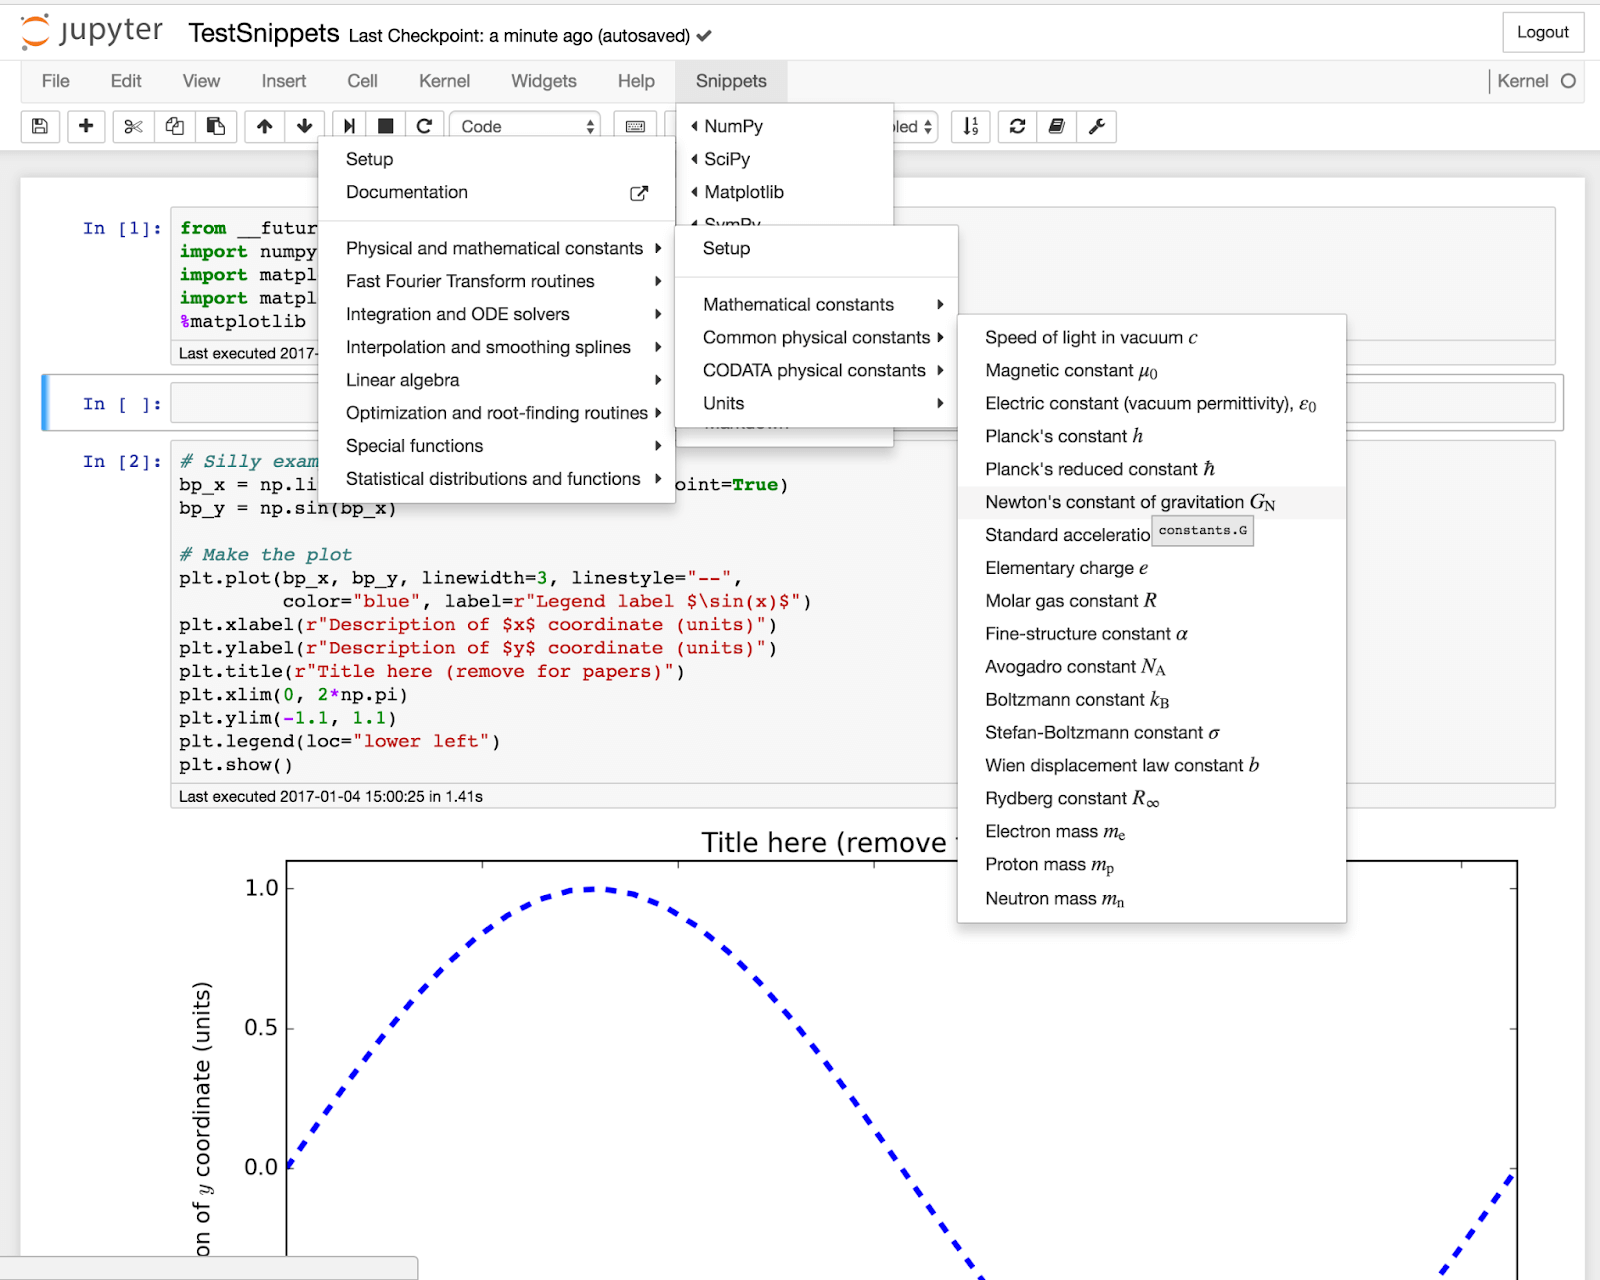
If you’re anything like me then you spend more time Googling for code snippets than you spend typing code. Snippets is a handy menu extension that lets you quickly import a large number of code snippets directly into your code. Snippets is highly customizable allowing both to reduce menu size by removing unneeded submenus and adding code snippets of your own.
A quick search tool to ease finding the file you need in the Files tab. This extension is simple and pure upside.

Autopep8 is another code formatter similar to A Code Prettifier. Autopep8 only works with python, and may require you to install from the command line using:
pip install autopep8
It works much the same way, but you may prefer one over the other.

Execute time is as simple as it sounds. It makes cells display execution start times and duration. This can be useful particularly for code that takes a while to process. It can be enabled and disabled at the user’s discretion.
A simple extension that will highlight the currently selected word and all matching words in the document. Very useful to quickly see where a variable or a function is used, as well as other repeated words.
Instead of making repeated changes to your code to get the information you need and then laboriously undo your changes you can use Scratchpad. Scratchpad allows you to run code against the current kernel without modifying any code. You can use it to test potential changes or simply produce some results you need on the fly.
Codefolding is a rendering extension that enables folding code snippets. It can fold based on the hierarchy of the code, which can be handy when reading large sections of code.

With those extensions installed you’re going to gain efficiency and comfort with using Jupyter Notebooks. Whether you need enhanced rendering, save time with code snippets, or employ sophisticated auto-complete there is an extension available to do so. Your presentations will improve, and your work will be better for it.
We are thrilled to announce Tabnine for Teams. This update marks a major milestone on our journey to deliver a top-to-bottom AI-assisted development workflow for individual developers, as well as teams.
The most common reaction we hear from developers using Tabnine is how amazed they are with Tabnine’s ability to learn and adapt to their personal styles and coding patterns.
The second most common reaction we hear is “Can you make Tabnine work for teams?” This has always been the next logical step in Tabnine’s evolution. After all, developers working in a team are using the same project-specific modules, APIs, code patterns, and conventions, so what the AI learns from each one of them is very likely useful for the rest of the team when working in the same context.
Tabnine now helps teams create high-quality software together faster and more consistently. With Tabnine, teams can get code suggestions tuned for their specific project patterns and conventions, thanks to models that adapt to the code that the team members write and the suggestions they accept or reject.
Create your team now, and add teammates at my.tabnine.com
Under the Hood
Tabnine is built from three AI engines working in conjunction to provide the best coding assistant for teams:
The Private Codebase Trained AI (available now for all users) and Team Trained AI (gradual rollout) work in conjunction to provide the best team-specific assistance to developers.
Absolute Privacy
Tabnine is designed to serve teams and organizations with strict code confidentiality policies. Tabnine allows every customer to choose whether they want to use our cloud service or run in a completely local setup with self-hosting so that no code leaves your network.
Whether you choose cloud or self-hosted architecture, everything Tabnine learns from you stays completely private and available to your authorized team members only.
We are all incredibly excited about adding team collaboration to our Basic, Pro, and Business Tabnine plans. Team collaboration will continue to be a major focus for us moving forward, so expect to see the product evolve quickly over the next few months. Thanks for joining us on this first step! Now is a great time to get started with Tabnine for Teams.
