Object-oriented programming (OOP) is something that’s been around for so long that everyone has kind of accepted its existence. However, there is a growing anti-sentiment among certain programming groups against OOP, citing organizational inefficiencies and potential growth of code debt.
The natural alternative to OOP is functional programming (FP). Functional Programming follows the idea that a piece of code is stateless and works in a declarative manner. This means that the program exists to solve a specific problem through transforming the input.
In programming, there are two specific ways to transform an input. The first is via an imperative method, meaning that it focuses on describing how the program works through a list of sequential steps to arrive at a specific outcome. You can’t mix and switch out the sequence without some side effect consequence.
For example, here is a pseudo imperative program:
Start.
Check initial status of socks.
If no socks on feet, locate socks and put it on.
Remember new state, otherwise continue.
Put shoes on.
End.
In the above example, you have to put socks on before shoes. If you change the order of the command, the outcome would produce an error.
In contrast, declarative programming is a little more flexible. There is no order needed to achieve a particular outcome. Mathematical rules are a good example of declarative programming.
For example, regardless of order, the result will remain the same.
1 + 2 + 3 = 6
2 + 3 + 1 = 6
Functional programming is declarative in nature. It’s not concerned with states and will return the correct output if it follows the entire program.

On the whole, functional programming just seems so much easier to deal with in the long run. No more trying to figure out states, where your program is at and how it might fall over if your state isn’t right.
A good portion of OOP relies on states and that state can blimp out if something went wrong at a particular step. By design, OOP thinking works around things and doing things to these things in a particular order. It sounds imperative on the surface, but OOP itself is not 100% imperative.
By default, OOP is the default thinking method taught in programming courses. In the growing age of self taught, many new developers are starting with OOP and ended at OOP.
However, many senior developers are hitting up against OOP. In part, it’s because many developers fail to keep their states exclusively separated and mutations occur through the shared relationship between objects.
The bigger the object grows, the harder it becomes to keep that object maintained and concise. Over time, the pattern that simplified the thinking process takes up more time than its actual modification.
If object oriented programming is like a house, extending an object is like adding another room. When the house is small, it’s easy to see where everything is and the structure is generally sound. However, when you start adding levels and layers, if the foundations are not made with the extension in mind, it can become unstable and collapse.
In the code, when things get too big, it turns into one big glob of a global state – which is never a good thing and often a last resort. When the last resort becomes a frequent resort, then you know that your code has fallen over itself and requires more time to clean up than to add something meaningful to it.
At that point, your entire program becomes more cumbersome to maintain, costly to sustain, and a general hindrance to your general output.
Functional programming, as a result, has been gaining traction in awareness and general application. This is because functional programming is the polar opposite of what object-oriented tries to be. It discards the concepts of states completely and prevents unwanted relationships from forming.
Despite solid arguments for functional programming, object-oriented is often etched deeply into the actual programming language itself. JavaScript, for example, is a multi-paradigm with prototypal OOP foundations. In JavaScript, everything is an object – no matter how hard you want to deny it through a functional approach.
Java allows for a purely functional approach, but it requires a mindset shift that limits your ability to use things like primitives, classes, mutables, and loops. The idea that all you need is a function like a big step backwards when you suddenly discard all your potential tools in your programming language.
However, what most people don’t realize is that when it comes to functional programming, there’s more to it than just writing straight forward functions. The thinking behind FP is that your code is no longer a list of instructions anymore – something which object-oriented programming often find themselves trapped in. Rather, with functional programming, you have a collection of functions that you can ‘compose’ with.
The idea behind composition is that relationships are established via an interface link that allows the function to remain separated and reused in other places. In an OOP class inheritance based system, the created object is tightly coupled with the parent or superclass.
This means that if something in the parent or superclass changes, it may have an undesirable impact on the children. The effects of change can also flow upwards, where children classes are able to mutate certain things that are contained within the parent or superclass.
The issue with inheritance is that it can cause unnecessary two-way mutations. Functional programming, however, is a one way street and any change created is flowed through in a unidirectional manner.
Here’s an example to help you distinguish between a functional composition approach vs OOP class instance inheritance.
Imagine you have a car. Under OOP class instance inheritance, your car would look something like this:
class Vehicle {
// vehicle definition here
}
class Car extends Vehicle {
// car is now a child of vehicle
}
With OOP, the vehicle is a car.
However, with a functional composition approach, the idea of vehicle is discarded completely. Rather, the functionalities, bits and pieces are broken up like lego and then reassembled to form a car.
So rather than saying that the vehicle is a car. You change your thinking to the car has a door, wheels and steering wheel.
With a functional approach, you are composing what your car looks like rather than pre-defining it and hoping that it doesn’t change.
The major perk in composition is that it makes your program more flexible towards change. While it creates an object-like result, the process of assembly differs greatly from an OOP inheritance methodology.
As more developers work to ship code in a rapid fire manner, they will eventually encounter the issue of the object growing too big and complex to properly maintain. That’s when functional programming will start to take over their workflow and thinking processes.
What we need to acknowledge is that object oriented isn’t bad. Over the years, we’ve seen development in the balance between OOP and FP. The thing about object oriented and functional approaches is that they are just implementation ideologies.
These ideas were initially created to solve a specific type of problem. for OOP, it was to try to encapsulate the world in a diecast style. However, the thing with diecast is that you can’t easily change them. They might be modular, but as the complexity grows, that modularity needs to also be flexible to accommodate.
Functional programming is a much more modular approach – but it also contains many small parts that need to be coordinated in an efficient manner. It’s easy to lose track of things, especially in a team setting. With objects, you can see the shape right away.
It’s the functionality extensions that’s becoming an issue. Functional programming has an equivalent issue where the shape can get lost in the sea of modular pieces.
So is object-oriented dead or alive?
That question is too black and white.
In part, it’s because OOP is evolving as languages that support it come out with hybrid solutions. JavaScript, for example, is OOP by design but strongly supports functional programming based ideas. This gives the opportunity to mix and match ideas based on the required situation.
The point of programming is to translate ideas. What the programmer ends up using is a judgement call that’s marked by the demands of the project, what the boss wants and how much time they’ve got to work on the code. Nothing is ever a clean sandbox and sometimes, entrenched implementations of OOP may be the thing that’s holding the project back. But as new ways of thinking about OOP with a functional approach emerges in the community, the programming idea moves along in time with what the language of choice has decided to support.
In short, object oriented is neither dead, nor is it truly alive. Rather, it’s an evolving creature that’s absorbing other abstraction ideas in order to be more effective as an ideological implementation.
No one likes a broken night build. Not the testers, not DevOp, and especially not the developers who then need to scramble to find, blame, fix the issue, then commit said fix to the code. All before they even consume their morning dose of caffeine after a long night of coding.

Because of this universal (and justified) dislike of broken builds, the concepts of continuous delivery and continuous integration (CI/CD) came to be and were quickly adopted by R&D teams. One of the oldest and most popular solutions for implementing end-to-end CI/CD in application development lifecycles are Jenkins Pipelines.
Before we dive into the specifics of building and adding Jenkins Pipeline to your projects, it’s worth understanding what continuous delivery and continuous integration actually are. And also why you need them in your life.
Continuous Integration (CI) and Continuous Delivery (CD) are both popular DevOps practices that are part of a software development pipeline/orchestration approach. They are often abbreviated and merged as “CI/CD”, though each refers to a different set of processes and events.

Continuous Integration (CI) is a development methodology that assumes frequent (and thus “continuous”) integration of code into a shared repository. It includes development, code analysis, unit testing, code coverage calculations, and build activities. Many of the tasks are executed using various automation tools.
Continuous Delivery (CD) is the process of deploying changes into production in a way that prevents broken code from finding its way onto software in live environments. The goal of CD is to ensure that the code is always in a deployment-ready state for all supported environments, regardless of the number of developers that may be making changes to it at any time.
Jenkins Pipeline (or simply “Pipeline” with a capital “P”) is a series of events or tasks performed in a specific sequence to transform the code from version control into a stable software product by employing a suite of plugins in Jenkins. Thus, enabling the implementation and integration of Continuous Delivery processes within Jenkins.

A Jenkins pipeline contains several states (or stages): build, deploy, test and release. Interlinked and sequential, each state contains events that make for a continuous delivery pipeline.
Jenkins Pipeline has a customizable and scalable automation system that lets you build distribution pipeline scripts – also dubbed “Pipeline as Code”. Written as plain text in Groovy Domain Specific Language (DSL), these scripts are called JenkinsFile and are surprisingly easy to write and comprehend.
A JenkinsFile stores the entire CI/CD process as code on the local machine. As such, the file can be reviewed and checked into a Source Code Management (SCM) platform (be it Git or SVN) along with your code. Hence, the term “Pipeline as Code”.
There are two different types of syntax you can use to construct the Jenkins pipeline, each drastically different in approach from the other: declarative and scripted.
With the Scripted pipeline, the JenkinsFile is written on the Jenkins user interface instance. It then runs on the Jenkins master with the help of an executor (agent). The code is defined inside node blocks, so it takes relatively few resources to translate the scripted pipeline into individual commands.
The Declarative pipeline is a newer approach to creating pipelines by allowing the reading and writing of the pipeline code. As it contains a predefined hierarchy to design pipelines, it makes it easier to organize and control all the aspects of pipeline execution.
With Declarative pipeline syntax, code is written within a JenkinsFile in pipeline blocks that can then be checked into the SCM of your choice.
Generally speaking, most opt for Declarative pipelines over Scripted not only because of its abundant syntactical attributes. The approach and syntax are generally a lot more intuitive and easy to learn, especially with the introduction of Blue Ocean for Jenkins Pipelines.
Blue Ocean has been compared to a shiny layer of paint on top of the fully functional vehicle that is Jenkins Pipeline. Blue Ocean for Jenkins Pipeline, essentially the Jenkins Pipeline GUI, is a suite of plugins that introduces improved UX, as well as a set of tools to visualize the jobs getting executed in a personalized view for every member in a team.
Moreover, you don’t need knowledge of any scripting language in order to create Jenkin Pipeline projects. But it sure does help.
Before you can get started with your very first Jenkins pipeline, you will need to install Jenkins, the Jenkins Pipeline plugin and the Blue Ocean plugin package. Once you have all the ingredients, you can start setting up your Jenkins Pipeline project.
The Blue Ocean UI makes Pipeline project creation an ocean breeze. Not only does it help you set up the project, but it also automatically creates and writes your JenkinsFile for you, while you manage the project with little to no manual scripting.
Start by accessing Blue Ocean in your Jenkins menu.

If you have no Pipeline projects in this instance on Jenkins, you’ll see a welcome window offering you to create your first Pipeline.

If it’s not your first visit, you will instead see the dashboard, where you can choose to add a New Pipeline under the Pipelines tab.

Clicking the link will start a user-friendly wizard, beginning with selecting the location of your code.

Unsurprisingly, configuring most of the above options is fairly straight-forward and similar. The only differences lay in authentication and token generation process for each.
For example, we can choose Git and proceed to connect to a local or remote (via SSH) git repository by entering its URL.

Enter your repository URL, and Jenkins will provide you with a public key. Since you want to give Jenkins permissions to make commits, you should create a new service user and add the public key to it. Then simply click Create Pipeline.

This will prompt Blue Ocean to scan your repository’s branches for a Jenkinsfile, commencing a Pipeline run for each branch containing one. If Blue Ocean cannot find any Jenkinsfile, it will create one for you. You will, of course, need to help it out using the Pipeline Editor.

By default, the right pan of the editor UI shows the Pipeline Settings. Here, you can define the agent used by the pipeline, as well as environment variables.
In the left and main pane of the editor UI you will see your Pipeline Editor, where you can start adding pipeline stages, and populating them with steps, each including different tasks.
To add your first stage, click on the + icon and enter a meaningful name for the stage, like Build.
Then, click + Add Step to add the first step to this stage. For example, select Shell Script and enter mvn clean install -Dlicense.skip=true. You can then add Print Message steps along the stage to indicate the process to the user and ease logging and troubleshooting.

Finally, before you can run your pipeline, you need to save your project in source control by simply clicking save. This will bring up the Save Pipeline prompt, where you can leave a comment describing the changes made to Jenkinsfile.

Clicking on Save & run will save any changes to the pipeline as a new commit. Then it will start a new Jenkins Pipeline Run based on those changes. Finally, Blue Ocean will navigate to the Activity View for this pipeline.

Pipeline as Code is becoming an increasingly DevOps concept. It is also one that has been adopted by many leading tools like Azure DevOps.
However, Jenkins Pipeline is a much more rounded and mature solution for end-to-end CI/CD process integration and implementation. Especially if you take into account the ease-of-use and cross-team collaboration features Blue Ocean brings to the table.
I recently installed the Tabnine plugin for Sublime (Windows), and spent the last several weeks using it while coding on some of my side projects, just long enough to get a solid first impression of this tool: Tabnine is amazing.
Going in, I was a tad skeptical that a tool was going to be able to figure out what I was trying to do in my code fast enough to suggest anything more substantial than just completing the current identifier.
But I have been really pleasantly surprised, and delighted, by just how quickly this tool is learning my code—and how quickly I’m learning to use it!—to accelerate my coding. I wanted to share some examples I recently captured, to give you an idea of the kinds of things you may see if you use it.
Of course, this tool is powered by complex natural-language ML models and rulesets, and it learns from each project it’s used on, so… YMMV. But, I think if you give Tabnine (or Codota, depending on which editor you use) a try, I think you may be amazed at what pops into the autocomplete drop-down! Check it out.
The first example I want to show you came from a segment of logic I was writing which just happened to have a pretty clear structural pattern to it, though I didn’t plan it that way particularly. And I didn’t realize it at the time, but it seems like that was a really attractive opportunity for the Tabnine plugin to kick in with its powerful semantic analysis.
As you’ll see, it progressively figured out more of the structure as I went along, and made even more impressive suggestions at each juncture!
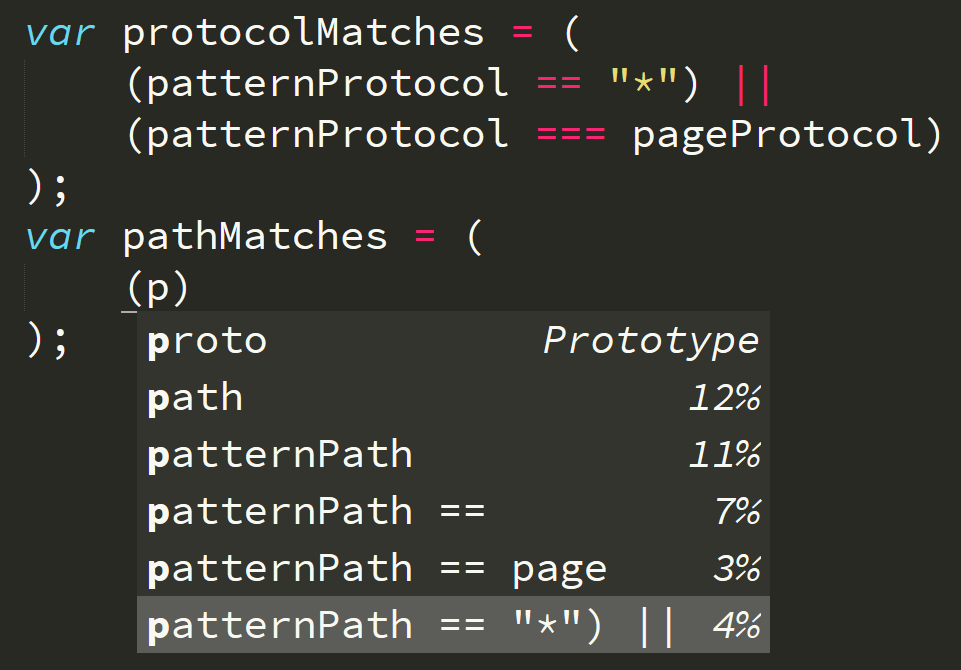
I had a bit of code logic that processing a couple of URLs that had been split into multiple parts (“protocol”, “origin”, and “path”), and I needed to compare these parts (including handling * wildcards) to see if the URLs match.
The result should be a boolean (true / false) if a match exists respectively for each part of the URLs.

As you can see in this screenshot, the plugin figured out that I wanted to use another variable called pageProtocol for the comparison. You don’t see this in the screenshot, but that variable is declared a dozen or so lines above, in the same function, nearby where patternProtocol is declared. So, Tabnine figured out that these two identifiers might have a relationship.
I hadn’t even typed p yet, so it just made that guess not based on token completion but on semantics.
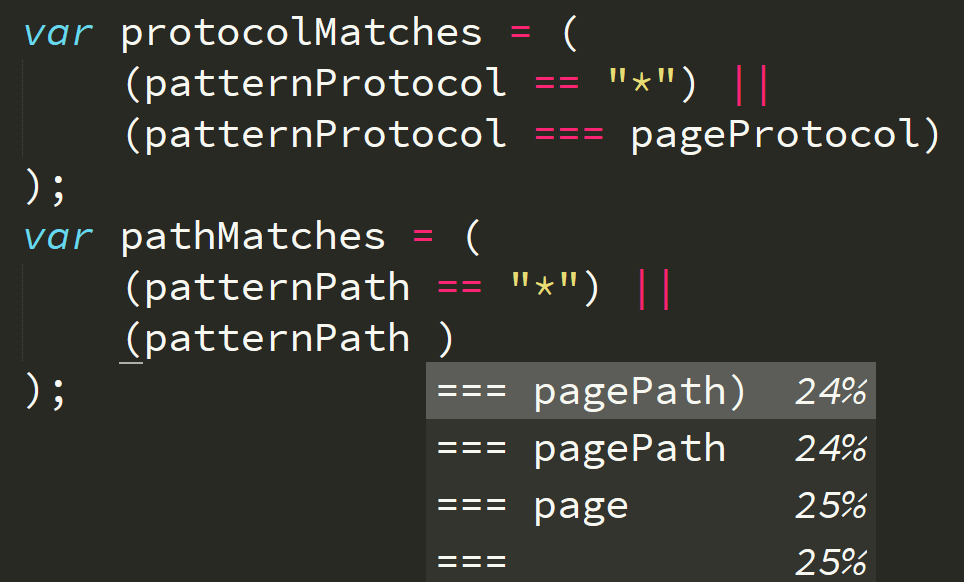
Continuing on, the next boolean I wanted to declared, I typed pat, as you can see, and Tabnine (somehow, not quite sure!) figured out that I wanted to type pathMatches! OK, now I’m impressed.

So I started to fill out this boolean’s matching logic, and…
Boom, it knew that I needed to do the wildcard check again. Notice how it knew that semantic, but it also knew that I needed patternPath as the identifier! How!? My best guess is, it understood the relationship in the first declaration between protocolMatches and patternProtocol, and thus extrapolated that same relationship between pathMatches and patternPath. And as a bonus, it even added the ||on the end.
I won’t lie, that was a little freaky at how good that suggestion was!
Continuing on, it seems to be understanding the structure of these comparisons, and how the different variables fit in, kinda like the semantic analysis results in a “template” that identifiers drop into:
Wow. This is really starting to be quite helpful.
Let’s keep going. Now I realized that I accidentally skipped over the “origin” matching boolean, so I went back to insert that in the middle:
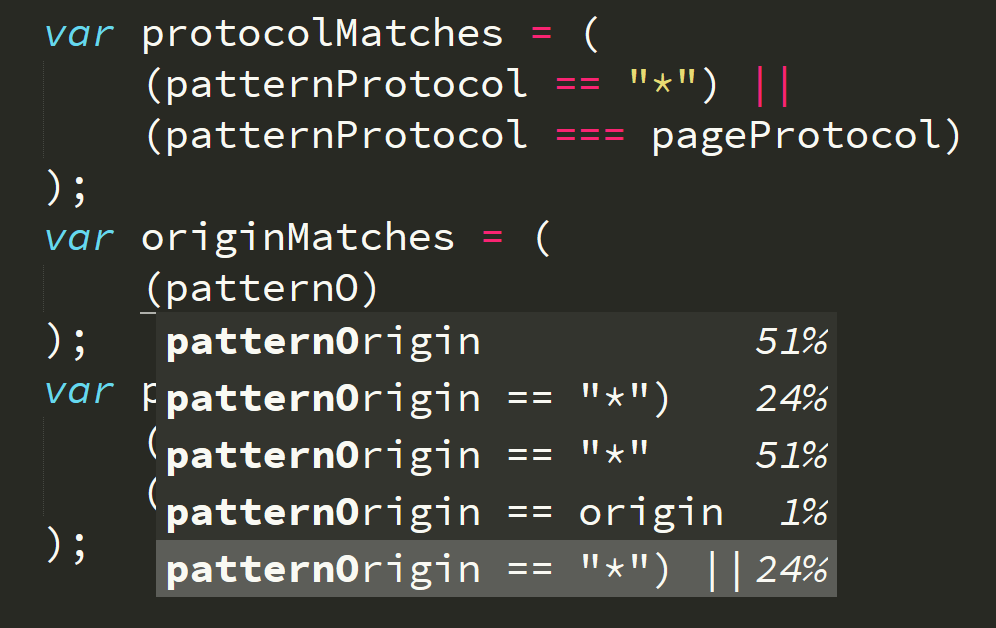
Here it still understands enough to suggest the rest of that line of code as soon as I get to the “O”. Nice.
Then…
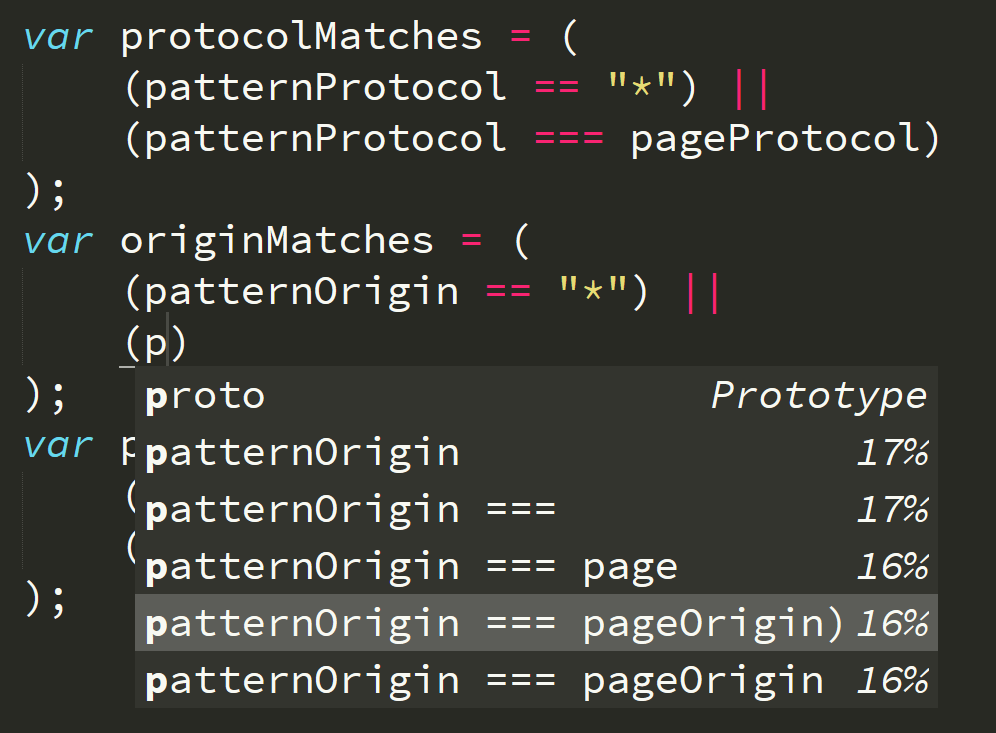
I typed just one letter, p, and it knew the whole rest of the line! And it got both identifiers correct! This is really, really impressive. I’m hooked.
So here’s the completed snippet:

After I see the code snippet complete, then I realized something I hadn’t seen before… the plugin even understood that in each pair of comparisons, I was intentionally using == for one check and === for the other. That’s on purpose, because of the nature of the values that I know can be in each of those variables. I don’t think Tabnine used any type awareness for those suggestions, but it’s still cool that it respected how I was doing my comparisons.
OK, so… in that previous example, the structure was a little too convenient, and that ended up helping Tabnine make some pretty great suggestions. Right?
What if another chunk of code has a little less obvious structure to pick up on? Will I still get useful suggestions?
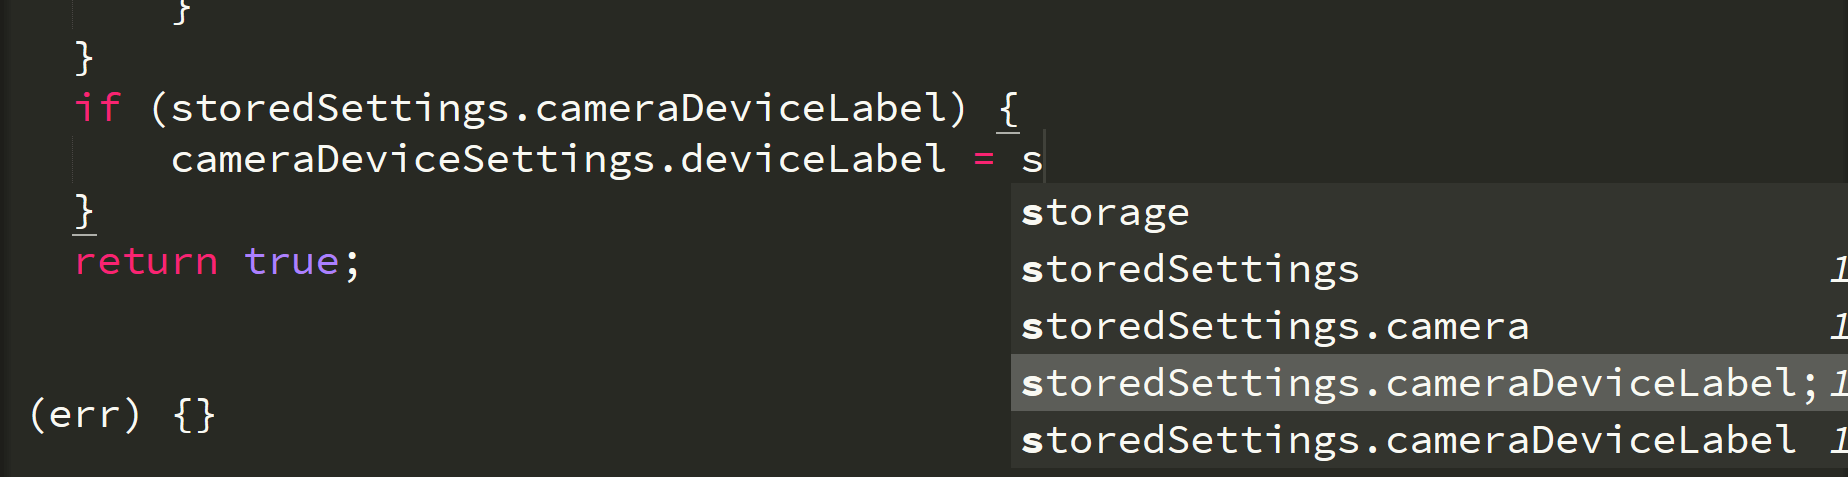
Check out how Tabnine here figured out that I might want to assign the value from the property that I did a check for in the surrounding if statement. That’s indeed what I was going for, and Tabnine nailed it!
This example really amazed me… I sat there for a good several seconds doing a double and triple take, saying, like “Really, did it actually make that whole suggestion!?”

It clearly matched to the for-loop from the earlier function, but look at how it correctly figured out that the method to call was getVideoTracks() instead of just copying getAudioTracks(). I guess it got the hint from the names of the functions I chose (which was accidental, I promise).
But it’s really pleasing to see the tool figuring these nuances out!
Here’s another example where a previous statement gave just enough of a hint to Tabnine:
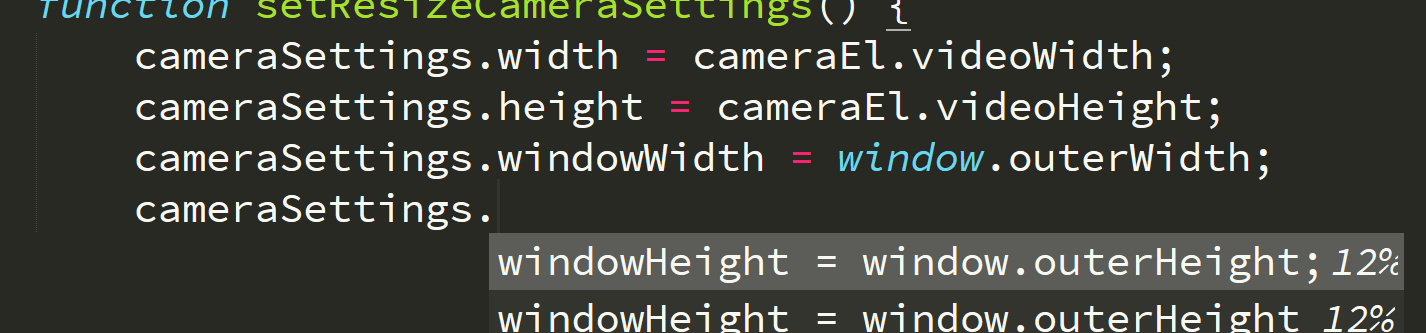
Again, it figured out the relationship between the variable windowWidth and the property name outerWidth. We’ve already seen that.
But it also figured out that I was wanted to deal with height instead of width. How did it do that? I think it picked up on that detail from the previous two lines, which involved width / videoWidth and height / videoHeight, respectively. So it extrapolated that since I did “width”, then “height” before, that I probably wanted to do that again on these two lines.
Again, my only reaction is… just… wow. Cool.
So, obviously, this tool is learning, not just from all the public code the models were trained against, not just from the rules the Codota folks baked in, but also it’s learning from my project, my code. As I used Tabnine, it’s learning how to help me more effectively.
That’s just super satisfying to realize.
But there’s another effect here. As I get more used to using Tabnine, I am learning. I’m learning to use the tool more effectively. I’m actually sensing when and how I might be able to code in such a way as to give it enough hints that it’ll spit out a useful suggestion to save me some typing.
That’s not perfect or completely deterministic, of course—this is AI!—but, I’m finding that maybe 1 out of 3 times I try to get it to give me a specific suggestion, sure enough, it spits out something either spot on or pretty close.
So it’s like the Tabnine tool and I are mutually learning each other. This just feels really good. We’re both working together to make me more effective and efficient at coding.
I know this article focuses mostly on all the happy path examples I pulled out. You may still be skeptical, like I was. You may be wondering about the limitations and the times it gets it flat out wrong.
Yes, there are definitely limitations to this. Yes, it definitely spits out wrong suggestions a fair bit.
But, in my estimation so far, I’d say about 50-75% of the time that I see the autocomplete list popup a set of semantic suggestions from Tabnine, at least one of the suggestions is at least part of what I was likely going to type. And maybe 10-20% of the time, those suggestions are something I should type, but my brain hadn’t quite come up with yet!
Over time, I expect this tool will only get better at helping me out. And I’m really excited to be working with the folks at Codota to provide them feedback on how to improve the tool even further. There’s already a long list of fun and cool things we’re exploring, so stay tuned to this space!
If you try out the Tabnine (or Codota) plugin for your editor, and you give it a week or two to get used to (and for it to learn your coding), I think you’ll be really pleasantly surprised at how helpful you may find it. If so, I hope you’ll reach out to me via social media (@getify on Twitter, etc) and let me know what’s great and what you hope it can eventually do!