Native apps are all the rage, but web apps are better for accessibility and for being cross-device and operating system agnostic. According to Forbes, the number of apps in both Android and Apple saw steady declines in their app stores. Apple’s descent started in 2017. Meanwhile, Android’s app store peaked in March 2018 at 3.6 million apps. While there are genuine reasons for this, such as old and unsupported apps being deleted and fewer releases, the web and its existence in browsers remains the first point of contact for many users.
Golang may play a role in helping to shape and improve the web in the future by providing a robust, efficient, and easy-to-use programming language that developers can use to create a wide range of web-based applications and services. Golang’s focus on simplicity, stability, and reliability may make it a popular choice for web developers looking for a reliable and efficient language for their projects.
While Golang is the programming language, it is not complete without a framework to keep everything in line. Gin is a web framework written in Golang. The primary perk of using Gin is getting just enough infrastructure to get your application up and running.

But what exactly is Gin? How does it work? This tutorial will explain the basics of using Gin, such as installation, routing, custom rendering, reusable templating, installing dependencies, and using middleware.
Golang is a programming language created by Google. It is a statically typed, compiled language with syntax similar to that of C. Gin is a Go web framework designed to be easy to use and fast.
Gin is built around a simple idea: it is possible to write web applications without much boilerplate code using reflect. This means that your code will be concise and easy to read.
Gin comes with many features that make development faster and easier. These include
Developers can use Gin in a variety of ways, such as to develop web applications, API servers, or even command-line tools.
If you’re looking for a fast and lightweight web framework, Golang Gin is a great option. It’s easy to use and has a great community behind it. Here are some reasons why you should use Golang Gin.
To remain relevant in the constantly changing landscape of software development, it is essential to stay up-to-date with the latest advancements and trends. Keeping abreast of new technologies and practices ensures that you are equipped with the knowledge and skills needed to succeed in this dynamic field. Learn more about how to utilize AI to optimize your software engineering in 2023.

Assuming you have a working Go installation, this should get you up and running with Gin, create a new project directory and change into it:
mkdir myproject cd myproject
Download and install Gin:
go get github.com/gin-gonic/gin
Create a main.go file with the following contents:
package main import "github.com/gin-gonic/gin"
func main() {
    r: = gin.Default()
    r.GET("/tab", func(c * gin.Context) {
        c.JSON(200, gin.H {
            "message": "nine",
        })
    })
    r.Run()
    // listen and serve on 0.0.0.0:8080
}
Run the server:
go run main.go
You should now be able to access the server at http://localhost:8080/tab.
Routing is matching a URL path to a handler. In gin, a router matches incoming requests to the appropriate handler. A router is initialized with a root path and an array of routes. Each route consists of a method, a path, and a handler. The handler is a function that is invoked when a match is found.
Incoming requests are matched against the routes in the router. If a match is found, the corresponding handler is invoked. If no match is found, a 404 Not Found status is returned.
Gin also provides a way to group routes. A group is a collection of routes that share a common root path. Groups can be nested to create more complex routing structures.
To create a new router, use the New() function:
router := gin.New()
To add routes to the router, use the router’s Handle() or HandleFunc() methods:
router.Handle("GET", "/", homeHandler)
router.HandleFunc("POST", "/login", loginHandler)
The first argument to Handle() and HandleFunc() is the HTTP method. The second argument is the URL path. The third argument is the handler function.
Handlers can be any type of function, but gin provides a few helper functions designed specifically for gin use. You can find these helper functions in the gin.HandlerFunc type.
To invoke a handler, use the router’s ServeHTTP() method:
router.ServeHTTP(w, r)
The ServeHTTP() method takes an http.ResponseWriter and an http.Request as arguments. It matches the incoming request to a route and calls the corresponding handler.
Gin also provides a way to retrieve the URL for a given handler, which can be useful for creating links in your templates. The Url() method takes a handler and returns the URL for that handler:
url := router.Url("homeHandler")
To render your own HTML templates in Gin, you need to first set the HTMLRender variable to point to your own HTMLRender instance. You can do this by passing in a pointer to your custom HTMLRender instance to the gin.SetHTMLTemplate() function.
Once you have set the HTMLRender variable, you can then call the gin.HTML() function to render your template. The HTML() function takes in two parameters: the name of the template to render, and a data interface{} that will be passed to the template.
Here is a simple example:
// main.go
package main
import (
"github.com/gin-gonic/gin"
)
func main() {
r := gin.Default()
r.SetHTMLTemplate(myCustomHTMLRender)
r.GET("/", func(c *gin.Context) {
c.HTML(200, "index.tmpl", gin.H{
"title": "Welcome to TabNine",
})
})
r.Run()
}
// myCustomHTMLRender.go
package main
import (
"github.com/gin-gonic/gin"
"html/template"
)
func myCustomHTMLRender() gin.HTMLRender {
return &MyCustomHTMLRender{
templates: template.Must(template.ParseFiles(
"path/to/your/template1.tmpl",
"path/to/your/template2.tmpl",
)),
}
}
type MyCustomHTMLRender struct {
templates *template.Template
}
func (r *MyCustomHTMLRender) Instance(name string, data interface{}) gin.HTMLRender {
instance := &MyCustomHTMLRender{
templates: r.templates.Clone(),
}
instance.templates.ExecuteTemplate(writer, name, data)
return instance
}
A middleware is a function that can be used to modify the behavior of an HTTP request handler. Gin provides a convenient way to register middleware.
For example, let’s say we want to log all requests to our web application. We can create a middleware function to do that.
func Logger() gin.HandlerFunc {
return func(c *gin.Context) {
// Get the client IP address
clientIP := c.ClientIP()
// Get the current time
now := time.Now()
// Log the request
log.Printf("[%s] %s %s %s", now.Format(time.RFC3339), c.Request.Method, c.Request.URL.Path, clientIP)
// Proceed to the next handler
c.Next()
}
}
Then, we can register the middleware function with Gin.
router := gin.Default()
router.Use(Logger())
router.Run(":8080")
That’s it! Gin will now log all requests to our web application.
Installing dependencies in Golang Gin is pretty straightforward. All you need to do is run the following command:
go get github.com/gin-gonic/gin
This will fetch the latest version of the Gin framework and install it in your $GOPATH.
With the ever-growing demand for faster and more accurate software development, the need for speed and accuracy in coding has never been more important. Tabnine is an AI-based auto-completion tool that uses machine learning to constantly improve code completion suggestions, making them more and more accurate over time.
It also offers a wide range of features that make it extremely fast and easy to use, such as instant results, fuzzy matching, and support for over 50 programming languages. Working faster and more accurately is the goal of any developer. If you’re looking to improve productivity and accuracy, give Tabnine a try!
Tabnine is an intelligent, AI-driven code completion tool that can cut your coding time, reduce mistakes, and make best practice suggestions.
[cta_btn url=”https://www.tabnine.com/pricing/landing” label=”Start a free trial”]
We are living in the golden age of developer-focused podcasts – a plethora of perfectly packaged, easily accessible knowledge and entertainment, all waiting to be consumed at the press of a button. Software developers of every stripe, seasoned pros to novice newbies, all have access to endless hours of edutainment cued up on their playlist. Old favorites along with new entries waiting to be discovered for our binging pleasure.
Check out Tabnine’s list of the Top 10 Dev Podcasts in 2022
Apple Podcasts | Google Podcasts | Overcast | SoundCloud | Spotify

The Stack Overflow podcast is more than 400 episodes and a dozen years deep into its run and is still as fresh and fun as episode 1. Long-time listeners will tell you it is a can’t-miss podcast for anyone interested in the beauty and burdens faced by software developers. From Rails to React, Java to Node.js TSO’s hosts Ben Popper, Cassidy Williams, and Ceora Ford welcome guests and drive conversations covering the topics that matter most to the development community.
Apple Podcasts | Google Podcasts | Overcast | Spotify

There are tons of project-based educational ‘follow-along’ Youtube channels and podcasts for developers looking to get their fill of content, CoRecursive dives deeper to expose “The stories and people behind the code”. The interviews and discussions can be light and entertaining but more often than not provide real substance to those interested in big and profound foundational questions.
Apple Podcasts | Google Podcasts | Spotify

After more than 500 episodes SER’s objective remains the same “Software Engineering Radio is a podcast targeted at professional software developers. The goal is to be a lasting educational resource, not a newscast.” New episodes drop three to four times per month. Some recent episodes covered topics including cross-platform UI, data observability, web scraping, blockchain interoperability, and continuous integration and continuous delivery (CI/CD).
Apple Podcasts | Google Podcasts

If you’re looking for a dose of delicious developer-focused content then Software Engineering Daily is definitely worth a listen. Host Jeff Meyerson covers everything related to software engineering, from machine learning to bitcoin, boot camps to hackathons, data science to databases, and more. The show’s interview format allows Jeff to welcome a wide variety of experts with discussions covering a wide swath of software-related topics.
Apple Podcasts | Google Podcasts | Overcast | SoundCloud | Spotify

The Changelog is another classic podcast with its first episode dating back a decade to May 23, 2012. More than 400 episodes later, hosts Adam Stacoviak and Jerod Santo continue to produce shows with an open-source focus and an open tent policy, allowing them to cover All programming languages and platforms. If you’re ever feeling a bit bored and looking for a good podcast binge, The Changelog has hundreds of hours of archived episodes to enjoy.
Apple Podcasts | Google Podcasts | Spotify

With his first podcast airing way back in 2006, Scott Hanselman is the OG originator of programming-focused content. Racking up even 100 episodes of a podcast is no easy feat, Scott is now closing in on 1000. Based out of Portland, Oregon, Hanselman spends his days working as part of the Web Platform Team at Microsoft and refers to himself as a “programmer, teacher, and speaker”. Scott covers topics including technology, culture, gadgets, and code.
Apple Podcasts | Google Podcasts | Spotify
Sometimes show descriptions or bios are so well written I just step aside and say “check it out” – Command Line Heroes is a perfect example.
“Hear the epic true tales of how developers, programmers, hackers, geeks, and open source rebels are revolutionizing the technology landscape. Command Line Heroes is an award-winning podcast hosted by Saron Yitbarek and produced by Red Hat.”
Apple Podcasts | Google Podcasts | Overcast | Spotify
If you’re looking for a quick 15-minute hit of podcast perfection tune in for a piping hot cup of Developer Tea. Jonathan Cutre started the podcast back in 2015 with the goal of creating content that could be enjoyed during a typical tea break. Cutre is the co-founder of Spec, a developer at Clearbit, and a trained pilot. Jonathan has managed to pack his petite podcasts full of the sort of content he says is aimed at helping “developers find their ultimate purpose and excel at their work in order to positively impact the people around them.”
Apple Podcasts | Google Podcasts | Overcast | Spotify
The show description for Changelog’s JS Party is perfect – “Your weekly celebration of JavaScript and the web. This show records LIVE on Thursdays at 1 pm US/Eastern time. Panelists include Jerod Santo, Feross Aboukhadijeh, Kevin Ball, Amelia Wattenberger, Nick Nisi, Divya Sasidharan, Mikeal Rogers, Chris Hiller, and Amal Hussein. Topics discussed include the web platform (Chrome, Safari, Edge, Firefox, Brave, etc), front-end frameworks (React, Ember, Angular, Vue, etc), Node.js, web animation, SVG, robotics, IoT, and much more. If JavaScript and/or the web touch your life, this show’s for you.”
Apple Podcasts | Google Podcasts | Overcast
I love me some clever copywriting – This podcast’s name is my favorite by far. Talk Python to Me is a weekly Python-focused podcast hosted by developer and entrepreneur Michael Kennedy. Michael and his industry expert guests discuss Python and Python-related topics like web development, data science, machine learning, and academia in satisfying 45min sessions. With more than 300 episodes in TPTM’s catalog, every Python enthusiast will find some quality content.
Did your favorites make it onto our list? Did we miss any gems? – Share their names with us and the community @Tabnine_ onTwitter.
Code reviews are a core tenant in the software development process to ensure that the code is free of bugs and up to the expected standard. These reviews are typically done through a source code repository before merging the code to the main branch. Bitbucket is one of the most popular git-based source code repositories, with over 10 million developers using it to manage their projects. This post will show how to utilize the BitBucket code review features to review our code.
BitBucket is a git-based managed source control repository service. It provides users with all the necessary features to handle any software development at any scale. As an Atlassian offering, Bitbucket has first-party integrations with all the other Atlassian services such as JIRA Software, Confluence, Trello, Bamboo, and Opsgenie to power the entire software delivery process.
BitBucket service offers a whole host of features to power all your code management needs, such as;
The code review functionality consists of multiple features to simplify the overall review process. The code-first approach adapted by the Bitbucket code review emphasizes readability with a single-page view for a pull request. It enables users to quickly review large codebases, find issues and fix them easily. Features like task management and contextual commenting allow users to easily manage changes to the code base. Integrating test results and security scans directly with the pull request and getting alerts for failures provides another layer of quality control for the review.
The ability to check the build state ensures that no failed build will get merged. Developers do this within the straightforward navigation provided by the one-page view of the pull request. It enables users to manage the entire request until it is merged from the single interface. When using a premium subscription, the merge conditions can be enforced upon the pull request to ensure no PR is merged until all the requirements are satisfied. These features make the BitBucket code review one of the most feature-rich yet initiative code review tools.
Now that you have a basic idea of what we can achieve with Bitbucket code review. Let’s look at how to use this feature in a development pipeline. This section will go over the main stages of the code review process using Bitbucket.
Let’s take an example scenario. Assume you are developing a website and other developers are working for you. IYou would want to review their code before merging it into production. You can do this through a simple bitbucket code management workflow described below.
The first step of any software development project is to create a repository to host and manage the source code.
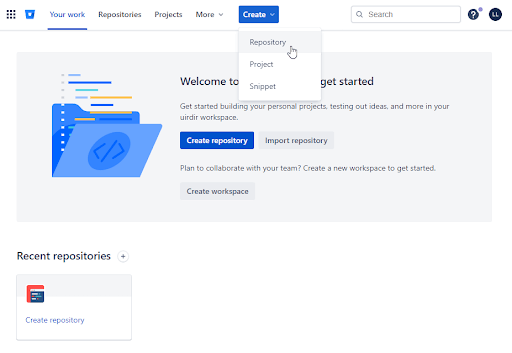
Step 1 – Login to BitBucket and select the Repository option under the Create button on the top menu.
Step 2 – Provide the necessary details in the repository creation screen.
It includes the basic information such as:
Advanced settings like:
Provide all the necessary details and click on Create Repository button.

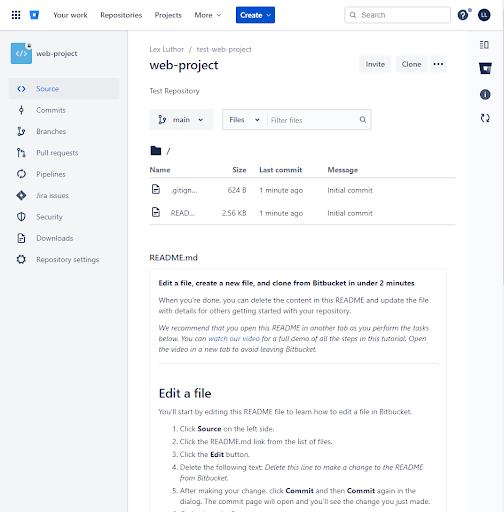
Note – For the “Include a README” option, we have selected the “Yes, with a tutorial” option. It will create a simple README.md file with some basic instructions on using the repository.
You will be automatically activated to the newly created repository. In this instance, the web-project repository will look like the following.
Step 3 – Now, we have a brand new repository. The next step is to add some files to this empty repository. We can do it either through the CLI, a GUI tool like Sourcetree, or the web interface.
Assume you have the following HTML file called index.html in your local environment.
<!DOCTYPE html>
<html>
    <head>
        <meta http-equiv="Content-Type" content="text/html; charset=utf-8">
        <style type="text/css">
        h1 {
            font-family:'Times New Roman', Times, serif;
            font-size: 50px;
            text-align: center;
            color: #0052CC;
            margin-top: 50px;
        }

        p {
            font-family:'Times New Roman', Times, serif;
            font-size: 20px;
            text-align: center;
            color: #cc0000;
            margin-top: 50px;
        }
        </style>
        <title>Bitbucket Code Review Test</title>
    </head>
    <body>
        <div width="100%">
            <h1>Test Web Page</h1>
            <hr width="100%" size="5" color="#0052CC">
        </div>
        <div width="50%">
            <p>
                Hello, This is a Simple Web Page
            <p>
                <img src="https://images.unsplash.com/photo-1568144628871-ccbb00fc297c?ixlib=rb-1.2.1&ixid=MnwxMjA3fDB8MHxwaG90by1wYWdlfHx8fGVufDB8fHx8&auto=format&fit=crop&w=1170&q=80" width="100%"/>
        </div>
    </body>
</html>
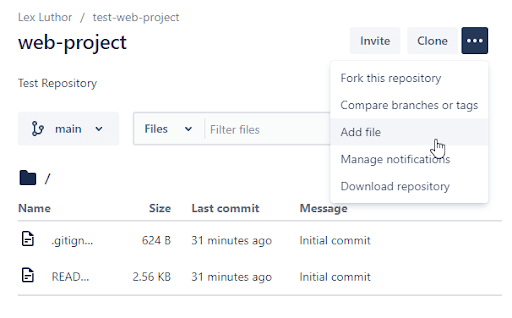
We can add this code to the repository using the “Add file” option. Click on the Add file option of the repository menu.
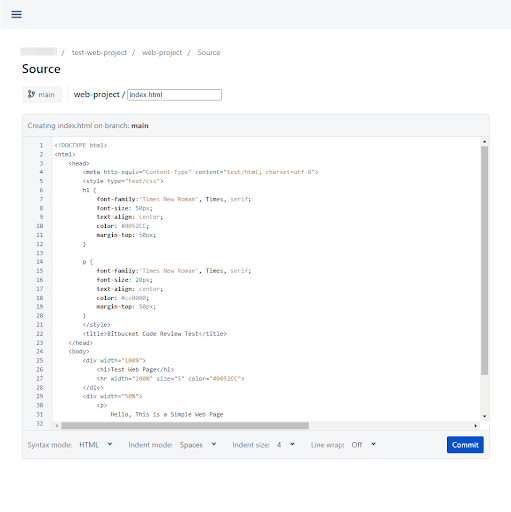
It will open the source view, where you can provide a filename and the content. Name the file as index.html, copy and paste the content, and click commit. Provide a commit message if required, and it will create the file in the repository under the selected branch.
You will see the committed file once the file is created.
Now we have a repo. Let’s see how to use this repo in a local development environment.
Step 1 – Clone the repository. Click the clone button in the repository to obtain the repository URL.
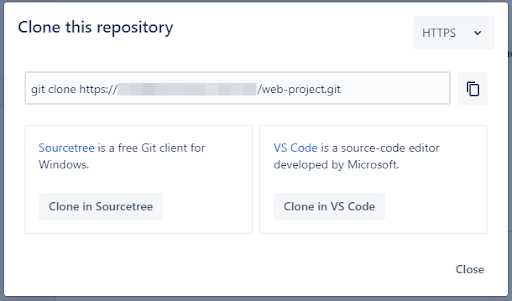
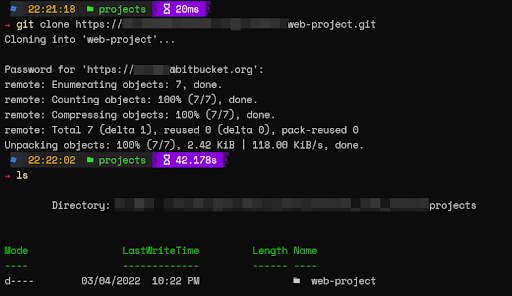
Step 2 – Use the cloning URL and clone the repository to your local environment. The following example is based on a Windows environment with Windows Terminal in Powershell.
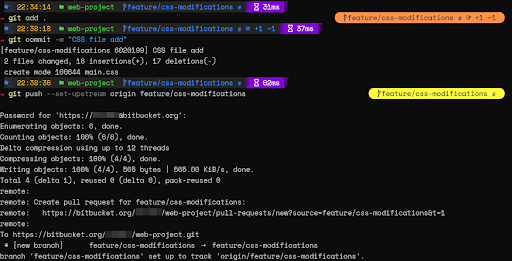
Step 3 – Navigate to the cloned project directory and create a new branch using the git checkout function.

Step 4 – Open the cloned project in your favorite IDE and change the index.html file. For example, let’s move the CSS from the head section to a separate file called main.css.
main.css
h1 {
    font-family:'Times New Roman', Times, serif;
    font-size: 50px;
    text-align: center;
    color: #0052CC;
    margin-top: 50px;
}

p {
    font-family:'Times New Roman', Times, serif;
    font-size: 20px;
    text-align: center;
    color: #cc0000;
    margin-top: 50px;
}
index.html
<!DOCTYPE html>
<html>
    <head>
        <meta http-equiv="Content-Type" content="text/html; charset=utf-8">
        <link rel="stylesheet" href="main.css">
        <title>Bitbucket Code Review Test</title>
    </head>
    <body>
        <div width="100%">
            <h1>Test Web Page</h1>
            <hr width="100%" size="5" color="#0052CC">
        </div>
        <div width="50%">
            <p>
                Hello, This is a Simple Web Page
            <p>
                <img src="https://images.unsplash.com/photo-1568144628871-ccbb00fc297c?ixlib=rb-1.2.1&ixid=MnwxMjA3fDB8MHxwaG90by1wYWdlfHx8fGVufDB8fHx8&auto=format&fit=crop&w=1170&q=80" width="100%"/>
        </div>
    </body>
</html>
Step 4 – Finally, commit the changes and push the new branch to Bitbucket using git add, commit and push commands.
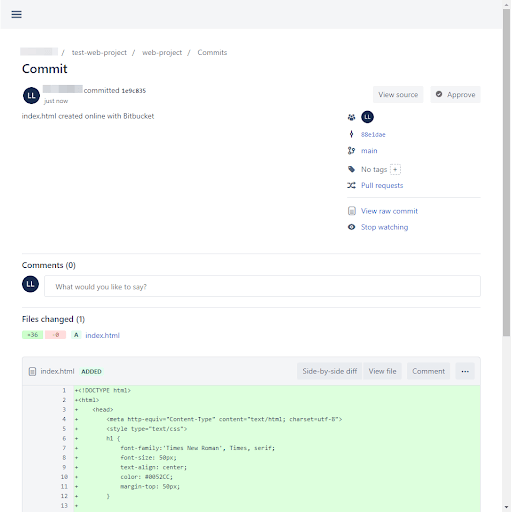
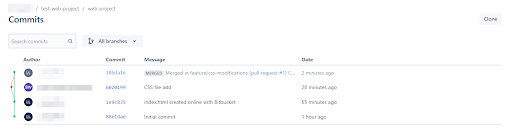
Step 5 – If you look at the commits section on Bitbucket, you will see a new commit with the new branch.
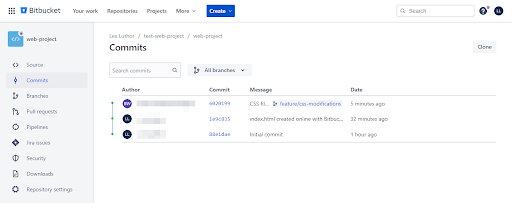
Now we have a new branch with changes. The next step is to create the pull request and do the code review.
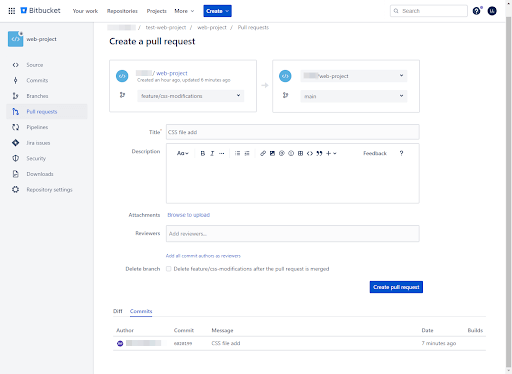
Step 1 – Navigate to the pull requests section in the repository and click on the create pull request button.

Step 2 – Enter the necessary details for the PR and create the pull request. It will include which branch to be merged, a short description of the changes, users who need to review the code, and the option to delete the branch once it is incorporated.
Step 3 – Once it creates the PR, the user can view the request and do the code review. The requested page contains all the request details, including the code changes. It will also include automated tasks such as build status, test, and security scan details.
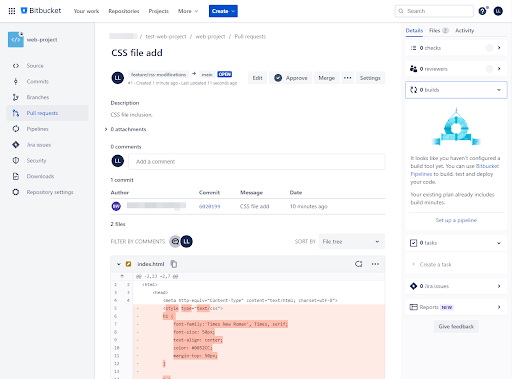
Step 4 – If the code review is satisfactory, the next step is to merge the PR. First, we need to approve the request by clicking the Approve button. As shown below, it will change the PR state to “approve.”

Step 5 – Integrate the PR by simply clicking on the Merge button. It will prompt the merge screen. Here, provide the merge commit and the merge strategy and click on merge to connect the source branch with the main branch.
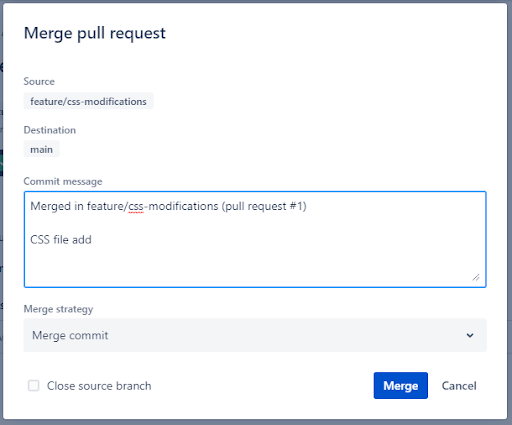
Step 6 – Verify the Merge by visiting the commits section on the Bitbucket repository. Here, you will see that the new branch connects with the master.
Code reviews are an essential part of any software development method. They provide a way to control code quality and allow developers to obtain peer feedback to improve their skill set. Any software project aims to create a product that fulfills the end-user requirements. AI-assisted auto-completion tools like Tabnine can enhance the productivity of your team. They will empower them to write code faster and more accurately, improving the overall quality of the software product.