Routing is a necessity when it comes to JavaScript-based single-page applications (SPAs). At some point, your app is going to need navigation. The way SPAs work is by sending the compiled and minified JavaScript file over with the HTML and CSS, then proceeds to render the site with lazy loading techniques to provide the user with a just-in-time browsing experience.
Routing is the technique that gives the impression of the app or website multiple pages or views. However, in reality, it’s all still just the same original page sent from the server-side. All the processing is completed on the client-side in a seamless manner.
So how does routing and redirecting work in React?
Unlike Angular and other JavaScript-based SPA frameworks, React doesn’t come with a pre-built routing system. React, after all, just a UI library. This means that its sole purpose is to help developers organize and render UI in the most effective and efficient manner. Routing is considered an extra feature.
However, the perks of React is that it has a strong developer community, meaning that common development needs — such as routing — have already been addressed via an add-on library to React.

In our case, it’s called React Router.
There are two ways you can install React Router into your React project. The first method is to add it to your project repository via yarn.
yarn add react-router-dom
Alternatively, you can do so using npm install
npm install react-router-dom
Debugging notes:
You might run into a potential conflict with babel jest when you try to use React Router. It’s similar to the issue that occurs when you install node-sass. You’ll see the conflict pop up in your console when you try to start your React application.
When this happens, it’s because the dependencies of babel jest are different from the react-router library we’ve just installed. If you look at the actual error, most of the time, it’s not the major versions that are in conflict with one another — rather, it’s the minor trailing updated versions.
To fix this, go inside your packages.json and add a resolutions property and tell it that we always want babel jest to be a specific version no matter what.
Here is an example of what this might look like:
 ...
 "devDependencies":{
  "react-scripts": "3.0.0"
 },
 "resolutions":{
  "babel-jest":"24.7.1"
 }
 ...
After you’ve done this, save your file and reinstall your React Router library. Once this is completed, you should have no problem starting your application.
Before you can begin to use routing in your React app, you need to go to your index.js and import in BrowserRouter.
It looks something like this:
 import React from 'react';
 import ReactDOM from 'react-dom';
 import { BrowserRouter } from 'react-router-dom';
BrowserRouter is actually a component that you can use to wrap around your application to make routing possible. What this does is give your <App /> component all the functionality available within BrowserRouter.
Here is how it looks in the code:
...
ReactDOM.render(
<BrowserRouter>
<App />
</BrowserRouter>,
document.getElementById('root')
);
...
So how do you use it in an actual component? Let’s do an example route inside your App.js.
Start by importing Route into your component.
...
import { Route } from 'react-router-dom';
...
Now we’re going to make a quick component that renders out a <div>.
 const catsPage = () => (
  <div>
    <h1>CATS!</h1>
  </div>
 )
This component is going to represent another page that’s alternate to our base rendered homepage. Here’s the code for that part.
 function App() {
    return (
      <div>
        <HomePage />
      </div>
    )
 }
Note: We’re going to pretend that your <HomePage /> lives in another file and pulled into this file via import.
The route component works by taking a few arguments. The main ones for this tutorial that we’re going to focus on are exact, path, and component.
Here’s a breakdown of what they do:
component: component is what we want the route to render.
path: the string that we want our string to equal to based on where we currently are. For example, if our component={HomePage}, then we might want our path to be path='/', which is the base of our application.
exact: this is a true or false boolean property. If you don’t assign anything to it, then it will default to true. exact tells the app that the path must be exactly what you set it as in order for the assigned component to render.
Here is what it looks like in the React code if we swap out <HomePage /> as per the code block example above:
 function App() {
    return (
      <div>
        <Route exact path='/' component={HomePage} />
      </div>
    )
 }
In the example above, if you had something like localhost:3000/, then it will render the HomePage component as expected.
But what happens if you remove exact from Route? You might have a link like localhost:3000/random and React Router library will still evaluate that as true and end up showing the HomePage component.
Now, this is where the fun part begins. If we created another route in React without using exact, what will happen is that React will render whatever comes up as true.
Let’s take a look at the follow block of example code:
 function App() {
    return (
      <div>
        <Route path='/' component={HomePage} />
        <Route path='/cats' component={CatsPage} />
      </div>
    )
 }
Without exact, the link localhost:3000/cats will evaluate HomePage to true and render it, followed by CatsPage directly beneath it. Without exact in React Router, as long as the path matches (even if it’s just a partial match), it will evaluate to true and render.
However, if you throw in exact, then it will have to be exactly as-is stated. So, for example, if you throw exact back into the route for HomePage, it won’t render when you try localhost:3000/cats because it’s not an exact match.
To use the Switch component, we need to add it to the import like so:
...
import { Route, Switch } from 'react-router-dom';
...
And then wrap your <Route /> components within <Switch> like this:
 function App() {
    return (
      <div>
        <Switch>
          <Route path='/' component={HomePage} />
          <Route path='/cats' component={CatsPage} />
        </Switch>
      </div>
    )
 }
What <Switch> does is that when a route inside the <Switch> tag pair finds a match in the path, it does not render anything else but that route. So, before, when we didn’t have exact as a property inside our <Route />, localhost:3000/cats will render both HomePage and CatsPage.
However, if we use <Switch>, it will match / first and not render anything else that may also evaluate to true. This means that if we tried to go to localhost:3000/cats, only our HomePage will show up.
So when we put exact back into <Route exact path='/' component={HomePage} />, then it will only render CatsPage. In short, you can think of <Switch> as a first match route rendering tool. <Switch> comes in handy when we don’t want to accidentally render multiple components that may have matching paths.
With the combination of <Route> and <Switch>, this is conceptually what routing is in React.
When <Route> renders a component for us, the component itself also gets passed three arguments. So, for example, <Route path='/' component={HomePage} /> will have the following arguments in the props — history, location, and match. For this section, we’re going to focus on match.
Inside our match, we get four things and they are url, path, params, and isExact. The url is the url of the component that it got rendered up to from the route. In our previous examples, we know that any path without exact will be partially matched. The url inside match tells us what portion of the url we’ve put into the browser is the valid part that evaluated it to true. The path inside match is just telling us the pattern that the url is trying to match.
The isExact is only true if the url matches the entire path pattern. Where does this come in handy?
When we use <Route /> without exact, it will render anything that matches. This means, for our HomePage and CatsPage example, if we had localhost:3000/cats without using exact, isExact under HomePage will display as false while CatsPage will return true. This gives us granularity in the future to use for whatever we might need to.
Finally, the params property is an object of url parameters. What is a url parameter? Here is an example:
<Route path='/cats/:catName' component={CatPage} />
The url parameter in the code above is :catName. :catName represents a dynamically changing value that can be anything we want it to be. This property is also accessible as a parameter via the params property under match.
So if we wanted to use this parameter, we can do so via props in our React code.
Here is an example:
 const CatPage = props => {
  return(
  <div>
  <h1>Hello, my name is {props.match.params.catName}</h1>
  </div>
  );
 };
Other spaces you might use params is when you want to fetch some data relating to the page, you have the details necessary to fetch through API calls to your backend.
And that’s basically it for React Routing and redirecting in React in a nutshell. The explanations and examples here here should be enough to get you started on creating your own routes in React quickly and efficiently.
Visual Scripting — it’s one of the rising ways to learn how to code. Kids are doing it. Aspiring developers are using it. Artists, animators, and game designers are picking it up en masse. But what is it? How does it compare to real programming? And where is it used in real life?
These are the questions we’re going to focus on and explore in this piece.
Visual Scripting is a tool that uses a graphical interface to help the developer create programs based on visual representations of logic rather than writing it out in the required language syntax. In a way, visual scripting can be seen as a translation bridge that sits on top of a programming language like C++.
The most common usage of visual scripting is by people who do not code natives and may be experts in other fields such as visual arts and design. The graphical nature of visual scripting lowers the barriers to entry into programming, making it easier and faster to quickly prototype or create simple applications.
Most of the time, these applications are game-based and have clearly defined patterns of expected behavior such as platform and simulation games.
The major perk of visual scripting is that it allows the designer or developer to quickly and visually see the connected relationships between each logical piece without the need to dig into the actual code. As visual scripting sits on top of its supporting programming language, the developer can also drill down into the actual code and make modifications as necessary.
The scaffold nature of visual scripting also makes it easy to create vast code structures through boilerplate code and pre-configured architectures for specific situations.
While it is an evolution in the way code, learning to code, and acts of creating code are performed, visual scripting is not a threat to traditional approaches to programming itself. This is because, under the hood, there is still coding involved. Visual scripting merely sits on top and assists with the code creation process, catering its strengths over to people who are more visually inclined.
Two major visual scripting engines are run by game-based engine editors – Unity and Unreal. These visual scripting engines are mainly targeted at artists who want to create their own games but are limited by their programming knowledge. Visual scripting makes the process of getting a product from concept to production much faster and easier.
Visual scripting may lower the bar to entry, but programming will always remain more flexible in the long run. This is because the developer has full control over what is happening, while visual scripting is restricted to what the scripting program allows.
Programming lets the developer fine-tune the code generated by the visual scripting engine and refine any hard edges that the tool cannot do.
Bolt started as a visual scripting tool that plugs into Unity. In 2020, Unity acquired Bolt and the tool became part of the game engine’s official toolset release that is available to all users for free.

Here’s a quick overview of how Bolt works and how visual scripting in general works.
At the root of all programming are basic variables. If you already know a programming language, then the concept of floats, strings, and booleans should be very familiar to you.
There are 11 basic types in Bolt visual scripting. Float, integer, boolean, string, char, Object, enums, and lists are general programming staples. However, here is a quick summary of the other basic types that are more specific to Bolt.
Vectors in visual programming are a set of float coordinates used to create positioning.
For 2d games, only X and Y coordinates are required. For 3D games, three coordinates, X, Y, and Z are required. 4D is supported under X, Y, Z, and W coordinates but is rarely used.
GameObjects are a collection of Unity scenes that contains position, rotation, and a list of components. GameObjects are unique to Unity. Other visual scripting engines may have something similar but under a different name.
A dictionary is a collection of mapped key-value pairs. It can be seen as a mini-database for the game that keeps track of things like age, lives, names, and various other in-game-related data. You can retrieve and assign elements based on keys.
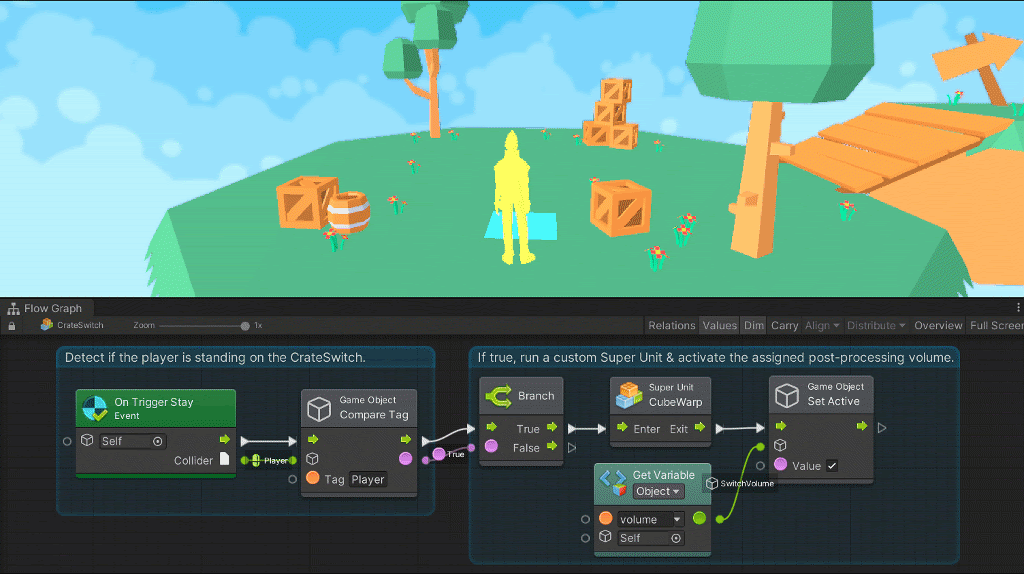
A flow graph lets you connect the individual pieces of your game together in a specific order.
If you think about it, a game is made up of a series of logical steps that forks out into different paths depending on the situation and other game elements. This is what flow graph essentially lets you do — configure the path of the next action based on a specific set of conditions.
Perks of flow graphs include:
A state is considered a self-contained behavior that tells an object how it should behave. There are two types of states in Unity Bolt: flow states and super states.
A flow state is a contained nest of flow graphs. For example, you might have a clear tree structure created by your flow graph. This tree represents the flow state of that particular flow graph group.
A super state is the parent state that contains another nested graph. So a super state can have multiple nested flow states inside.
A transition allows for the connection of different states together. This can be done through a trigger from idle to active states. The difference between a transition and a state is that a transition acts as a bridge between states. This means that each state or state graph group is a stand-alone feature. The transition only gets the user or player from one state to the next. If not, the user or player remains looped inside the state or reaches the end of the flow graph.
In Unity, scripting is a process of writing your won C# code. You can import custom types into Bolt as unit options. To do this, navigate to Tools > Bolt > Unit Options Wizard and follow the import walkthrough.
Scripting also lets you dig down into the C# code using variable and events API. To access the variables API, you’ll need to import it through using.
using Ludiq;
using Bolt;
To call on the variable API, you just have to access via the Variables class like this:
Variables.Application.Set("Lives", 9);
If you create a graph reference, you can access variables on the axis. To do this, you need to create a root graph on your game machine like this:
var graphReference = GraphReference.New(flowMachine, new IGraphParentElement[] { superUnit });
Now you can pass in your graph as a variable reference:
variables.Graph(graphReference)
Other things you can pass in as a variable includes objects, scenes, and applications.
Variables.Object(someGameObject)
Variables.Scene(scene)
Variables.Application
To access your saved variables looks something like this:
Variables.Saved
The events API lets you create triggered custom events. To write one looks something like this:
SomeCustomEvent.Trigger(enemy, "Life Steal", 10)
And that is the bits and pieces basics of Unity Bolt in a nutshell.
Getting into Bolt is a process of creating the units and connecting them up to form a series of actions, reactions, and interaction decision trees.
Eran reacts to a recent quote from AI Pioneer Geoff Hinton: “Deep learning is going to be able to do everything.” He points out that the limitations to “everything” won’t be the computational ability but the access to sufficient data. Kyle challenges whether the outcomes of ML decisions will be acceptable in life if they’re less intuitive (even if technically more optimal). The conversation broadens to the classic questions of distinctions between AIs and humans (feelings, emotions, empathy), and whether we’re headed to a future that freedom of choice is subjugated to the “superiority” of machine-learning-based decision making.
Kyle shares concerns about how AI/ML have already surpassed what humans can understand. Eran talks about how AI can not only make its predictions based on data sets that exceed our mental capacity, but also leave some explanation breadcrumbs that humans can understand and audit. The discussion shifts to exploring the practicality of AI translating programs from one language to another, and even generating a higher level, idealized or universal “one language to rule them all”.
Kyle ponders how AI tools might in the future better understand our programs, and adjust and augment them as we write code. Eran shares some predictions about how that might play out. The discussion broadens to whether AI-refined code may move programs (and programming!) in a productive or destructive direction, and whether (and how!?) tools can keep assisting developers instead of replacing them.
When Swift made its first appearance back in 2014, many developers went berserk thinking that what they’ve spent their time learning for iOS development just went down the drain.
Despite the initial confusion and general fear that what they know is now redundant? Swift is rather solid in its concepts and boldly takes the best bits of programming to make it their own. With 6 years of experience under its belt, Swift has grown into a mature language that’s well respected by the community.
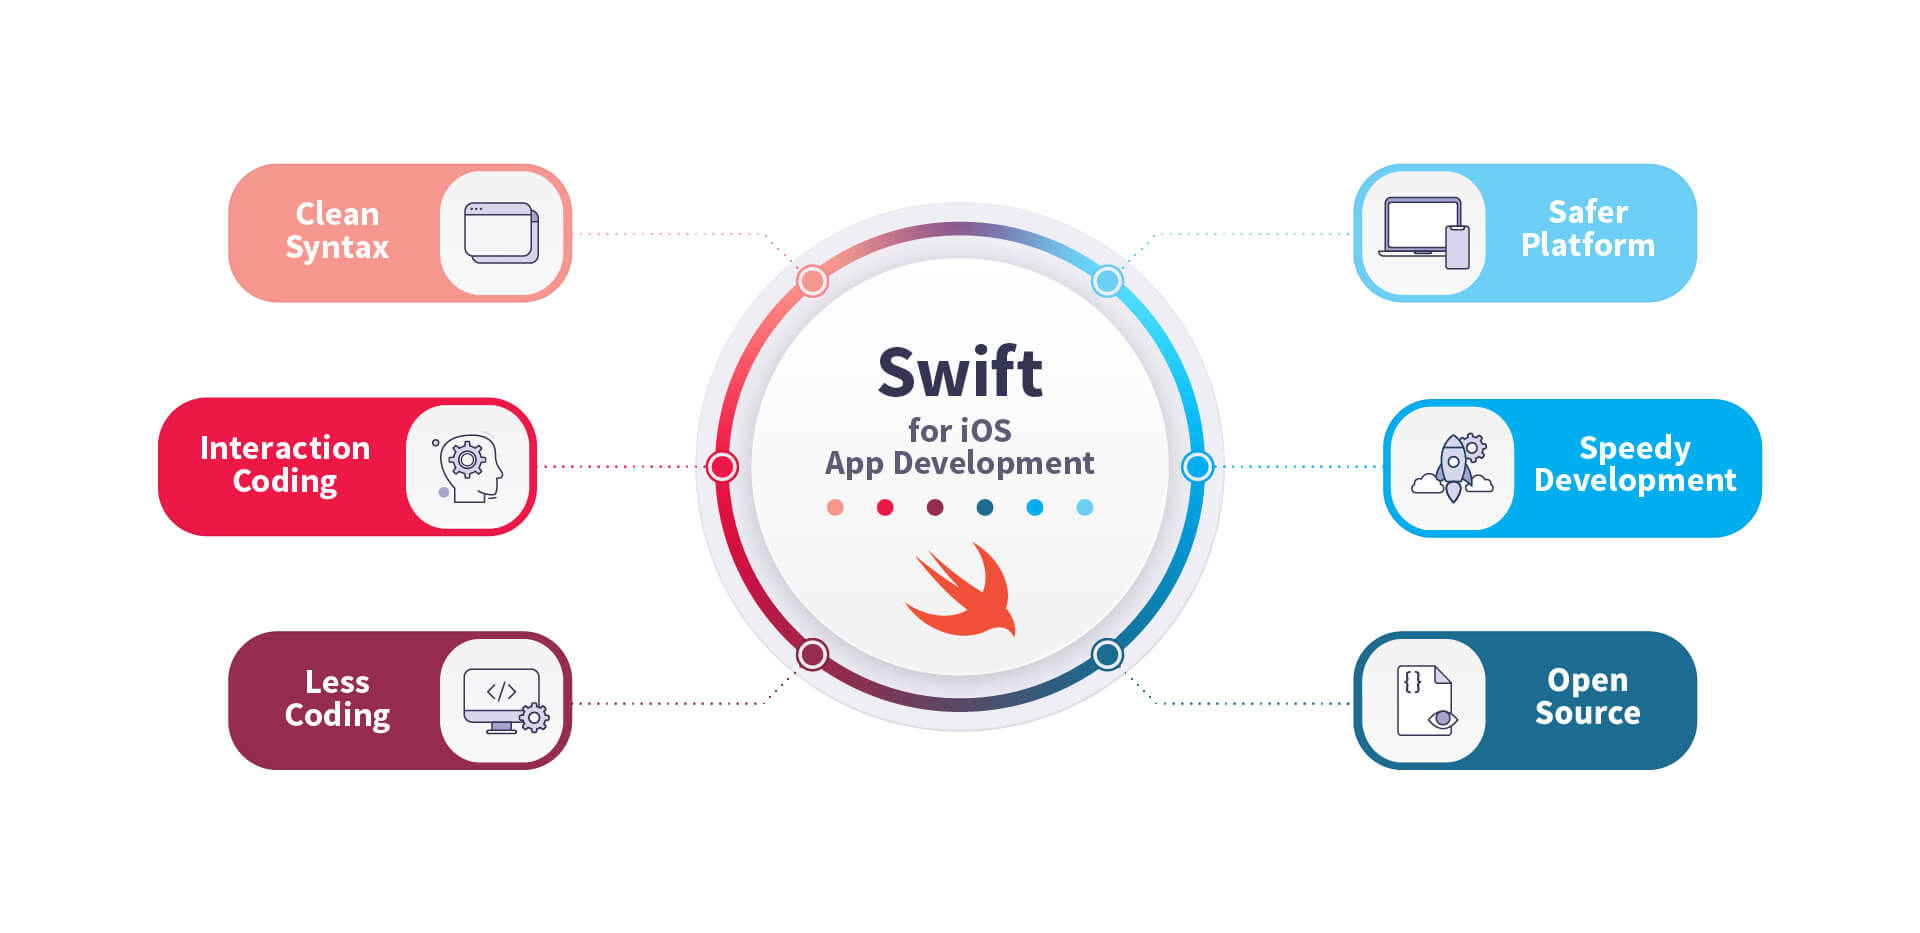
If you’ve already got some programming knowledge, learning Swift should be a breeze. In part, this is because it contains the same ideas that govern C-based languages, Rust, Haskell, Ruby, and Python, just to name a few. So if you already know one of these languages, then Swift should feel familiar to you.
However, if you’re new to coding and you’re learning Swift as your first programming language — don’t feel like you’re disadvantaged by this. Everyone starts somewhere and Swift is a good place.
Here is a quick on the basics of Swift to get you started.
At the foundation of all programming languages are the constants, variables, and data types. Swift is no exception to this. A variable in Swift looks like the standard variable declaration in any other programming language.
var name = "Just another variable"
Changing the assigned variable is a matter of reassignment.
 var name = "Just another variable"
 name = "this variable has changed"
If you use the let keyword instead of var, it becomes a constant and cannot be changed.
There are eight main basic data types and they are int, float, Double, Bool, String, Character, Optional, and Tuples. You can use type annotations to specifically set the type.
 var name: String
 name = "This is a string"
In Swift, there are the basic math operators that do exactly what we expect them to do such as addition +- , multiplication * and division /.
In addition to this, there are also comparison operators that let you compare two or more variables based on their assigned values such as greater than >, greater than or equal >=, and less than <.
The resulting value returned will always be a Boolean because the answer can only be true or false.
To check equality, == rather than a single = is used. A single = tells Swift to assign a value, while a == tells the program that it is comparing two values to determine the truthiness of the statement. You can also use != to check if something is not equal to each other.
In Swift, a function is defined by using the func keyword. Each function has the ability to take in parameters, followed by -> and the expected returned type.
So the skeleton of a function in Swift looks something like this:
 func functionNameHere(ParametersHere) -> returntype {
  //some code here
 }
If we translate this into a real function, it can look something like this:
funct course(name: String) -> String {
return name
}
print(course(name: "Learning Swift 101"))
And that’s the basics of writing functions in Swift.
A loop is a set of statements that repeats until a certain condition is met. Like other programming languages, Swift supports the following:
A for-in loop iterates over a collection of times such as range of numbers or items in an array. The condition is the length of the item, tracked by the index. In Swift syntax, a for-in loop looks something like this:
 for index in variableName {
    statements here
 }
If we translate this to an example, it would look something like this:
var someStrings:[String] = ["Hello", "my name is", "a loop"]
for index in someStrings {
print ( index )
}
In contrast to a for-in loop, a while loop in Swift repeatedly executes a target statement as long as the condition is true.
 while condition {
    statements here
 }
When transposing this into actual code, it can look something like this:
var lifeCounter = 10
while lifeCounter > 0 {
print( "You have (lifeCounter) lives left")
lifeCounter = lifeCounter - 1
}
A repeat…while loop is similar to a while loop. However, the check happens at the end at the executed statements.
 repeat {
    statement(s)
 }
 while( condition )
So in code, it can look something like this:
var lifeCounter = 10
repeat {
print( "You have (lifeCounter) lives left")
index = lifeCounter - 1
}
while lifeCounter > 0
Enumerations in Swift are similar to C and Objective C enumerations. An enumeration is a set of user-defined data types with an attached set of related values. Here is the syntax for enumeration in Swift:
 enum enumname {
    // enumeration values here
 }
When we put this into code, it looks something like this:
enum DaysOfTheWeek{
case Monday
case Tuesday
}
var days = DaysOfTheWeek.Monday
days = .Monday
switch days {
case .Monday:
print("Hello, Monday")
case .Tuesday:
print("Hello, Tuesday")
default:
print("just hello")
}
What’s happening here is that DaysOfTheWeek is defining the enumeration name. Each of the members inside DaysOfTheWeek can be assigned to a variable. In our case, Monday is assigned to the days variable. The switch case allows us to branch into the different outcomes and the corresponding member is matched against the case.
This is just an introduction to the syntax of Swift. There are more to explore in the official iOS development language. Apart from translating the syntax of what you already know over, there are a number of other things such as structures, options, collections, protocols, closures, extensions, and interface builders.
At the base of Swift is the syntax. Once you have that figured out, the next step would be to unravel the visual layer of Swift development. This includes digging into the auto layout and stacking views for building precise user interfaces.
Segues and navigation controllers are also important as it is the thing that lets us define relationships between view controllers and navigation. A good branch off from this would be to dig into tab bar controllers and how the view controller life cycle works.
The next step is to figure out how to create HTTP and URL sessions, in addition to JSON consumption and dealing with concurrency. These topics are extensively addressed by the official Apple iOS development guides available on Apple’s official Books app.

Or if you’re a more interactive learner, Apple also has a Swift Playgrounds app that can teach you an end-to-end approach to iOS development through a gamified approach. The app is primarily aimed at non-coders picking up coding for the first time, but can also be a valuable resource for developers who are looking to not get stuck in tutorial hell. It mostly consists of different modules that can build on different parts and features that are available for iOS devices such as camera accessibility, augmented reality, and the various sensors available.
YouTuber and JavaScript Specialist Ania Kubów took the time and effort to help her dev community decide: which AI code completion tool they should use to get their code done better, and faster. In order to get a fair result, Ania threw a thrilling showdown:
Kite vs. Tabnine – The Ultimate Battle
In the video, Ania displays a split-screen featuring 2 recorded sessions from her code editor. The exact same code is being written in VSCode on both sides of the screen, with only one difference – Tabnine is installed and activated on the left-hand side, and Kite is active on the right-hand side. Can you guess who took the trophy? Press play and find out.
Read more from the blog: Github Copilot vs. Tabnine