GraphQL has grown in popularity since its release in 2015. With the prevalence of JSON and its usage in API development, GraphQL takes it one step further. It does so by creating a standardized query framework that gives you only the data you need — thus increasing your REST API’s flexibility and can significantly reduce the data transfer loads.
It sits on top of what you currently have and supports a range of languages, including but not limited to Haskell, JavaScript, Perl, Python, Ruby, Java, C++, C#, Scala, Go, Rust, Elixir, Erlang, PHP, and Clojure.
The syntax for writing GraphQL is simple to understand and adaptable by various layers of the software development stack.
In this article, we will go over the fundamentals of searching and filtering queries for GraphQL.
Do you stay updated with the latest advancements and trends in software development?
It’s essential to remain informed about new technologies and practices to excel in this constantly evolving industry. Learn how you can leverage AI to optimize your software engineering in 2023.

Before we can kickstart a query in GraphQL, we need to be able to get a single object. To do this, you need to generate a single list of objects for a type. What this means is that you list out all the things you want returned from that particular object.

Traditionally, an API would just give back a standard format based on what’s been preconfigured in the backend. With GraphQL, you can list out only the fields you require for your needs.
For example:
 query{
    getCart(id: "UUID938204") {
      cartItems
      totalPrice
      VAT
      priceBeforeVat
      numberOfItems
      discountCode
    }
 }
Here’s an example of nested linked objects in GraphQL.
query{
    getCart(id: "UUID938204") {
      cartItems {
        itemSKU
        itemName
        itemPrice
        itemQuantity
        itemDescription
        itemDiscountApplied
      }
      totalPrice
      VAT
      priceBeforeVat
      numberOfItems
      discountCode
    }
 }
There may be other key-pair values available for your query. By limiting the data to only what you need, this is the most basic form of filtering in GraphQL.
You can also add the filter keyword to your query to limit the values returned based on the given parameters. Here is a syntax example of a nested query filter:
 query{
    getCart(id: "UUID938204") {
      cartItems {
        itemDiscountApplied(filter: {
        status: true
        })
      }
      totalPrice
      VAT
      priceBeforeVat
      numberOfItems
      discountCode
    }
 }
It’s also good to note that for this structure you work, your GraphQL scheme needs to have @id in its type. For example:
 type Cart {
    cartUUID: String! @id
    totalPrice: Double
    VAT: Double
    priceBeforeVat: Double
    numberOfItems: Double
    discountCode: String
 }
The @id becomes a filter parameter for your GraphQL query.
To query a list of objects, you can just add an array as part of your id filter parameters. For example:
 query {
    queryCart(filter{
      id: ["UUID2098", "UUID92083", "UUID98332", "UUID2833"]
    }){
      id
      totalPrice
      numberOfItems
    }
 }
To create a multi-parameter filter, you can use the and keyword to concatenate the filter requirements onto your query. In the query below, we are looking at a list of completed carts where the total purchase order is over $150.00.
 query {
    queryCart(filter{
      id: ["UUID2098", "UUID92083", "UUID98332", "UUID2833"]
    },
    and: {
      totalPrice: {
        gt: 150.00
      }
    }){
      id
      totalPrice
      numberOfItems
    }
 }
But what if you have a list of objects under a parent item that you want to filter? That is, filter down the nested values to only what you want.
To do this, you can create a nested filter in GraphQL to get to your required results.
In the example below, we want to query a specific completed cart based on the UUID and filter the cart to return items that have a greater price than $15 and have a discounted status of true. Here is the example syntax:
 query {
    queryCart(filter{
      id: "UUID2098"
    }){
      id
      totalPrice
      numberOfItems
      cartItems(filter: {
        price: {
            gt: 15.00
        }, and: {
          discount: true
        }
      })
    }
 }
In the previous examples, we’ve been filtering based on a definite value. What if we want to filter in GraphQL based on a range? To do this, you can use the between keyword.
In the example below, we want to query all our completed orders based on the number of items ordered. The filter parameters here are any that are ordered between 5 to 15 items per order. Here is an example of the GraphQL between syntax:
 queryCart(filter {numberOfItems: between: {min: 5, max:15}}){
    id
    userId
    totalPrice
 }
It’s also good to note that for this to work, you need to implement @search on your schema. For example, based on the above query, you’ll need the following schema:
type Cart{
 numberOfItems: Int @search
 id: String
 userId: String
 TotalPrice: Double
}
max and min values also work for alphabet-based filtering. It works based on alphabetical ordering.
In the example below, we have created a GraphQL query filter that will return all customers that have last names that begin with ‘Ca’ all the way to ‘Co’. For example:
queryCustomer(filter: {lastName: between: {min: 'Ca', max: 'Co'}}){
 firstName
 LastName
}
Another scenario for filtering in GraphQL that can come in useful is when you need to find objects that have one or more specified values. For example, you might want to filter your customer orders based on a specific postal code area.
Here is an example for the query’s syntax:
query{
  postalCode(filter: {code: {in: ["0600", "0601", "0602"]}}){
     code
     orderId
     customerDetails
  }
}
How is this different from just conducting a normal filter query? This is because the above filter aims to return data based on a parameter that is not usually the main id item such as cartId or customerId. Also attached to the postalCode parameter may also include other details such as suburb and city . The postalCode value is its own ‘parent’ value that’s being used as a child in a nested data object.
Finally, how do we filter non-null fields? The GraphQL trick is to use has. This will exclude values that are null. For example, you might have orders with no contact phone number attached to them. You want to be able to see only orders with phone numbers because there is a higher chance of it being a higher value order.
Here is the syntax for using has in GraphQL:
queryOrder(filter: {has: contactNumber}){
  orderId
  shippingAddress
  contactNumber
}
For the above query to work, you need to omit ! from your schema. In the example below, orderId, and shippingAddress cannot be empty as indicated by the ! after the value’s type. contactNumber however, has the option to be empty and not filled out by the user, and therefore contains the value null.
type Order{
  orderId: ID!
  shippingAddress: String!
  contactNumber: Int
}
Filtering is one way to get the query results you want in GraphQL. This leads to the question: where to from here? Getting comfortable with filtering in GraphQL is a good starting point, but there is more to it than just creating such queries.

Beyond searching and creating queries through filtering, there are also the following types of queries in GraphQL:
The above-suggested topics make a good Google checklist to help you find your way around the different parts of querying in GraphQL. While it is only the tip of what GraphQL can do, it is more than enough to get you started and give you all the things you need to achieve your querying needs.
Whether you’re just getting started as a developer or sharpening your skills to hunt for your next big career opportunity, this list of dos and don’ts will help you navigate the unforgiving seas of uncertainty many developers face.
If you’re in it for long-term career success and marketability go with Hybrid, hands down, every time. Take a quick peek at your favorite job posting board and you’ll see employers are looking for candidates with expertise in a couple of key areas plus a general level of knowledge in many others.
Being a Hybrid style developer demonstrates to prospective employers and teammates an ability to acquire a deep, vast, and valuable knowledge base in a specific area while simultaneously illustrating the in-demand flexibility needed to pick up a working level knowledge of new technologies and tools.

Mentors make a major difference. They can give you advice that sets you on a path to success, they can help you avoid massive mistakes, and they can open doors and introduce you to the right people at the right time.
Reaching out to friends, acquaintances, teachers, or even total strangers on a social platform might be way outside of your comfort zone but the truth is most people love giving advice about how they achieved their success. A well-worded message letting them know that you admire what they do and would genuinely appreciate some of their hard-won wisdom may lead to a long and mutually rewarding friendship.
Whether you’re planning to build a soaring skyscraper or an enduring career as a developer, it’s always a good idea to start with a deep, strong foundation. There is an enormous gulf between knowing a programming language and being able to create concise and elegant code with that language. Many people ‘understand’ English, few have the skill to write a series of intricately interwoven best-selling novels.
Achieving a level of comfort with programming fundamentals will give you enormous confidence. You’ll begin to recognize similarities and patterns like how JavaScript and PHP are both object-oriented languages that utilize first-class functions. You’ll pick up acronyms and shorthand jargon that will make it easier to quickly communicate ideas with team members, and you’ll begin to be able to problem-solve in more abstract ways.
It’s often been said that there are no stupid questions, I’m here to tell you that’s stupid! It’s true, asking for help is great, it can save you, your team, and the company you work for tons of time and money, and it can help avoid disastrous mistakes. But, wasting coworkers’ time with questions that you could easily find the answer to yourself with a bit of Googling is a big no-no.
If you’re like most junior developers, you’ll likely feel overwhelmed in your early days on the job. A combination of tips 1, 2, and 3 (see above) will help with that. Stress and anxiety will eventually give way to comfort and confidence but at some point, you’ll come across a problem you can’t solve alone. Before you jump to ask for help, write a well-thought-out question that details the problem you’re up against, the steps you’ve already taken to try and solve it, and your goals. The person that you’re asking for help will appreciate the time you have invested.
New technology and tools seem to change as quickly as the weather. It’s always wise to know which way the wind is blowing and keep an eye out for rough seas and career-crushing storms. It also puts you at an advantage if you can hop on board the latest trend before the ship sails.
Changes can make some of your skills obsolete, that’s another big plus for Hybrid style developers (see tip 1 above). Even though change happens quickly in tech it rarely happens instantly. If you follow the right industry news blogs you’ll have all the time you need to pivot and adjust to change with some new ‘skills to pay the bills.’
Here are a few industry news sites to get you started:
Picking the right IDE for your style of work and setting it up with all of the extensions/plugins that keep you focused and productive can make all the difference in your early days as a developer. There are tons of time-saving tools out there, obviously, Tabnine is always at the top of my list, when it comes to AI-powered autocompletion tools nothing else even comes close.
Tabnine puts their money where their mouth is when it comes to supporting the dev community by giving away hundreds of thousands of dollars worth of Free Tabnine Pro licenses to students. You can register to get your Free Tabnine Pro Student license HERE, or grab your Free Tabnine Basic, or Tabnine Pro license HERE.
Here are a few more great options:
Long hours fade into long weeks. If you’re writing code all day, every day, burnout is almost inevitable. Pace yourself and manage expectations carefully – yours and your managers. It’s great to put in some extra hours in those first few months to try and get over the ‘rookie’ hump, just remember your career is a marathon, not a sprint so leave some gas in the tank for the long haul.
As soon as it makes sense for you, start to set aside time for personal projects. It will help you shake off the mundane monotony of junior developer ‘code monkey’ tasks. Look for creative opportunities that let you stretch your skills beyond their limits, that’s the sweet spot where every great developer learns and grows.

Hopefully, some of these pearls of wisdom will help you out of a tough spot, or maybe avoid a perilous pitfall altogether. One more thing worth mentioning – pass on what you’ve learned to others.
Before you know it you’ll have months and then years of experience behind you, that’s when some wide-eyed ‘newbie’ will wander into your workplace looking lost and overwhelmed. You might still feel like a ‘junior developer’ but your experience relative to theirs will seem vast, and valuable – do what you can to help them out.
Tabnine knows that tuition, rent, and food can get expensive, that’s why we’re committed to supporting the community and the dev superstars of tomorrow with FREE Tabnine Pro Student licenses renewable for as long as you’re a student.
Get Your Tabnine Pro Free Student Pass Now!
Providing hundreds of thousands of dollars in free Tabnine Pro licenses ensures that dev students from around the globe are given access to professional coding tools without having to bear the burden of additional costs.
If you’re a software development student in São Paulo or San Francisco, Toronto or Tel Aviv, Beijing or Bangalore you can power through school projects with all the perks of Tabnine Pro absolutely free, for as long as you’re in school.
Tabnine supports all the most popular languages, libraries, and frameworks including:
Python, Javascript, Java, extended JS, React, PHP, Typescript, C Header, Bash, ML, Swift, Ruby, Perl, Rust, SQL, Vue, F#, Scala, Julia, TOML, Shell, YMAL, C / C++/ C#, HTML, Lua, Markdown, Haskell, Go, Objective C, JSON, CSS / SCSS, Angular, and Kotlin.
Tabnine Student Pass includes all the perks of Pro
Tabnine knows that the cost of an education can be overwhelming and we are proud to do our part to help lighten the load.
You focus on coding – Tabnine will cover the cost of AI code completion.
Get Your Tabnine Pro Free Student Pass Now!
More Great Student Packs
Tabnine is in great company when it comes to recognizing the importance of investing in education and the community – Check out these other great student deals and discounts!
GitHub – Free GitHub Pro for students | Powerful collaboration, code review, & code management
JETBRAINS – Free annual subscription for students | Professional IDEs: IntelliJ IDEA, PyCharm, and more
Stripe – No transaction fees on first $1000 in revenue processed | Web and mobile payments, built for developers
Python for frontend seems a bit counter-intuitive for anyone who has ever developed the frontend of applications. Traditionally, Python is considered a backend language. Anything web and frontend is predominantly HTML, CSS, and JavaScript.
When we say Python, we do not always think of frontend web. More like never. However, Python can be used for either front-end or back-end development. That said, JavaScript is the default language of the web.
Frontend web development deals with building web interfaces that a user can use and interact with. Everything we see in the browser is run through a coordination of HTML, CSS, and JavaScript. So how can Python be used for the front end?
Well, there’s a big little Python library called Brython that makes it all possible.
Brython stands for ‘Browser Python’ and is Python’s implementation of JavaScript. In a way, Brython is a Python-to-JavaScript compiler. It lets you write client-side code in native Python and compiles it out to HTML, CSS, and JavaScript for you.
To work with Brython, you don’t need to know JavaScript. However, you still need a proficient understanding of HTML, CSS, and Python.
There are two ways to include Brython into your Python project. The first is through pip:
pip install brython
Then in an empty folder, run the following command:
brython-cli --install
This will give you the following folder structure:
 brython_stdlib.js
 byrthon.js
 demo.html
 index.html
 README.txt
 unicode.txt
To run a web server locally, you can use the following command:
python -m http.server
Or alternatively,
python - http.server 8001
Every now and then Brython releases an update. To update your related packages, use the following commands:
 pip install brython --upgrade
 brython-cli --update
You can also add Brython to your HTML page via CDN.
 https://cdn.jsdelivr.net/npm/brython@3.8.10/brython.min.js
 https://cdn.jsdelivr.net/npm/brython@3.8.10/brython_stdlib.js
This will allow you to use Python syntax within your HTML page. If you’re familiar with Angular and React, the concept is similar when it comes to building a frontend with a library or framework. But instead of it all boiling down to JavaScript, we are dealing with Python with HTML and CSS instead.
The perks of using Brython for frontend Python instead of JavaScript is that you might already have a strong background in Python. Whilst JavaScript is easy to pick up, it does tend to have a lot of side quirks that only show up during trial and error experiences.
The other perk of using Python for your frontend is that you can unify your project under a Python umbrella, rather than spread it across multiple technologies. The more languages you have to support, the more time you’re going to need for long-term maintenance and upgrades.
Frontend Python through Brython will need you to execute Python code both in the server and the browser, give you the same access to browser APIs, manipulate the DOM, whilst letting you interact with existing JavaScript libraries — making Python for the frontend a flexible implementation.
To use Python in your HTML page, you need to load the function brython() . Here’s an example:
 <body onload="brython()" >
    <script type="text/python">
    Your python code here
    </script>
 </body>
To link in your python script into the frontend, you can do so like this:
http://main.py
For example, you might have a button that does something when clicked. You want the click event logic to sit inside your main.py file while the view is your HTML.
 <body onload="brython()">
  <form class="pure-form" onsubmit="return false;">
         <button
           type="submit" id="submit">Ok</button>
     </form>
 </body>
Here is an example of binding your logic to the click event in Python.
from browser import document, prompt, html, alert
def clickedOk(_):
alert("Hello there!")
return
document["submit"].bind("click", clickedOk)
The above will run the alert() function when the button is clicked.
While Brython is Python under the hood, it is an implementation of JavaScript. You cannot have a pure Python frontend application. Why? Because the web runs on JavaScript. Nevertheless, Brython still lets you leverage your Python knowledge for rapid front-end development.
Brython works by running a JavaScript translator on Python and executing it in the browser. This is done through brython.js and brython_stdlib.js, where brython() is invoked to compile the Python code contained in the script tag within text/python type.
brython() is the main JavaScript function that exposes the JavaScript namespace. It allows for any Python code to execute and is the only JavaScript function that you need to call explicitly for Python to work properly in the frontend. __BRYTHON__ is your JavaScript global object that holds all internal objects for your Python scripts. While we don’t use this object directly, anything Python-related will be held here.
Brython’s browser module lets you access various browser-related functionalities. It also lets you bind your values to different targets and events, allowing your frontend to be dynamically driven by data and any changes that get detected.
Here is a list of the different browser methods and what they do.
browser.alert(message) — this is a function that prints a message in a pop-up window and returns None.browser.bind(target, event) — this function lets you event bind to a decoratorbrowser.confirm(message) — this function prints a message in a window. It will show two buttons (ok/cancel). It will return true if ok, and false if cancel is selected.browser.console — the equivalent of console.log()browser.document — this is an object that represents the HTML document that’s currently displayed in the browser windowbrowser.DOMEvent — Lets you access DOM eventsbrowser.DOMNode — Lets you access DOM nodesbrowser.load(script_url) — Lets you load JavaScript librariesbrowser.prompt(message[,default]) — Lets you create a prompt via a pop up window. If your value is entered, it will return the default empty string.browser.run_script(src[, name]) — Lets you execute Python codebrowser.window — Lets you access the browser windowHere’s an example of how you can use one of the above browser methods.
 <script type="text/python">
    import browser
    browser.alert("Hello Frontend Python!")
 </script>
Or alternatively, if you want to split out your Python code from the HTML:
 <head>
     http://main.py
 </head>
Here is main.py example:
 import browser
 browser.alert("Hello Frontend Python!")
Brython is only one library of many others out there that are currently supporting Python in the frontend. Other major libraries include Skulpt, Transcrypt, Pyodide, and PyPy.js.
They all work as Python compilers, meaning that whatever you end up writing as your Python code is still valid. There might be a few differences, but overall, the general concepts introduced here are mostly the same.
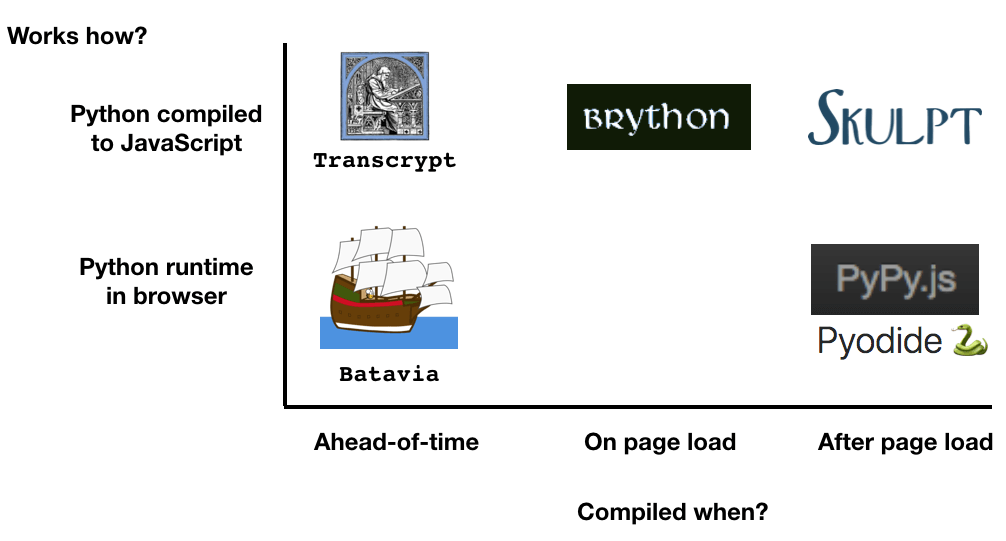
For example, Skulpt compiles Python code into JavaScript, in a similar fashion as Brython. However, it doesn’t have built-in functions that let you manipulate the DOM.
Transcrypt includes a command-line tool that lets you compile Python code into JavaScript, allowing for ahead-of-time (AOT) processes. The perk of Transcrypt is that it’s small. We’re talking 100KB kind of small, which makes it super fast to load. However, a compiler needs to be downloaded by the browser for it to work, making it an extra step for the user.
Pyodide is based on WebAssembly compilation and interprets Python code in the browser. There is no JavaScript compilation like the others, but it is often used with education-related spaces and libraries such as NumPy, Pandas, and Matplotlib.
PyPy.js is Python interpreter that compiles into JavaScript, making it compatible for ‘normal’ web development uses. However, PyPy.js is rather large, especially when compared to the others mentioned here. It is 10MB in size and therefore not practical for common web development uses. PyPy.js is also currently inactive with no updates or new release since 2019.

Whatever you end up using, Python for the frontend is not just a myth. While it all eventually turns into a form of JavaScript, it lets you leverage your current knowledge and skills without the need to start digging extensively into JavaScript.