New name – More AI awesomeness
Hey JetBrains folks!
We recommend you install the Tabnine plugin instead of Codota.
Tabnine supports every major programming language in most of the leading IDEs. Tabnine’s advanced Machine Learning model delivers superior AI code completions for an unparalleled coding experience.
What’s happening?
Over the past year, we’ve been hard at work adding all the awesome Java code completion capabilities from Codota into Tabnine. Codota users making the switch will be blown away by Tabnine’s next-level code completion capabilities.
Do you stay updated with the latest advancements and trends in software development?
It’s essential to remain informed about new technologies and practices to excel in this constantly evolving industry. Learn how you can leverage AI to optimize your software engineering in 2023.
Tabnine for Enterprise provides a secure coding environment that allows teams and organizations to host and train their own AI models. This feature facilitates collaborative autocompletion across IDEs and enhances code security by keeping the codebase and AI model on secure corporate servers. With Tabnine for Enterprise, your development team can enjoy the benefits of powerful AI code assistance, which promotes more productive and error-free coding, all while ensuring the confidentiality and protection of your company’s data.
How to install Tabnine on IntelliJ IDEA
In the coming months, the Codota development team will join forces with the Tabnine team allowing us to lift Tabnine’s AI code completion capabilities to even greater heights – we have some truly amazing things coming.
We know changes can be difficult but this is one sunset we’re certain will lead to a beautiful tomorrow.
Eclipse users – Keep working with Codota for now
Don’t worry – We haven’t forgotten about you. We hope to have a big announcement soon about when you can hop on the Tabnine train.
Switch statements are one of the building blocks of logic in code. It’s a way to create selection control in a standardized format that is much more condensed than your typical if-else option. In most cases, a switch statement is faster to code and run when compared to if-else, when pitched in contrast against a switch statement.
Unlike every other popular programming language, Python doesn’t have a switch or case statement functionality available. However, all this changed with Python 3.10. Anything older than Python 3.10 does not support switch statements and therefore the contents of this article will not work on a majority of versions.
For context, at the time of writing, Python 3.10 is still in the testing phase and remains in an early developer preview release. Nevertheless, the ability to use switch statements is an exciting and major development for Python and Python developers.
Without further ado, let’s get right into it.
A switch statement is a set of conditional tests that allows the developer to direct the course of the program based on a set of scenarios and variables.
On the surface, a switch statement looks somewhat similar to an if statement, but with structural and syntax differences. For example, an if statement in Python looks something like this:
 a = 10
 b = 20
 if a > b:
 print("a is greater than b")
The equivalent of else-if in Python looks something like this:
 a = 10
 b = 20
 if a > b:
  print("a is greater than b")
 elif a == b:
  print("a is equal to b")
And finally, the default final else to provide a catch all clause for when none of the cases match:
 a = 10
 b = 20
 if a > b:
  print("a is greater than b")
 elif a == b:
  print("a is equal to b")
 else:
  print("b is greater than a")
The shorthand of if-else in Python looks something like this:
 a = 10
 b = 20
 print("a is greater than b") if a > b else print("a is equal to b") elif a == b else print("b is greater than a")
As you can see, things are already starting to get complicated. On the surface, everything looks quite simple. But if you look at it from an ease of readership and comprehension, having more than one or two sets of if statements can already begin to clog up our code.
When there are too many if-else statements in a block of code, it can feel like reading a run-on sentence. The longer the sentence, the harder it is to keep all the information in your mind and comprehend what it’s trying to tell you.
This is where switch statements in Python come in.
Switch statements in Python are defined by two things: match and case. match sets up the scene and tells Python that the following block of code will be a switch statement. case sets up Python with what to do if the conditions are met.
Here is an example:
localhost = "3000"
match localhost:
case "80":
print("localhost:80")
do_something_http()
case "8080":
print("localhost:8080")
do_something_httpalt()
case "443":
print("localhost:443")
do_something_secure()
case "3000":
print("localhost:3000")
do_something_localhost()
case "80":
print("localhost:4200")
do_something_webpack()
case _:
print("localhost not found")
What’s happening here is that each block gets evaluated. If the case matches exactly, then the following block of code gets executed. While this can be achieved in the same manner with a series of if-else statements, the removal of comparison conditionals (e.g. if localhost == "80" etc.) repeated on multiple instances makes it “cleaner”.
An underscore _ is used to signify the default, catch-all case when nothing satisfies the given parameters. If no case _: is given, you will run into an error if nothing matches.
Here is another example of improved code readability with Python switch statement:
 match (product, category):
     case ("milk", "dairy"):
         print("15% discount today only!")
     case ("lettuce", "vegetables")
         print("veggies are good for you")
     case ("beef", "butchery")
         print("mmmm iron")
     case _:
         print("you didn't add anything")
You can pass multiple arguments into the switch to be compared against the cases. The sequence and length of these arguments is entirely up to you and there is no restriction in Python.
In addition to arguments, you can also pass in objects like this:
 match user:
     case User(admin=False):
         print("You are not authorized")
     case User(region="NA"):
         print("You are from the North America!")
     case User():
         print("This is a customer somewhere else")
     case _:
         print("Error: Not a user!")
User() is an object with data attached to it. For example, by adding admin=False and region="US" in between the parenthesis, you are creating a condition for the switch statement to evaluate.
The examples so far have been based on static values. What if we wanted to make our switch statements a bit more dynamic in Python?
Here is the syntax example of how to write it:
REGION = "NA"
match user:
case User(admin=False):
print("You are not authorized")
case User(region=REGION):
print("You are from the {REGION}")
case User():
print("This is a customer somewhere else")
case _:
print("Error: Not a user!")
In the example above, {REGION} is dynamically pulled into the print() statement, while also being a parameter for matching in User(region=REGION).
Based on the above Python switch patterns, we can also increase the complexity of the condition by adding more parameters. Here is another example:
class Region(str, Enum):
AFRICA = "AF"
ASIA = "AS"
EUROPE = "EU"
NORTH_AMERICA = "NA"
OCEANIA = "OC"
SOUTH_AND_CENTRAL_AMERICA = "SA"
match user:
case User(admin=False, region=region):
print(f"This is a customer in {region}")
case _:
print("Error: Not a user!")
Now that we’ve got the basics down, what about conditionals in Python switch statements?
The same match and case structure still applies. The only main difference is how you write your conditional after the case keyword.
Here is a quick example of what this looks like:
 match items:
     case [Item() as i1, Item() as i2] if i1.name == i2.name:
         print(f"Discount applied: x2 {i1.name}")
     case [Item(), Item()]:
         print(f"No 2 for 1 deal. Item not the same.")
     case _:
         print("Received something else")
The first part of the conditional is encased around [] to set up the arguments of the conditional. The second part is an if statement that allows you to compare the arguments against each other. If the if condition is met, then the case is executed.
While this may seem like you’re just writing another if-else statement, a switch case structure in Python is much easier to debug in the long run, while also giving you the flexibility to match other cases without the need of an explicit conditional.
While switch statements in Python are still in its experimental testing phase, the expected release date is October 10 2021 — so not too far off. Everyone is expected to migrate out of version 3.9 by mid 2022 as full support for that version is being discontinued.
Overall, pattern matching in Python switch statements is quite easy to understand once you have the syntax and general structure of how it works.
Writing maps and filters in Haskell can feel daunting. With Haskell being a strictly functional programming language, the process of thinking and implementing ideas and logic can feel a little strange — especially if you are coming in from an object-oriented background.
In this article, we are going to go over what maps and filters are, and how to write them in Haskell.
The first question we need to answer is: what is a map?
A map is a higher-order function that requires an array and another function. The other function is applied to the array and returns a new array, based on the application.
Mapping, in programming, can be considered as a process of transforming a set of data into something else based on what that something else defines.
A higher-order function is a function that operates another function. In Haskell, and a lot of other programming languages, mapping is a process of applying the map higher-order function on an array to transform it.
This brings us to the second question: why do maps matter?
When you’ve got a collection of things that you need to transform into something else, the process of doing each transformation individually can be time-consuming and repetitive. The process of mapping automates this process and condenses it down to a repeatable pattern that gets applied in a function and predictable manner.
So how do you write a map in Haskell?
When it comes to writing maps, Haskell takes a function and a list, then applies that function to every element in the list to produce a new list. Here is the syntax example of how it works:
map :: (a -> b) -> [a] -> [b]
Looks a bit confusing? Let’s take it one part at a time. The line starts with a function (a -> b), followed by a list [a] that this function is going to apply to. [b] is the new list, after it has been transformed by the function.
The function (a -> b) is an exact copy transformation from a to b, which means that the mapped array of [b] is going to be exactly the same as [a].
If we wanted our map to produce something else, we would transform our function (a -> b) to match our intention.
So what does this look like? Here is an example map in Haskell:
 module MapCube where
 mapcube a = map (^3) a
mapcube takes in the parameter of a , where it is then used by the map function against the function declared. So when we run our module, we will get our returned array as cubed results.
 :l MapCube
 mapcube [1,2,3,4]
mapcube[1,2,3,4] will return [1,8,27,64] as the new mapped array. This is because the function (^3) is applied to each value in the array.
Let’s take a look at another example of a Haskell map.
 module MapTax where
 maptax price = map (*1.15) price
In this example, the tax rate is 15% on top of the given value. So when we run it:
 :l MapTax
 maptax [12.45, 13.00, 45.65]
maptax [12.45, 13.00, 45.65] will return [14.32, 14.95, 52.50] because the function (*1.15) is applied to each individual array item that got passed in.
This is the general syntax for writing maps in Haskell. You can abstract the function out into another function like this:
module MapTax where taxrate n = n * 1.15 maptax price = map taxrate price
Writing it like this makes it easier to read, especially if your mapping conditions start to get longer and complicated. Based on the above, we know exactly what maptax is trying to achieve and how it’s going to achieve it.
It’s easy to get lost in our own code, which makes it even more important to name our functions in the most descriptive way possible. This allows the code to be naturally self-documenting and highly informative for the developer that comes after you.
Now that we understand how maps work in Haskell, let’s move onto filters. Before we start, we need to understand what a filter is in a programming context.
The point of a filter in programming is to take a section of code that matches against a certain criteria and return it. Unlike map, where the map function is applied to all items in the array and returned accordingly, filters in Haskell work by observing all the values it is given and deciding if it qualifies to be a returned value or not.
If the parameters of the qualification are not met, the value is not returned. Unlike mapping, when you filter something, the returned value cannot be reversed. This is because it omits the unqualified values from the original list, meaning that the data is lost once the filter has completed its iteration over the data set.
Like maps in Haskell, a filter is also another type of higher-order function that you can employ for your purposes.
Here is what a filter looks like according to Haskell’s documentation.
filter :: (a -> Bool) -> [a] -> [a]
Notice here that the filtered value doesn’t create a new array. In map, we see that [a] transforms into [b] via the syntax [a] -> [b]. However, in a filter function, [a] -> [a], which means that it replaces the original dataset completely.
So what does writing a filter in Haskell look like? Here is an example with an abstracted function:
module FilterExample where isEven n = n `mod` 2 == 0 filterme a = filter isEven a
isEven is the function that we pass into our filterme function. So when we run it:
 :l FilterExample
 filterme [1,2,3,4,5,6]
filterme [1,2,3,4,5,6] will return [2,4,6]. The function isEven sets up the filter condition and is applied accordingly against the given values.
Let us take a look at another filter function:
module FilterExample2 where filterme a = filter (==3) a
This filterme function takes one parameter and applies the conditional check of (==3) against every value that gets passed through. So when we run the following:
 :l FilterExample2
 filterme [1,2,3,4,5,6,5,4,3,2,1]
The expected return result of filterme [1,2,3,4,5,6,5,4,3,2,1] will be [3,3].
The main takeaway from how filtering works in Haskell is that it needs to evaluate to true in order to be passed into the returned result. This means that the filter function must evaluate to a Boolean.
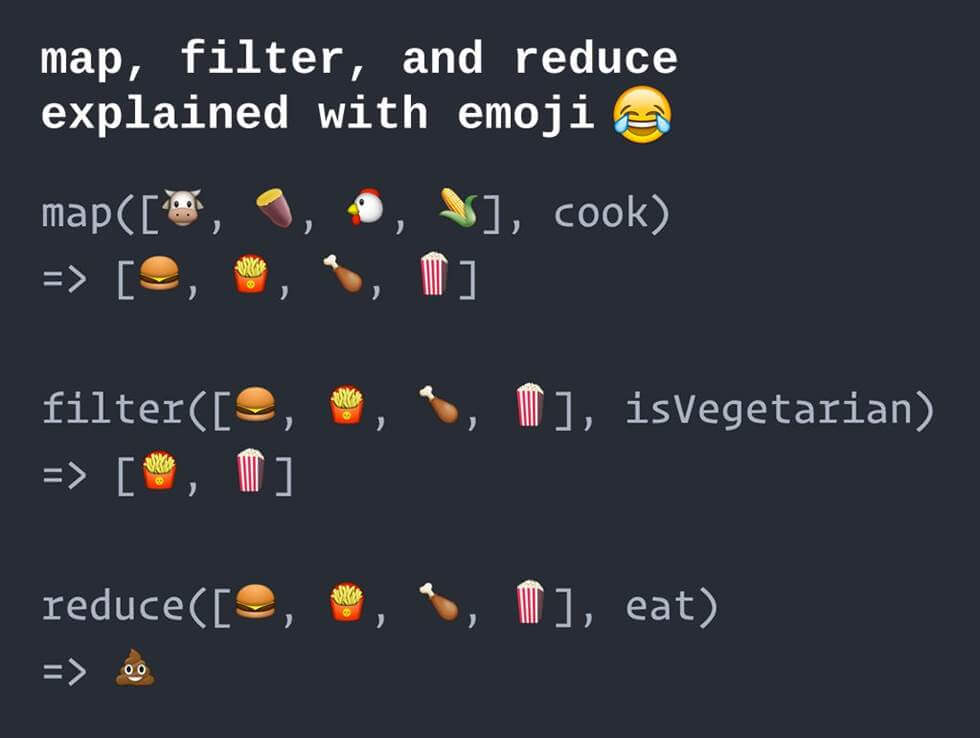
If you look at it, you can use map and filter almost interchangeably. Why? Because they both produce an array based on the parameters of the applying function. However, in map, the function is applied with an expected returned result, regardless of the outcome. In contrast, filter relies on a Boolean outcome.
Writing Haskell maps and filters isn’t hard once you get the general syntax down. Figuring out what you want as the end result and the steps to get you there is most likely the hardest part. You can create multiple levels of maps and filters, based on your required conditions. This means that you can mix and match maps and filters, as many times as you want.