There are two main methods of arranging JavaScript code – via a library structure or through a framework. But if you go deeper, you’ll find that the code is often constructed in a way that results in a module.
A module is a functionality that can be imported or exported. Sometimes it comes along in the form of 3rd party libraries. Sometimes it comes bundled with the framework you’re using.
Modules can be used in various parts of an application, bundled into or excluded in builds. However they are used and implemented, a module is essentially one of the many lego-like bricks that make up the pre-built functionalities of your application.
Node.js is a server runtime environment that runs JavaScript outside of a browser. Despite popular belief, node.js itself is not a framework. Rather, it’s the thing that allows frameworks and libraries to run.
For frontend applications, you can run a JavaScript application without a server by just opening the browser, in addition to a lot of manual configuration. Backend apps need a runtime environment to run.
Backend apps without an interface often come in the form of APIs or interact with the database.
Modules are clusters of code that are grouped based on functionality. They are highly self-contained, making them highly reusable and independent from one another.
When it comes to code, a way to import modules into your project is to use the require() function.
For example, to implement the third-party HTTP server module express, you can do so via your console. The node_modules folder is the default folder where all your 3rd-party libraries are downloaded to and served from.
To install, simply npm it.
npm install express
To import, create a const and call it in via require()
const express = require(‘express’);
To reference and use express, you can do so by initializing it.
const app = express()
app.get(‘/’, function(req, res) {
   res.send(‘Hello TabNine’)
})
app.listen(3000)
The functionality of package.json
Before we talk about the purpose and functionality of package.json, we need to have a clear understanding of npm.
npm is one of those things we use but may not actually know exactly what it does.
npm is a package manager.
A package manager is a piece of software that automates the installation, upgrading, configuring and removing things from the space it covers. For npm, this means installing, upgrading, configuring and removing libraries and frameworks, in addition to kickstarting runtimes like node.js via npm commands.
It saves you from manually having to code in all the different pathways and dependencies requires to make your JavaScript application run.
package.json is a json file that npm uses by default to identify the project and handle all the declared dependencies. It is used as a starting point by npm and the information contained in this file to fetch and coordinate the various JavaScript libraries (packages) required by an application to run.
You can create a package.json file via the console using npm init
When you run this command, it will give you a series of questions to answer via the console and generate a json file that contains a name, version, description, main (the entry point of your application), any scripts, the author, and license type.
If you decided not to answer the questions in the console and come back to it later, your package.json file should look something like this:
{
  "name": "tabnine",
  "version": "1.0.0",
  "description": "",
  "main": "index.js",
  "scripts": {
    "test": "echo "Error: no test specified" && exit 1"
  },
  "author": "",
  "license": "ISC"
}
By default, index.js is set as the main, but you can have it be whatever you want.
To add third-party modules into package.json automatically, run the --save flag when you install the module.
For example, in the above example, we used installed express for our project using npm. To have it added to our package.json, add the --save flag at the end.
npm install express --save
The --save flag essentially tells npm to save express as a dependency. If it doesn’t exist, it will create a new dependencies object in your package.json file that looks something like this:
"dependencies": {
    "express": "^4.17.1"
  }
Otherwise, npm will just add it to the dependencies object. By default, npm will look to your node_module folder to find the dependencies.
You can also use --save-dev to make a particular module only available in the development environment. When you use --save-dev, it will create or add to the devDependencies object, in the same manner as it did with dependencies and --save.

The dependencies object makes it possible to share code in an elegant and efficient manner. npm plays a pivotal role in keeping track of dependencies and version used. When you push and share code in a team setting via git, you’re only making the code created by your team available.
This saves you download and upload time, and coordinating between manual updates. To install and instantiate a working project on your local machine, you only need to pull the code and run npm install.
The package manager will use the meta-data inside package.json and figure out the rest for you.
npm, however, is not the only package manager available. In 2016, Facebook announced the release of Yarn, a package management client that runs of the npm registry.
The npm registry is a free and public registry for JavaScript modules. Since then, Yarn has become another major and widely used package manager. Yarn is backward compatible and follows the conventions set by npm for the package.json file.
This means you don’t have to worry if the dependencies object is called something else.
There are times where you may not want the modules to download into the node_module folder. Whatever the reason, there is no way to change it in npm as it is part of node.js’ core module loading system. If you were to change it globally, it may cause your packages to break.
However, yarn gives you the option to configure it. To do this, run the following command:
yarn install --modules-folder <path>
The package manager will do the heavy lifting required to make everything work smoothly. Alternatively, if you don’t want to keep specifying the path every time, you can create a file called .yarnrc with the following as a configuration.
# ./.yarnrc
--modules-folder lib
When you run yarn install, it will create a lib folder and install packages to it instead of node_modules.
Modules are foundational to building robust and reusable code.
Most major frameworks have a command-line interface that you can install via npm to scaffold out a barebone application such as the Angular CLI and Vue CLI. These generators will automatically create a package.json for you with the required dependencies to make things run smoothly.
For this reason, a lot of new developers tend to miss out on learning the importance of package.json and how it functions. Generators often take away the complexity of setting up and make the task of app development faster and more robust by generating scaffold code that’s modeled on an accepted standard.
package.json is a simple file that has the potential to turn complex as it grows. The dependencies object is only a small portion of what it can do and covers the scope of this article.
In theory, you can manually add each dependency yourself but using a package manager such as npm and yarn just makes your development flow a lot faster and easier. It also cuts down the potential for mistakes and errors.
It’s so lonely at the top of Olympus.
Zeus, the eternal king of the gods, faced some hard times while trying to maintain his reign. Hades nearly usurped his brother, Zeus, in a battle for control. As the battle raged, most of the the Gods took Zeus’s side, because who wants to mess a guy that shoots lightning, but some of the more disgruntled Gods took Hades’ side and the battle raged.
The back-end programming world is not unlike Mount Olympus. There is always a battle raging for supremacy, and in 2020, the battle still rages between Java and Python. And, like the ancient Greeks, most developers choose to “worship” one or two commonly used programming languages. However, unlike Ancient Greece, modern programmers are (slightly) more flexible.
There are coding polyglots out there who dabble in more than one back-end programming language, and do it using a single IDE. Some might call them blasphemers, we prefer to think of them as peacemakers.
If you happen to be one of those, and now looking to effectively program in Python (or Jython – a kind of mixture of both Java and Python) in Intellij IDEA – this post is for you! We’ve assembled a list of plugins that add Python coding functionality, and also to help you do it more efficiently.
Before we dive into Python support on Intellij IDEA, it’s worth mentioning JetBrains’ standalone IDE for Python and Django – PyCharm. With a free community edition of PyCharm available for download (much like Intellij IDEA Community Edition for Java development) it’s no wonder PyCharm is the most popular standalone Python IDE and is widely favored by the pros. It offers a simpler UI for project management, IDE settings and other features.
The main advantage of the Intellij IDEA Python plugin over PyCharm is its full range of Jython support features (cross-language navigation, completion and refactoring). PyCharm only supports Jython as the runtime for running applications. So if you’re using Java/Python integration in your project, PyCharm alone won’t get the job done.
Another reason why this relationship between JetBrains IDEs is relevant is the fact that the plugins supported in PyCharm are usually compatible with Intellij IDEA. This makes perfect sense as it is based on the same IDE framework by Intellij.
So let’s start with the basics: installing the plugin to enable Python support in Intellij IDEA.

To give your Intellij IDEA all the functionality of the popular PyCharm flavor of the JetBrains IDE all you need to do is install the official Python plugin by JetBrains.
The only thing to check before you download and install the Python plugin is the type of Intellij IDEA license you have. The Python plugin (that comes packaged in PyCharm) is compatible with the paid versions of Intellij IDEA (rather than the free community edition).
The basic plugin will give you smart editing for Python scripts, effectively expanding the functionality of Intellij IDEA to match that of PyCharm for all Python-related concerns and purposes. However, software professionals such as yourself have a few extra plugins up their sleeve to make you Python development on Intellij IDEA even more effective and productive.

As the name suggests, this plugin is a Python linter. It provides both real-time and on-demand scanning of Python files with Pylint from within you Intellij IDEA. Pylint is an open source project so it can be fully customized for your needs. In addition, Pylint has extensive documentation on the plugin website.

This handy little plugin is a smart alternative to the “Execute Line in Console” command. It automatically determines the number of lines to be sent to the Python console and is easy to access with a keyboard shortcut: alt shift A.
It’s worth noting that this plugin may become obsolete in the upcoming version of Intellij IDEA and PyCharm, as a request to implement it in JetBrains IDEs has been submitted in late 2019.
Not a Python plugin in the strict sense, Tabnine is programming productivity tool that helps you write better code faster.
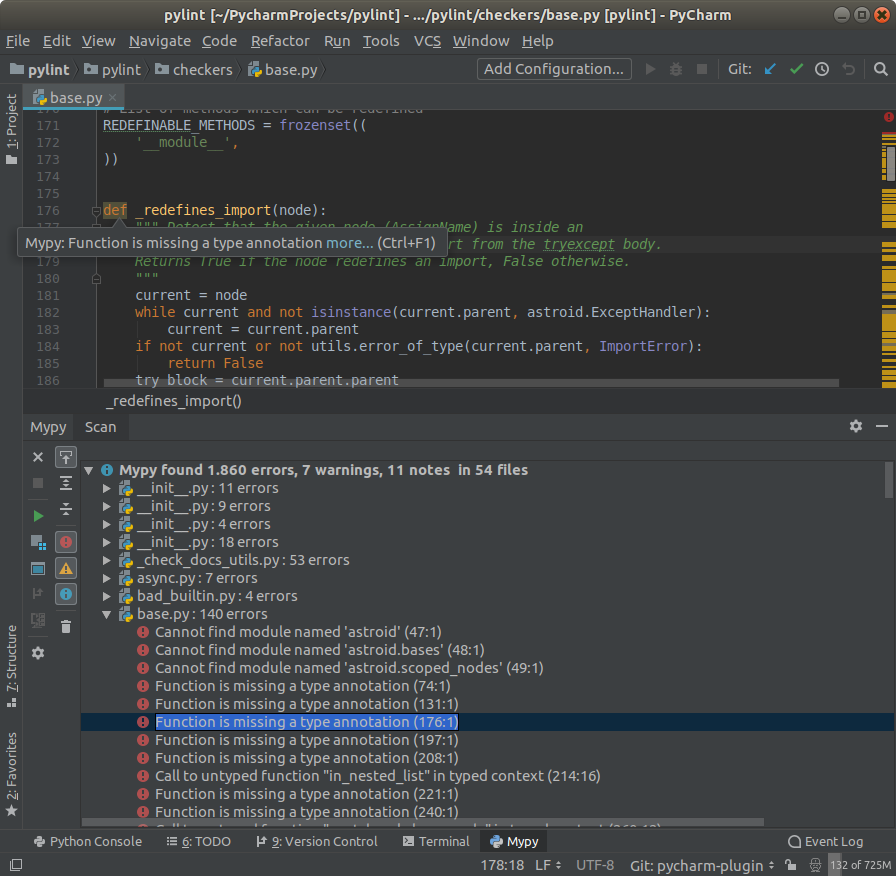
Mypy is an optional static type checker and source code analyzer for Python that aims to combine the benefits of dynamic (or “duck”) typing and static typing. Among others, it looks for programming errors, helps enforce a coding standard and sniffs for some code smells.
This plugin from the JetBrains plugin marketplace integrates MyPy into your Intellij IDEA. If you need some guidance, the MyPy website features extensive documentation to help you install and use MyPy to improve your Python code.
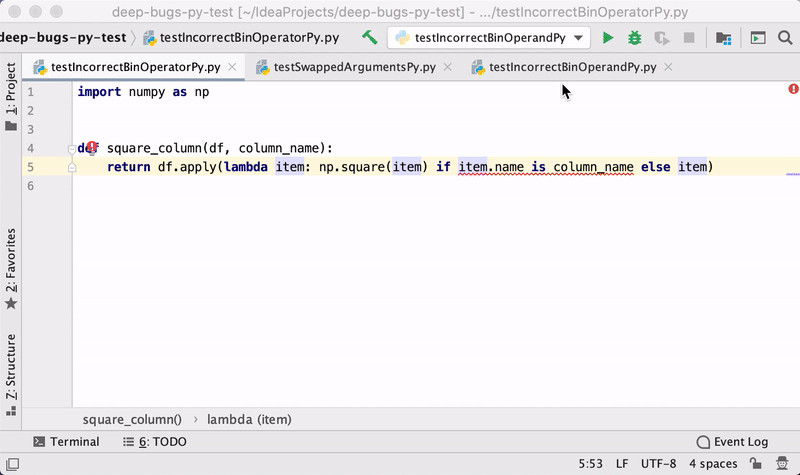
Developed by the JetBrains research division, this plugin promises to seek out potential bugs and quality issues in your Python code by using deep learning models. DeepBugs can detect bugs like incorrect function arguments, incorrect comparison, and others, based on extracted code semantics.

Why wait to run the program to see the magic happen? This plugin lets you run your Python code as you type it. It will display variable values, matplotlib, Pyglet, or turtle graphics in a dedicated panel on the right of your Intellij IDEA workspace.
This last plugin in our list is a handy collection of three inspections you can run on your Python code to attempt to detect potentially dead code and intentions for generating boilerplate code. This plugin will seek out potentially unused classes, functions (including methods) and names (in global and class-level assignments) in your code.
If you’re an experienced Intellij IDEA user, then you probably already have your favorite IDE plugins and theme installed. Just in case you don’t (or if you’re looking to expand your collection with a few time-saving productivity-improving gems), we’ve collected the top 21 plugins for Intellij IDEA. Our extensive list includes all you need to make the most of Intellij IDEA as a development environment – from AI coding assistants (like our own Tabnine plugin) to fun additions like the Nyan Cat progress bar.
Java is the oldest programming language that continues to grow in applicability. However you spin it, Java still offers flexibility, scalability and continues to power some of the most complex computing systems in the world.
Some try to build upon Java, attempting to create an alternative (like Scala and Kotlin) for certain use cases, such as android development. However, the ancient giant is not showing signs of retreat, and fortunately, Java is a rather gentle giant if you befriend it. How? By understanding that proficiency in the syntax and a nerdy shirt are not the only things you need to be a Java great developer.
There’s quite a difference between learning the core OOP principles of Java and being a good Java developer. The first is something anyone with access to the Internet can have in quite a short time. The second is a result of gained experience combined with a firm grasp of the design principles and conventions that make for efficient applications and code that is easier to maintain.
Note that some of the below concepts are relevant not just for Java but for most object oriented languages.

If you’re kinda new to Java, this short introduction to the most important core concepts of Java (and OOP in general) can serve as a great cheat-sheet on your path to more efficient and effective coding. If you’re a seasoned senior developer, this collection of the top 10 core Java software design concepts will be a wonderful reminder of what is important to remember.
I will only write this once: repetition is ineffective. Valid not only for Java, OOP or even programming, the DRY principle means simply “don’t repeat yourself”. To elaborate, it is stated as “Every piece of knowledge must have a single, unambiguous, authoritative representation within a system.”
As you probably know, one of Java’s main strengths is its efficiency in reusing code and resources, and this principle is just one of several to reflect that. You can avoid repetition by using abstraction, one of the four core principles of OOP.
In Java this means using interfaces and abstract classes that do more than save you keystrokes. In addition to helping avoid repetition, abstraction aims to “hide” internal implementation details. Such consolidation makes for code that is easier to read and maintain.
Another OOP principle for reuse and efficiency is polymorphism that favors the use of a common interface instead of concrete implementation. As polymorphism literally means having one thing take many forms, it allows for a single common interface to be used for a general class of actions. The use of a common interface allows for easier and faster integration of new requirements or features without manual changes across the codebase.
In Java, polymorphism is implemented with method overloading and method overriding. When various methods with the same name are present in a single class, method overloading takes place. The various methods, though identical in name, are differentiated by the number, order, and types of their parameters. When a child class overrides the method of its parent, method overriding occurs.
No less important than the efficiency of your coding is the protection of data stored in fields within classes from system-wide access. This is achieved through encapsulation – a virtual capsule for data and code within the class itself.
In Java, encapsulation can be implemented by keeping class variables and methods private by default and providing access to them via public getter and setter methods. An example of fully encapsulated classes are Java Beans.
In addition, encapsulation also has the added benefit of easing the testing and maintenance of code and several Java design patterns make effective use of it.
If you’ve ever had a group of friends help you move house you fully understand the importance of delegation. You simply can’t do everything by yourself, so when you can – delegate.
We’ll not get into the debate between delegation and inheritance or decide which is better. That being said, Delegation is an abstraction mechanism centralizing method behavior, which is similar to inheritance done manually through object composition.
In essence, the delegation design pattern lets a delegator object unload tasks to a helper object. A common implementation of this principle is in event delegation where events are sent to handlers.
The key advantages to delegation as a design principle is the reduction in code duplication, and the ability to modify behavior with greater ease than with inheritance.
This simple sentence, coined by Erich Gamma in the early 90s in Design Patterns: Elements of Reusable Object-Oriented Software (also known as the GoF – Gang of Four), is one of the most important design concepts in OOP in general and in Java in particular. And it is one you should apply in your code.
Programming to interfaces is a way to write classes based on an interface that defines the behavior of the object. Initially, it may seem like more work as you would first be creating an interface, then defining its methods and only then writing the actual class with the implementation.
However, using interface type on variables, return types of methods or argument type of methods in Java makes for flexible code that is also easier to test.

The last five in our list are the SOLID principles. They were first conceptualized by Robert C. Martin in his 2000 paper, Design Principles and Design Patterns, and were later enhanced by Michael Feathers, who also introduced us to the S.O.L.I.D acronym.
The main goal behind the SOLID principles is creating code that is easy to understand and maintain, with complexity reduced even as your application grows in size and scope.
The single responsibility principle (SRP) states that a class should only have one responsibility and only one cause to change.

This makes perfect sense (and so requires little explanation) as having multiple reasons for change in a single class will affect output and functionality, and cause your code to become an unmaintainable mess.
Though the name sounds very self-contradicting (how can something be open and closed at the same time?) it’s actually very simple and logical. The principle states that entities or objects should remain open for extension, but remain closed for modification.
In Java, this means that classes, methods or functions should be open to the addition of functionality, but closed to the alteration of previously tested and functional code. Except, of course, if one discovers it is not as tested and functional, and bugs need fixing.
The Liskov Substitution Principle (LSP), introduced by Barbara Liskov back in the late 1980s is perhaps the hardest one to explain in our list. Probably because its definition is very mathematical and somewhat confusing.
Let Φ(x) be a property provable about objects x of type T. Then Φ(y) should be true for objects y of type S where S is a subtype of T.
When translated to plain English the principle suggests that any class that is the child of a parent class (subclass) should be usable in place of its parent (superclass) without any unexpected behaviour. So an overridden method of a subclass must be able to accept the same input parameter values as the method of the superclass.
In my personal opinion, it is actually best explained by this meme:

According to the Interface Segregation Principle (ISP) a client should not be forced to implement an interface which it won’t be able to use. In other words, larger interfaces should be split into smaller ones to ensure that implementing classes only “care” about the relevant methods.
Though this initially can sound like more coding work, it’s actually efficient because it reduces dependency complexity because it prevents the client from depending on a certain thing that it doesn’t actually need.
The principle of Dependency Inversion (DIP) states that high-level modules should not depend on low-level modules and instead both should depend on abstractions. In addition, abstractions should not depend on details but rather it’s the details that should depend on abstractions.
When following this principle, high-level modules remain independent of the low-level module implementation details.

Clean, efficient and maintainable code is not that hard to write, and is usually worth the effort. Not only because applying battle-tested software design patterns will make it easier for you to enhance and develop your application, but also because one day someone else might have to. And you never know just how far frustration with your coding practices may take them.