Text editors are one of the most basic must-have tools in the arsenal of every developer. However, whether you choose Vim, Atom or Sublime Text, one thing is certain: you will need plugins to get the functionality you want.
It doesn’t even matter if you’re a web developer or Python coder. If you want to enhance your text editor to be a comfortable tool for coding? You’ll need to download and install plugins or extensions.
When it comes to Sublime Text, there’s a good reason for its popularity among its peers. It packs quite a few built-in features that make this lightweight cross-platform tool loved by many despite its license cost.
The features Sublime Text 3 (the latest commercial version) offers developers include GoTo definition, a command pallet, split editing and a list of handy preset keyboard shortcuts. However, if you need more than markdown support and spell checking for text? You’re going to have to turn to plugins (also known as packages) for your Sublime Text.
It’s worth noting that our list of our favorite Sublime Text plugins is fairly versatile and is (mostly) random in order. Our list of the top seventeen Sublime Text packages has something for everyone with both general packages and extensions aimed at developers in specific languages or stacks.
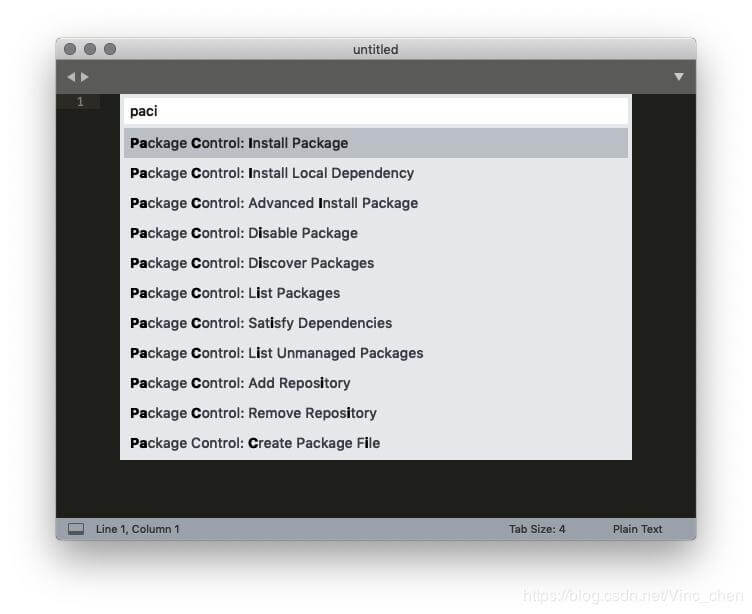
Before you can install any packages to extend the functionality of Sublime text, you will need a package manager. This makes Package Control the most essential plugin for Sublime Text.
As the name suggests, Package Control lets you install, download and update packages in Sublime Text. It includes a list of over 2,500 packages available for installation. Not only that, but you can add any GitHub or BitBucket repository as a package.
Package Control will also automatically update packages installed to minimize the time you spend on maintenance. That way you can focus on the actual coding and package update hunting for Sublime Text.
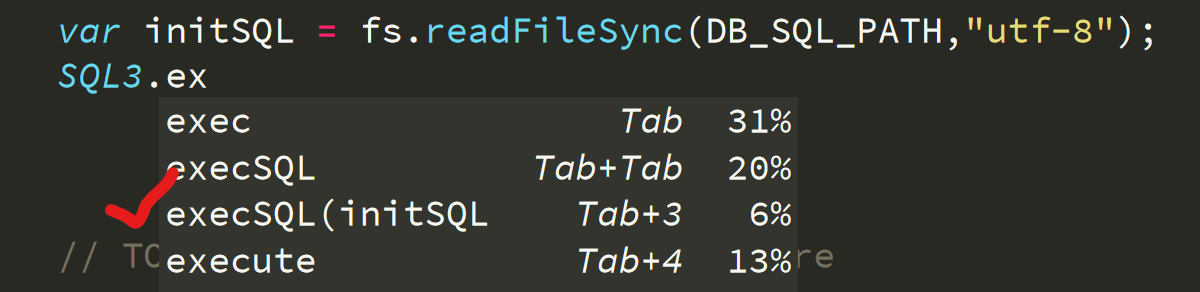
Our own AI-powered predictive code completion solution has its own Sublime Text plugin available. It replaces the native Sublime Text auto completion feature with a far more comprehensive solution.
Tabnine indexes your entire project by reading your .gitignore or others, and determines which files to index. With that data, it can predict long file names before you type them by leveraging a mnemonic completion engine with near-instant suggestions as you type.
[cta_btn url=”https://www.tabnine.com/pricing/landing” label=”Start a free trial”]
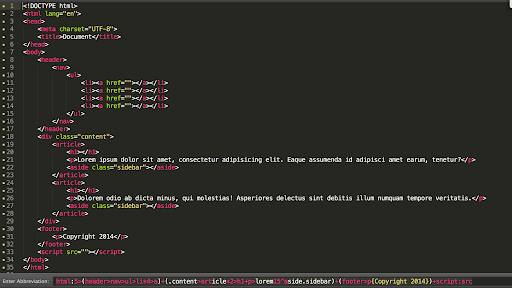
If you’re a frontend developer odds are you are familiar with Emmet regardless of the editor or IDE you use in your day to day coding. Emmet streamlines work with HTML and CSS, in essence helping you type a lot less. It lets you use abbreviations that automatically deflate into fully functional code. You can then interact with the resulting code snippets to add tags and make other changes.
As expected, Emmet is available as a downloadable Sublime Text package from the Package Control extension.
Though this plugin is quite out-of-date and was originally created for Sublime Text 2, it continues to maintain a steady stream of downloads on packagecontrol.io
Alignment is a useful tool for aligning multiple sections or multi-line sections. It’s a simple keybind package that aligns your selection when you type ctrl + alt + a on Windows, or cmd + ctrl + a on a Mac. Of course, you can assign different delimiters to save keystrokes and time.
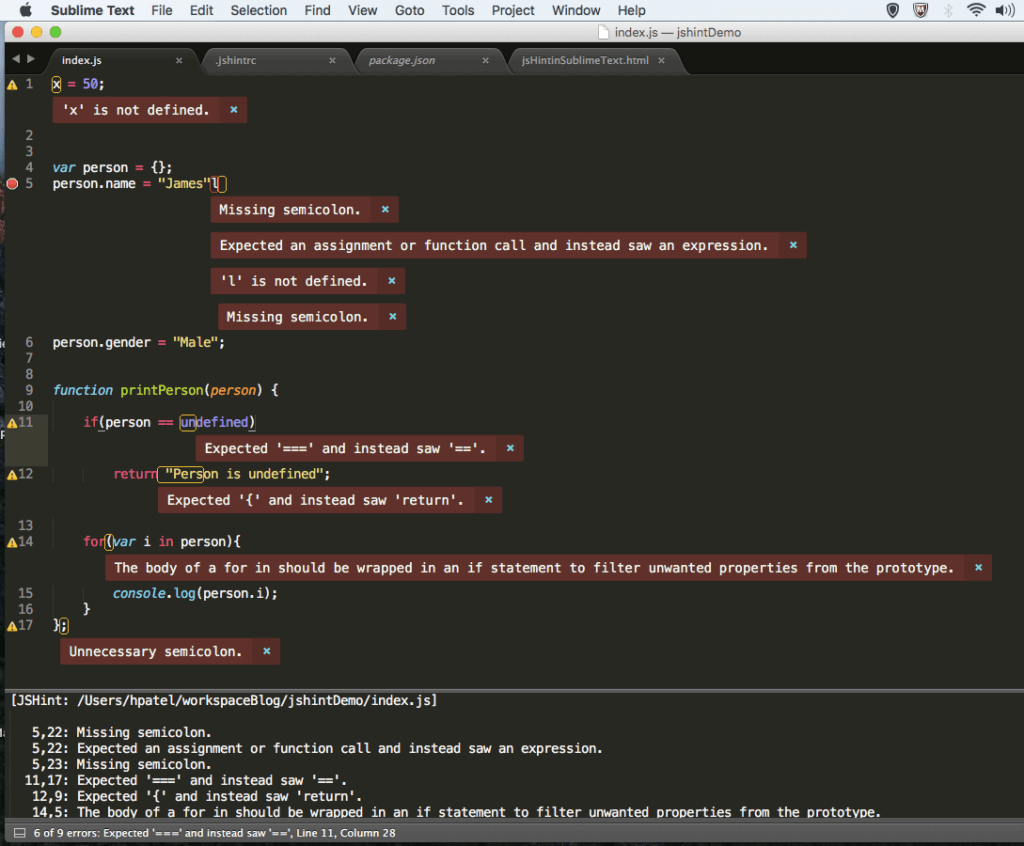
Code quality matters. We don’t need to tell you that. When it comes to JavaScript development, one of the solutions every JavaScript developer should know is JSHint.
JSHint is an intuitive extension that adds JavaScript debugging capabilities to your IDE or text editor of choice. Of course, there’s a package to integrate it with Sublime Text.
When installed and run, JSHint opens in a new window where it displays potential errors and problems in your code. If you want to see it in action, you can play around with the web-based version on the JSHint website.
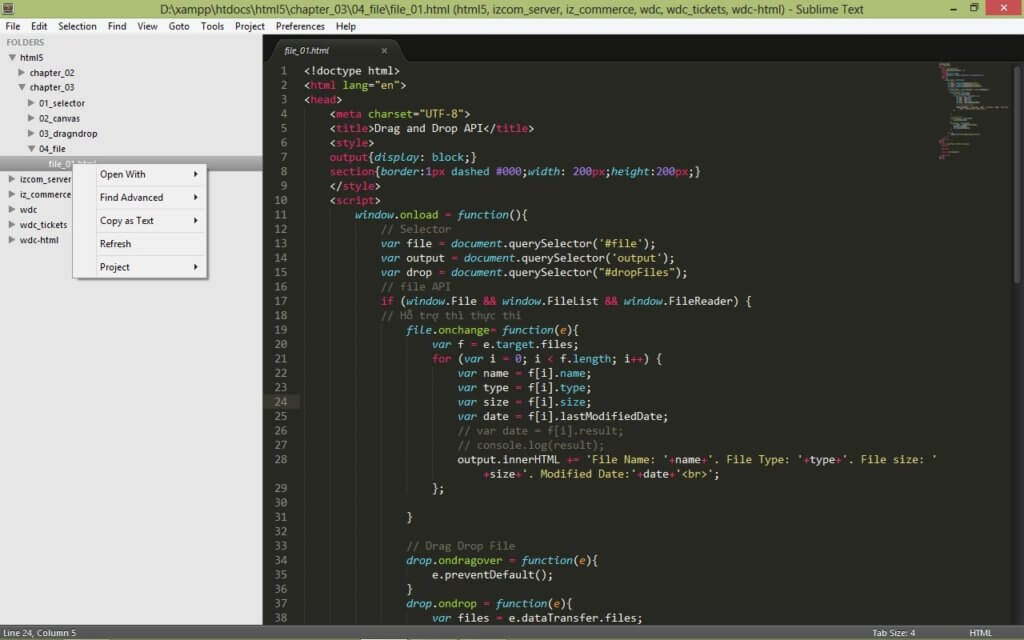
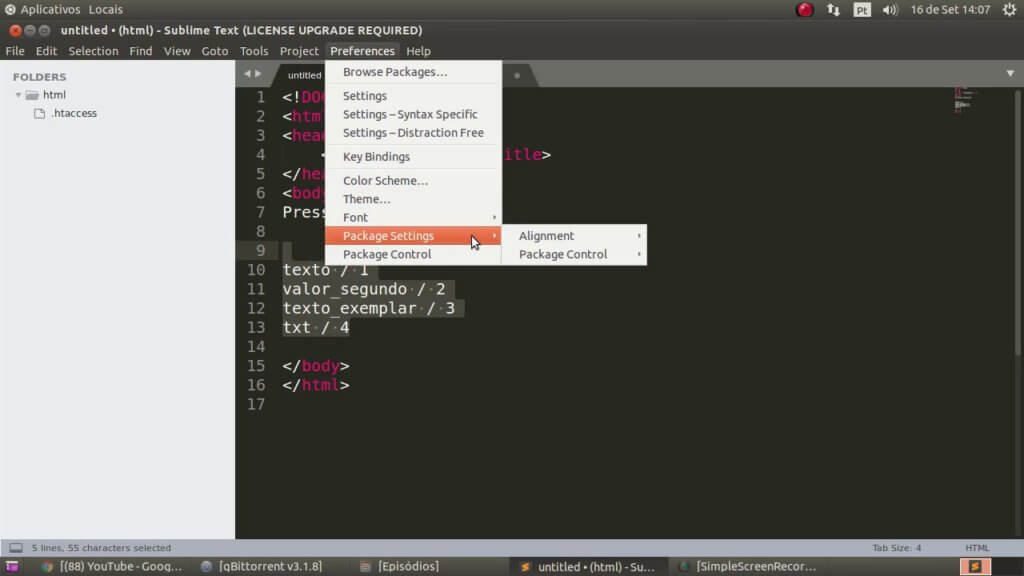
Provides enhancements to the operations on the Sidebar of Files and Folders for Sublime Text. Among other functions, it sets delete at “Move to Trash”, adds an “Open with…” option, as well as a plethora of actions you can perform on files and folders without closing Sublime Text to perform actions on files.
It’s worth noting that SideBarEnhancements is not only one of the top downloaded packages, but is also well maintained on GitHub.
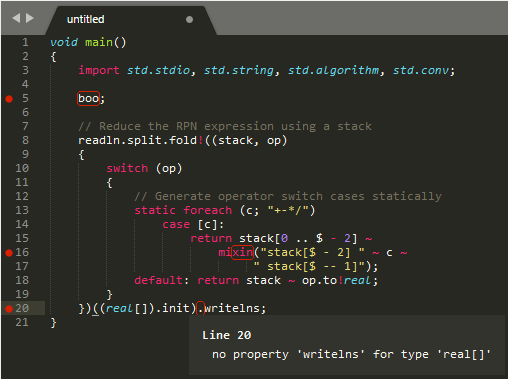
SublimeLinter is a plugin for Sublime Text that provides a framework for linting code. One of the most downloaded packages available for Sublime Text (up there in the top 25), SublimeLinter does not actually lint all by itself. To perform linting on your code, you’ll also need to install the package suitable for the language or languages you code in.
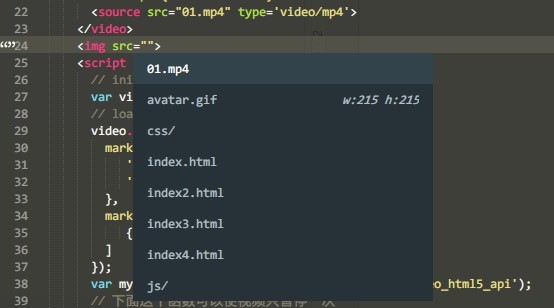
Though it may sound like a small change to your workflow, automatic completion of filenames in your code can save you quite a lot of time and typing. Once installed, all you need to do is type Ctrl+Space when trying to link to a file. AutoFileName will then bring up a list of files and directories that you can easily browse through and select.
To make things even more efficient, you can customize AutoFilename to automatically appear upon pressing / . Even fewer keystrokes!
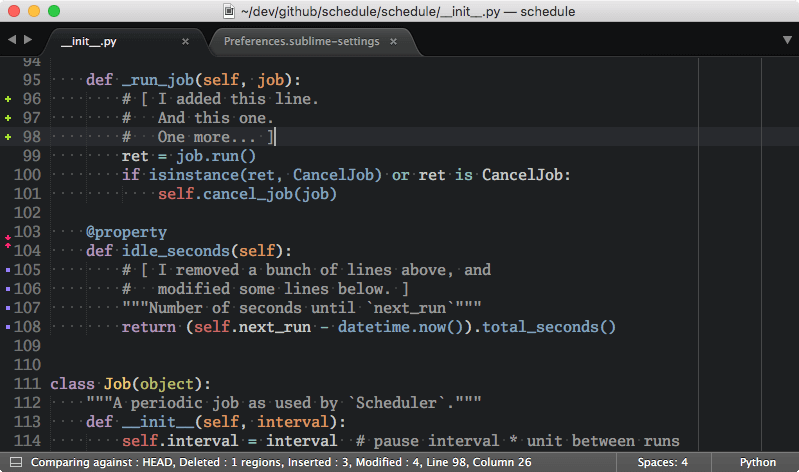
GitGutter is a Sublime Text plug-in that shows information about files in a git repository in a way that draws inspiration from Atom.
As the name indicates, it will show you Gutter Icons to indicate inserted, modified or deleted lines. Hovering over the icons will bring up a Diff Popup with details about modified lines. You can then navigate between changes and perform commands on each change.
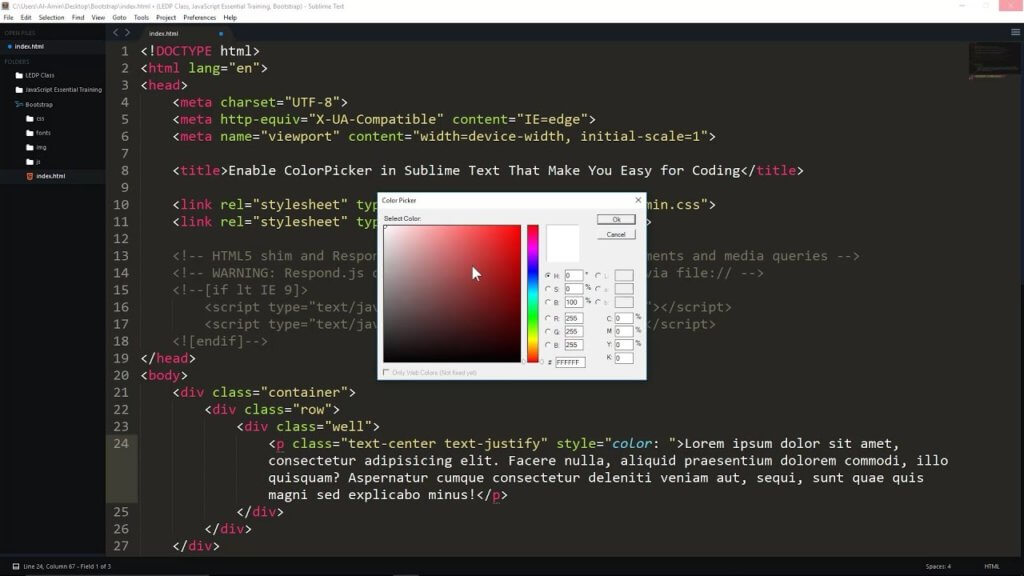
Does exactly what the name says by adding a color picker dialog so you can insert or change color references in your code with ease. To open the color picker, simply type cmd+shift+c on a Mac, or ctrl+shift+c on Windows or Linux. The default setting is to insert the hexcode in uppercase, but you can customize it to insert lowercase in the package settings.
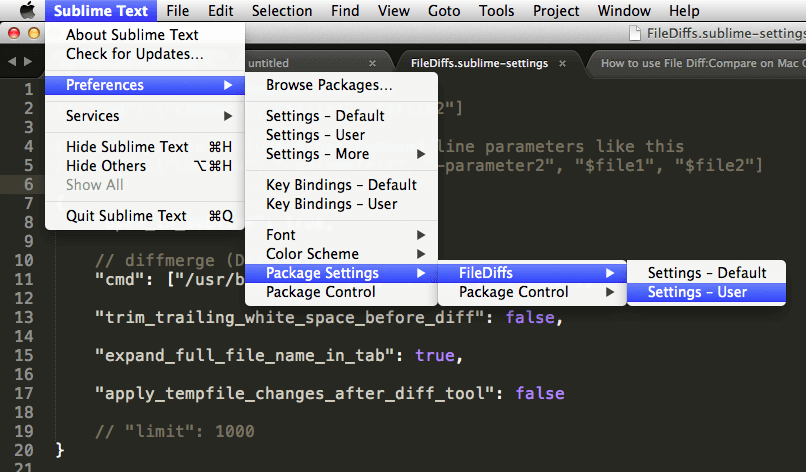
Who touched your files and what did they do? The who is less critical than the changes made, which is where the FileDiffs plugin package comes in handy.
Instead of manually digging through the git repository history or (Gods forbid!) the content of files, you can use FileDiffs. It will show you the differences between the current file, or selection(s) in the current file, and clipboard, another file, or unsaved changes. FileDiffs can also be configured to work with external diff tools in Sublime Text.
When you work with code, brackets and tags can be an endless source for bugs and compilation errors. This makes Bracket Highlighter a must-have plugin package for most Sublime Text users.
Bracket Highlighter matches a variety of opening and closing brackets such as: [], (), {}, "", '', <tag></tag>, as well as custom brackets and tags.
It’s worth noting that the Emmet plugin mentioned above does add some bracket highlighting features. That said, if you’re looking for a more customizable and comprehensive tool – Bracket Highlighter is your plugin package.
GitHubunator is a package that will allow you to select text in a Sublime Text file, and see the highlighted lines on a remote GitHub or BitBucket repository. All you need to do is highlight the text you want to search for, then right click to open the context menu. You can then launch the corresponding Github or Bitbucket web page in your default browser.
ChangeQuotes converts single to double or double to single quotes while attempting to preserve correct escaping. To run it, place the cursor anywhere inside the quoted text then open the command palette to run it.
Finding the right theme and syntax highlighting style is a matter or trial and error. For those who want to look beyond the default themes built into Sublime Text, Themr is the plugin you seek. It allows you to quickly and easily cycle forward, backward, or randomly through your available UI themes using the command palette or keyboard shortcuts.
You can also add new themes and keep them organized and saved as presets. You can even assign keyboard shortcuts to quickly access your favorite themes.
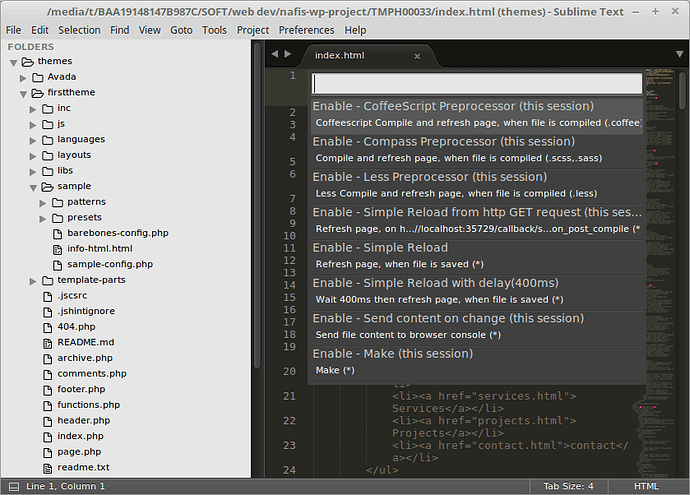
A small but necessary plugin for most web developers is LiveReload. Instead of having to refresh your browser every time you make a tiny change to a file in order to see results? LiveReload will simply sync with your browser of choice and instantly display the updated results.
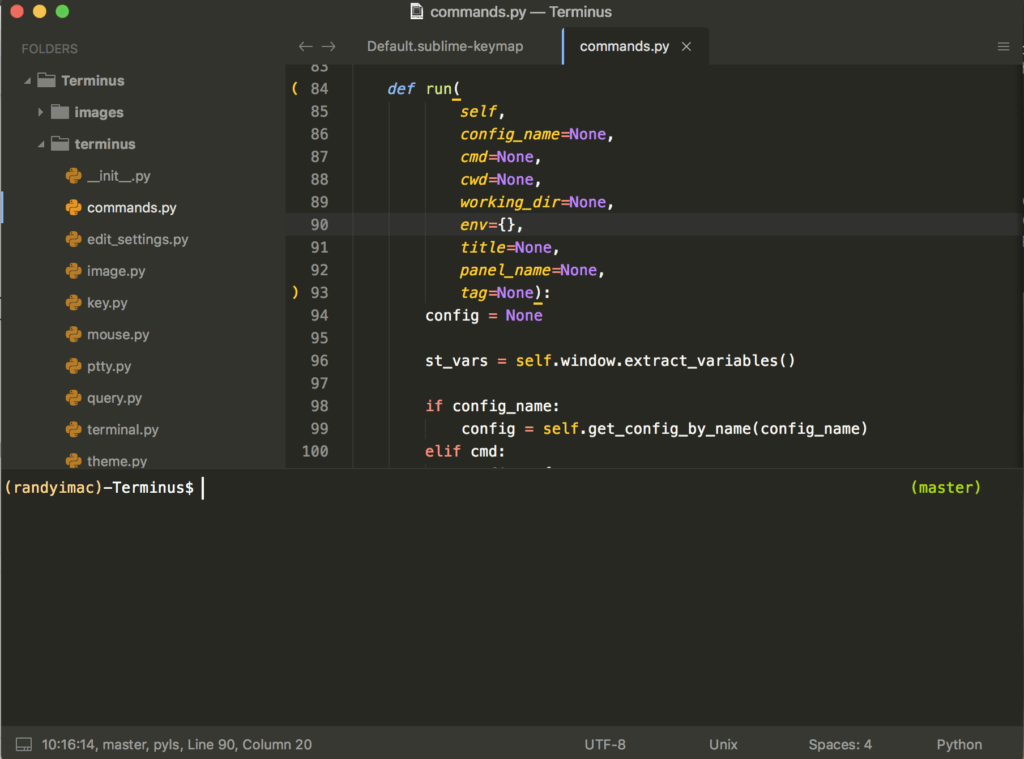
Last but not least, a Sublime Text plugin that optimizes the usage of terminal features. This useful plugin creates the keyboard shortcuts and menu entries you can use to quickly open a terminal no matter where you are. So for example, you can run terminal at the position of the file currently edited, or jump to the project root folder.
This list is by no means comprehensive. In fact, at the time of writing, there are just over 5,000 packages available for download from packagecontrol.io alone! So there’s no doubt that we’ve left out a few plugins and extensions you simply can’t live without. Which is it?
Kotlin is part of the new generation of languages that are gently gaining big traction against big names like Java and C++. Kotlin was designed and developed by JetBrains as an open source and statically typed programming language. Over the past few years, Kotlin has grown to become the main language of choice for Android developers, with Google advocating for it over Java nowadays.
The idea of coroutines is not new. It’s a concurrency pattern that allows you to achieve multiple processes at once. Coroutines can be found in JavaScript, Java, Clojure, C+, C++, PHP, Python, Ruby, and Swift, to name a few.

However, they may not be called a ‘coroutine’ directly, but the fundamentals of what a coroutine achieves is similar, if not exactly the same. Kotlin’s ideological implementation of coroutines borrows heavily on these languages that have an established experience in it.
But what is a coroutine?
A coroutine can be broken into two parts – co and routines. The co part represents the word cooperative and routines refers to functions.
Kotlin works in a serial fashion, meaning that a function cannot move forward if it relies on another function to give it some signal or data. The control flow shifts to the second function, giving it total power and the ability to hold an application hostage. You cannot negotiate the power away from the second function, making the process of running your app tightly coupled to the expected return.
With the introduction of coroutines, Kotlin is able to implement asynchronous code and achieve concurrency. This means that your Kotlin code has the ability to form layers, allowing for things to run in parallel with each other.
Cooperative functions become a possibility for Kotlin as coroutines allows the transfer of control via exit points, allowing for effective recursive loops to occur.
In part, it’s because coroutines are cheaper when it comes to memory than threads, making it more efficient on the machine it’s expected to run on.
For Kotlin, coroutines lets you write asynchronous and non-blocking code (that is, your code can continue to execute without having to stall and wait for things to complete).
In IntelliJ IDEA, start up a new Gradle project and follow through with the wizard set up. In your build.gradle file, you need to make sure it’s configured for Kotlin 1.3 or higher. Coroutines isn’t supported in previous versions before Kotlin 1.3.
Your plugins settings should look something like this:
 plugins {
     kotlin("multiplatform") version "1.4.0"
 }
It’s good to note that multiplatform can be replaced by other targets such as the jvm or js for JavaScript. For now, multiplatform will work for the purposes of this tutorial.
Coroutines is a library in Kotlin. This means that you’ll need to import it as a dependency. Here’s a sample code of what that looks like:
dependencies {
    ...
     implementation "org.jetbrains.kotlinx:kotlinx-coroutines-core:1.3.9"
 }
Implementing this dependency will bring in kotlinx.coroutines library. You also need to add it to Bintray JCenter repository.
repositories {
     jcenter()
 }
Now you can start writing your coroutines inside src/main/kotlin
In a way, it’s like a light-weight thread. It can run in parallel, wait and communicate to each other. The easiest way is to think of them as functions that can be run in an asynchronous manner.
The major difference between coroutines and threads is to do with how memory is allocated. Coroutines simply has a cheaper memory allocation, therefore making more efficient by default.
Let’s pretend we have an orders list that we can fetch using an API. So the function used to fetch the data can look something like this:
fun fetchOrders(){
     val array = api.fetchOrdersList()
     updateUI(array)
 }
If you do this on the main thread, your app will certainly crash. Another way is to wrap this inside a thread. Then you start facing a life-cycle management issue. So we start using callbacks with subscriptions.
Next thing we know, we end up with code that looks like this:
fun onDescript(){
     subscription1.cancel()
     subscription2.cancel()
     subscription3.cancel()
     subscription4.cancel()
 }
It’s a special kind of callback hell – long, unnecessary and somewhat tedious. Coroutines solves in Kotlin what async support did to JavaScript. It runs in the background as lightweight threads while allowing you to execute tasks relating to the background or UI changes.
To turn your function into a coroutine, use suspend.
suspend fun fetchOrders(){
     val array = api.fetchOrdersList()
     updateUI(array)
 }
And that’s it.
You might be asking yourself – surely, there has to be more to it than this. Indeed, you are correct.
You can also write a coroutine using withContext, which will let you specify which thread you want to execute on. Kotlin has three types of dispatchers available and they are:
So writing your coroutine using withContext looks something like this:
fun fetchOrders(){
     withContext(Dispatchers.IO){
        val array = api.fetchOrdersList()
        updateUI(array)
    }
 }
Alternatively, you can write a coroutine using launch. What launch does is start a coroutine without blocking the current thread and returns a reference to the coroutine as a Job. Jobs can be cancelled if required to stop the execution of that particular coroutine.
Writing launch looks something like this:
  launch {
      val array = api.fetchOrdersList()
      updateUI(array)
 }
By default, this will run on main and the context of the parent. You can specify dispatchers to determine which thread your launch coroutine runs on. This can look something like this:
   launch(Dispatchers.IO){
      val array = api.fetchOrdersList()
      updateUI(array)
 }
At some point, you might want to cancel the coroutine because you don’t need it anymore. It’s important that you cancel any coroutine you’re not using because it helps free up resources from unnecessary socket connections.
We have three flags that we can use to verify the status of a coroutine and they are:
isActive – will return true if the function is still completing the states of a coroutineisCompleted – is false by default and will flip to true when all the parent and child jobs are completedisCancelled– this is also false by default unless an exception occurs or you cancel it. Only when one of these two things happen, it will flip to true.Canceling a coroutine looks something like this:
//hypothetical coroutine setup
val scope = CoroutineScope(parentJob)
val customerListJob = scope.launch{ ... }
val orderListJob = scope.launch{ ... }
//canceling coroutines in the scope
scope.cancel()
That’s the basics of coroutines, what they are, how they work and how to write them.
If you’re already familiar with concepts like async and concurrency, writing coroutines should be a simple task to pick up. The alternative to achieving asynchronous in Kotlin is to use RxJava – a library that allows for easier termination of subscriptions when activities end.
Terminating subscriptions is something we all learn early on to prevent memory leaks and wasted resources. This is one of RxJava‘s jobs. The same idea can be applied to coroutines. While the scale and severity is not as high when it comes to coroutines, it’s still good practice to make sure that your coroutines are cancelled properly.
While the idea of coroutines is not exactly revolutionary or new, it’s implementation in a Kotlin context is. The ability to use coroutines in Kotlin means that the language has another tool up its curly braces for us to use. Any additional functionality and features that are based on time tested methodologies is a welcomed addition when it comes to Kotlin.
Kotlin is quickly becoming one of the most popular programming languages. Most programming bloggers now recommend Kotlin as one of the must learn languages of 2020.
But before we go into why this makes Kotlin multiplatform special, we need to dig into what multiplatforming is.
The idea of multiplatform is not new. It applies only to the compilation time and once that process is completed, nothing else really matters.
Unlike scripting languages like JavaScript, Python, and Ruby, Kotlin is a programming language. This means that there is no pre-existing interpreter available to turn your code into what you want it to be. A programming language is executed differently from what we’re used to, if you’re coming in from a web development perspective.
When we say the words ‘mobile’ and ‘multiplatform’ in the same sentence, we often associate with third party libraries and frameworks that create structures that wrap around the code to create native applications. However, if you look at the actual code, it’s all still JavaScript under the hood.
Non-browser based applications are a bit different and require translation to run on the machine it exists on. The exe files you see on your computer is a packaged set of translated source code that is compatible for your particular device. This translated code often boils down into machine code.
For multiplatform scripted-based outputs, the wrapper often creates a mini translator
For multiplatform scripted outputs, the wrapper often creates a mini interpreter to make your produced view possible. The code is not truly ‘native’, in that the actual code is sitting inside a generated construct that’s forcing it to work. Kotlin, however, creates true native code and is able to separate itself from platform specific things.
For a lot of other multiplatform languages, frameworks, and libraries out there, the act of committing to it can be a costly exercise. In part, it’s because they tend to lock you into their ecosystem. This means if you code in something like React Native or Flutter, your entire app is often stuck inside it. It’s the same with wrapper JavaScript based libraries.
You can’t exactly pick and choose what goes where.
Not only that, when using React Native or Flutter you’re often tied to certain UI restrictions and accessibility to native platform features are limited based on the language, library or framework’s support and the size of its ecosystem. This means that if that if your particular chosen language falls out of favor, or the ecosystem doesn’t grow as quickly as you need to in order to cover new features and functionalities, you become instantly disadvantaged.
This is why Kotlin is different to Flutter, for example. Kotlin doesn’t lock you in through an entire application. It focuses on a logic first approach, meaning that your application’s business layer is cleanly separated from the UI. This is important because modern applications tend to focus on a UI first approach, with business logic and rules tightly coupled into the interactions.
This causes a problem for creating truly multiplatform apps, especially in the mobile space. There are major differences in native UI defaults between iOS and Android, and navigating between the two can be difficult. When the code becomes tightly coupled with the UI, it requires sweeping changes to make it compatible and efficient for that particular platform.
Kotlin’s multiplatform approach creates an enforced modularization, forcing you to write your applications in a way that shields you from the allure of creating pixel perfect widgets. Rather, you are thinking about how all the pieces are going to fit together, dealing with how to call in external services, querying APIs, organizing returned data, and dealing with the kinds of interactions you want to achieve.
While the UI is the thing that interfaces with the user and creates the most impact, an app’s ultimate usefulness is determined by the logical rules it wants to implement. The separation of UI and logical layer makes Kotlin a less risky option than fully committing to something like React Native, because you can pick and chose what you want and integrate it with native app languages if required.
Kotlin’s allowance for hybridization results in a flexible migration for existing applications, whilst creating a high level of reusability between different types of developers. This is a useful feature for when we operate in two separate teams – one of Android and one for iOS – as it allows developers to share knowledge domains and reduce duplication of native code.
Kotlin is the common code between Android and iOS. However, you might want to work with your Kotlin code in Android Studio. Here’s a quick guide on how to get started with Kotlin in Android Studio – which is an alternative and free way of creating Kotlin code.
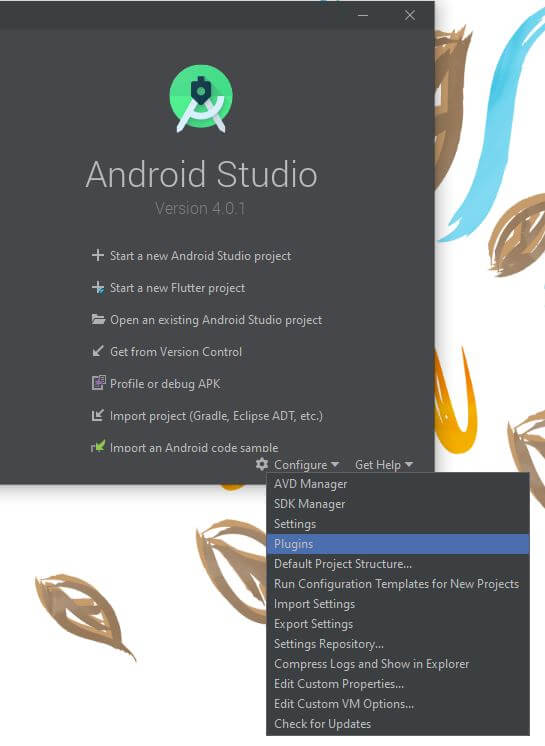
First, open up your Android Studio, click on Configure and select Plugins.
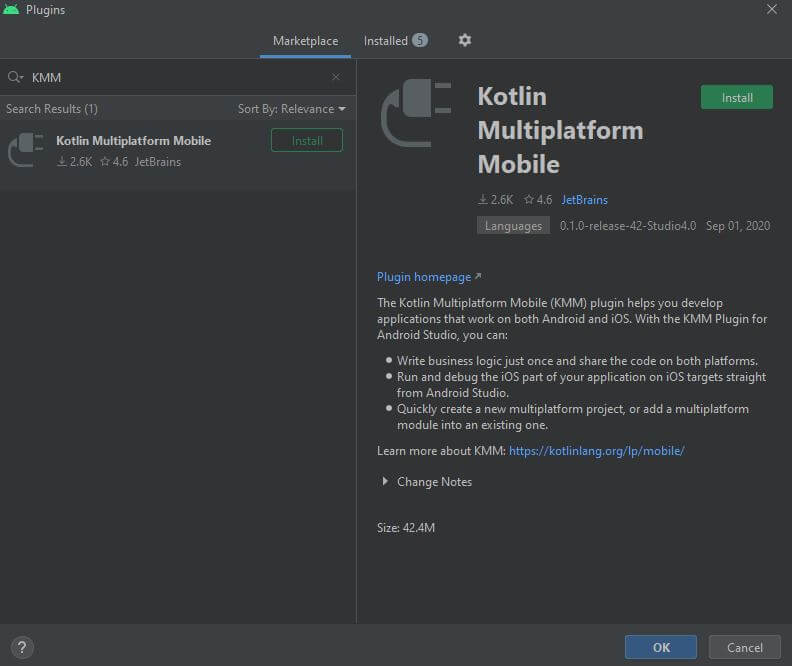
Select Marketplace and search for KMM. This stands for Kotlin Multiplatform Mobile.
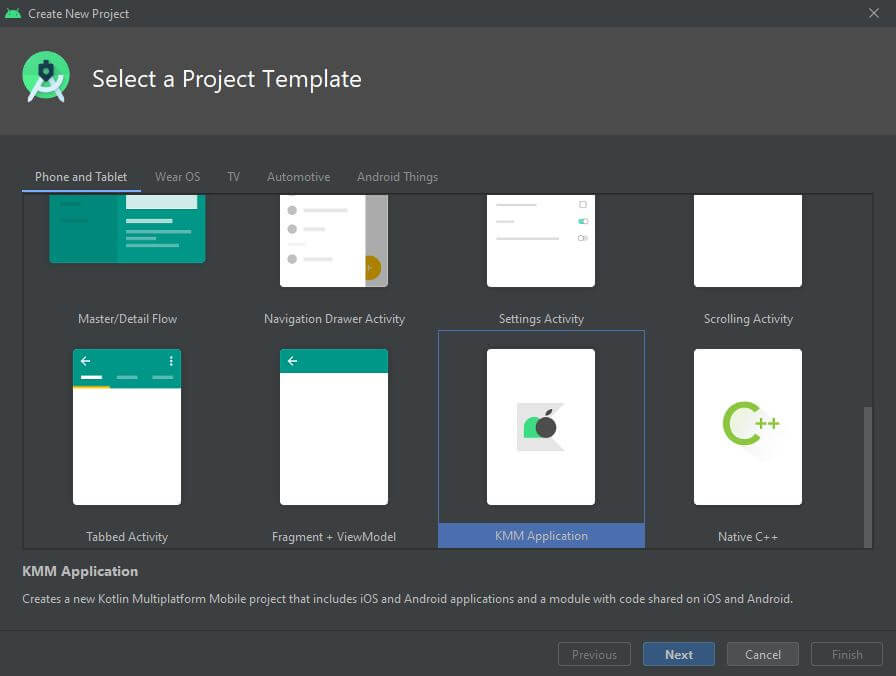
Once that’s done, it’ll prompt you to restart the IDE. Start a new Android Studio Project and in the Select a project Template section, select KMM Application. You might need to scroll down to the bottom to find it.
Give your project a name, select the minimum SDK support, save location and package name.
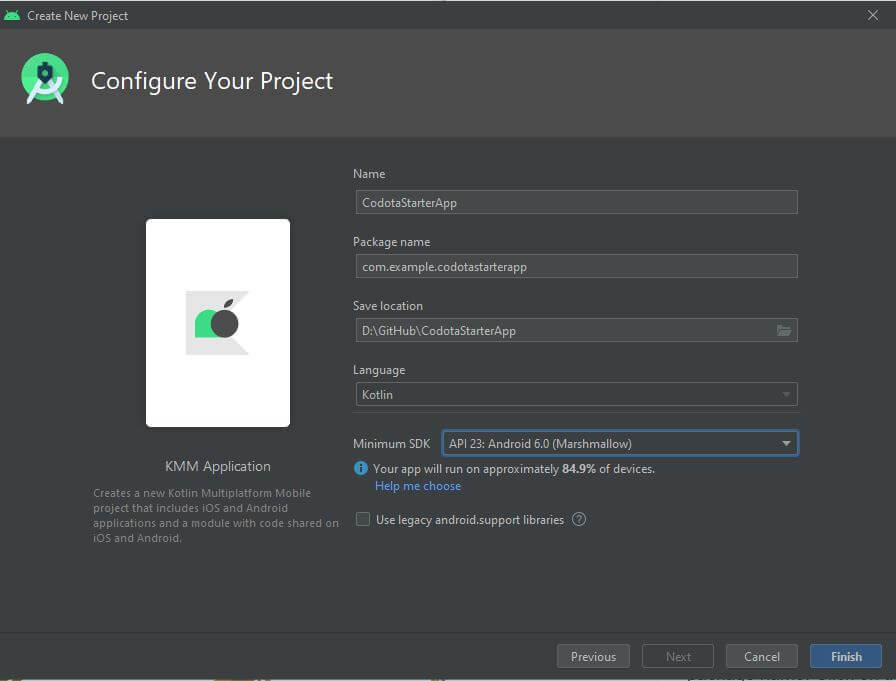
Click on the finish button and viola! You now have the barebones set up for Kotlin.
This setup is for writing an entire mobile app in Kotlin. However, if you only want to write libraries, Visual Studio Code also has a plugin that supports Kotlin.
To get Kotlin to work in Visual Studio Code, you’ll need two plugins: Kotlin Language and Code Runner. Open up your VS Code, head over to plugins and install it.
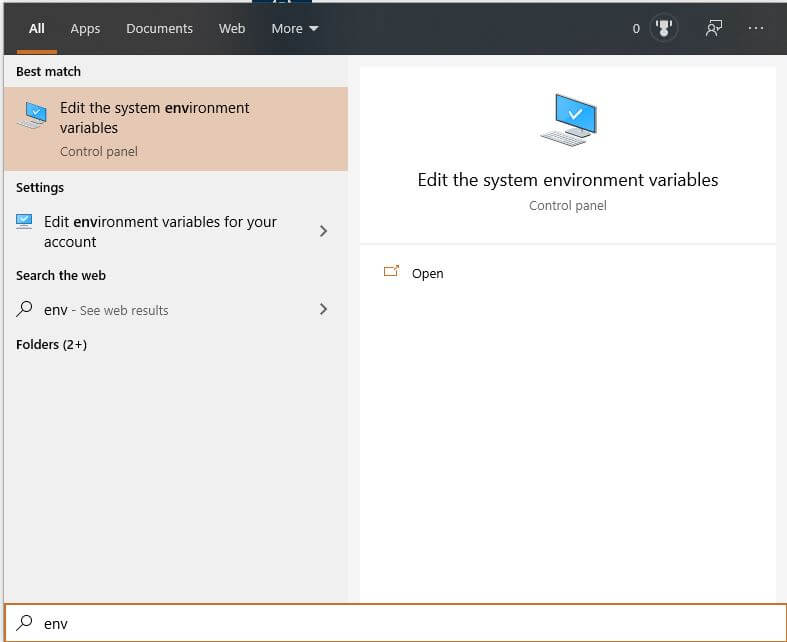
Next, add Kotlin and Java to PATH. This will let you run Kotlin and Java from the command line. To add a PATH, do the following:
env. Choose Edit the system environment variables.System Properties panel. Select Environment Variables.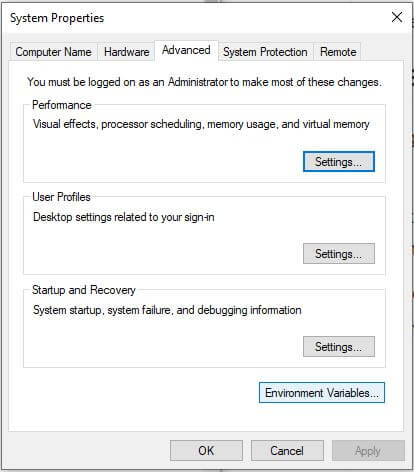
System variables, scroll down until you find Path. Click on edit.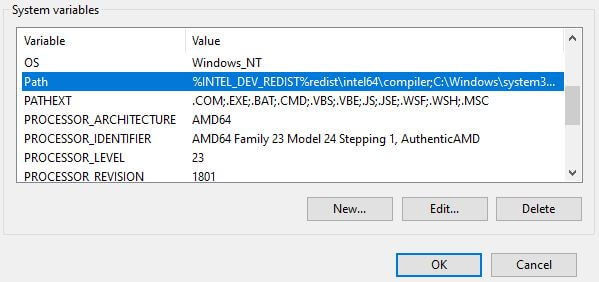

You can now run Kotlin in VS Code. To test that everything works, create a new folder with main.kt. Here’s a simple function to get you started:
 fun main(){
     println("it works! Do a happy dance.");
 }
To run your code, right click on the main function and select run code. Your code should compile and execute. During this process, you’ll also see an additional main.jar file.
That’s basically it to get set up with Kotlin. Multiplatform itself is a concept that applies at compile time. However, Kotlin does it better than other options out there by creating a system that allows you to keep your Kotlin code modular and not locked into a particular way of writing your app.
When you write in Kotlin, there’s no heavy lifting required to transition or migrate your applications out. It’s compilation process also means that you’re not going to run into problems that JavaScript based applications have with memory, threading, and third party plugin compatibility.
Opinions on optimal development-environment setup are as numerous as there are stars in the nighttime sky: highly personal and often deeply held! And yet, many also love to share their configurations with others and compare with peers. I’m often asked how I run my local JS development environment, so here’s how I run Sublime with a fairly minimal set of plugins.
My system runs Windows 10, and I develop in Sublime 3 (v3.2.2 currently) as my editor. I use a mostly stock “Monokai” color theme with “Source Code Pro” (open source from Adobe) as the font.
I run WSL (currently v1, but planning to upgrade to v2 soon) with Debian as my linux distribution of choice, and bash as my shell. I use the Windows Terminal for my command prompt. I keep most of the files and projects I work on inside of the WSL environment, and manage them with git from the command line (through the terminal). There are however a few projects that are stored out in the windows file system, such as on my Desktop.
I use a laptop, so I primarily develop on a single screen (~ 13.3″). I have newly added a secondary display (a Lenovo M14T touchscreen monitor, which I love!), but I only use that while recording or broadcasting. I manage multiple open apps with Windows’ “virtual desktops”, generally one app per desktop, so my editor is on one and my terminal is on the other.
Oh, and most controversial of all: I use tabs instead of spaces!
One main reason I like Sublime is because it ships with such a minimal footprint but has just enough power to be a really useful tool for me (that’s kinda why I’ve always preferred Debian for linux, too!). It has a Package Control package manager to install plugins to extend.
Here are the ones I’ve installed:
OK, let’s break down what these packages do and why I use them.
Clear Console gives you a quick (if hacky) way to “clear” the Sublime console if it’s full of messages using a hotkey. I don’t need that functionality often, but occasionally it’s helpful.
Honestly, this functionality should be provided natively in Sublime (I dunno, maybe it is by now!?), but years ago I installed this package and have used it ever since.
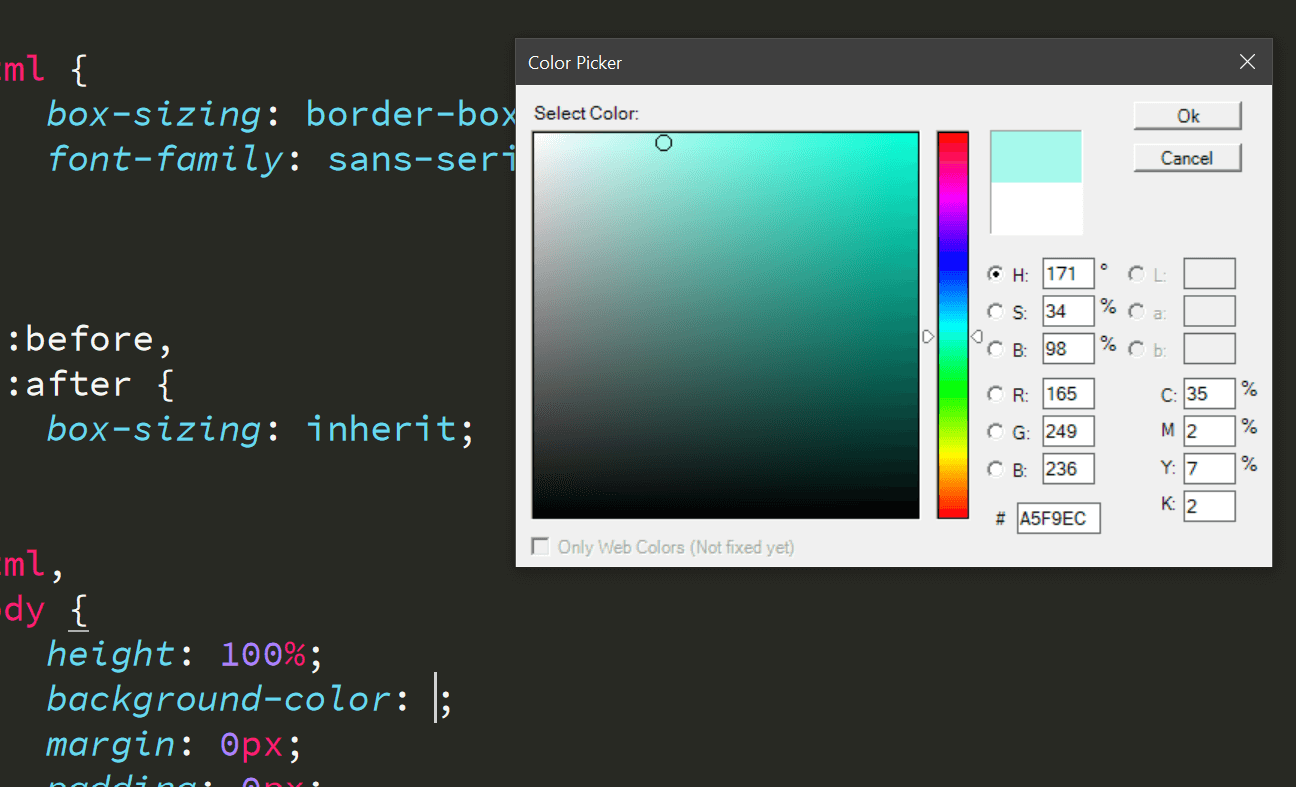
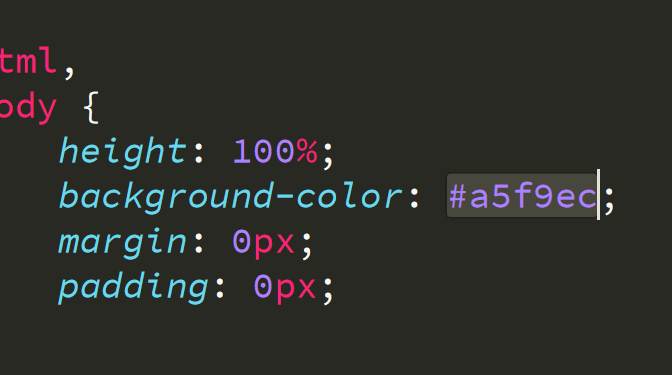
Color Picker does just what it says on the label, which is that it lets you invoke the system color picker from inside Sublime, and when you select a color, it inserts that hexcode into your code. That’s it!
Editor Config is a must-have for any developer. Since we’re all so opinionated on various coding styles, Editor Config lets us store (some of) those preferences in a file that stays with a project/set of files, so that others who open up our files have their editor adhere to those settings.
For example, you can set indent_style to “tab” (yay!) or “space” (boo), and end_of_line to lf.
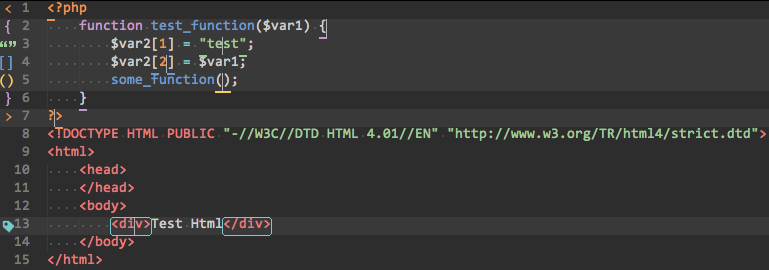
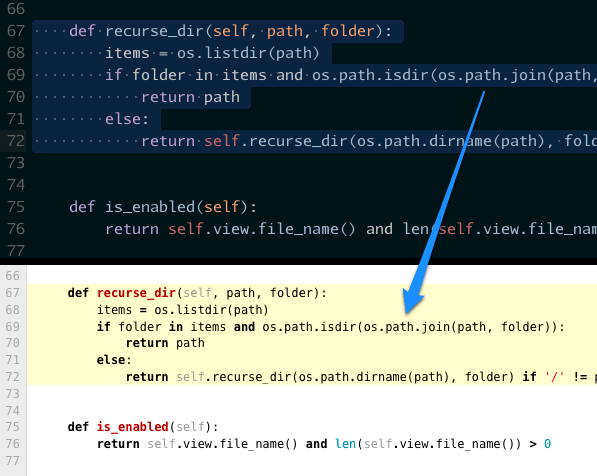
Levels is one of my all-time favorite plugins that I installed years ago. However, to be honest, even though I still have it installed, I almost never use it anymore.
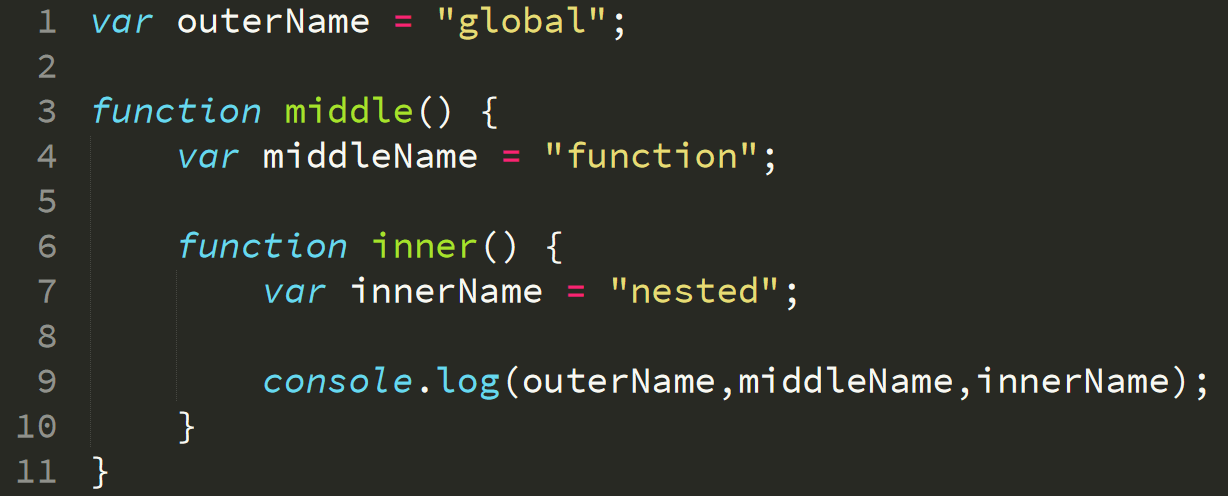
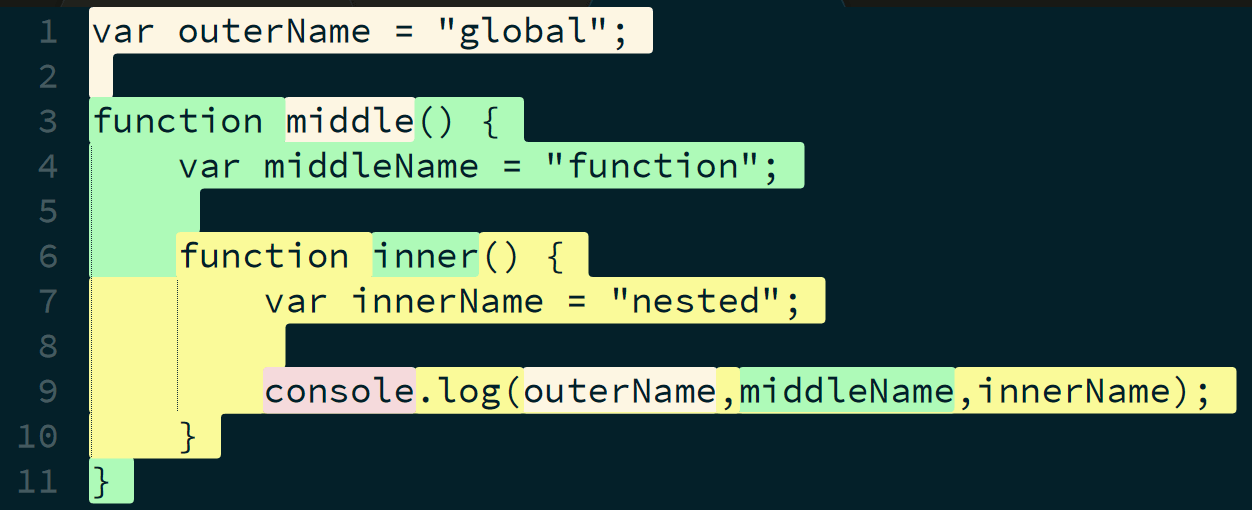
As you can see, the plugin (which uses the old ES-Levels library) colorizes code not by syntax but by which lexical scope an identifier belongs to. This has been super useful over the years, as a way to quickly glance at how the scopes of a file are layed out, and then switch back to normal syntax highlighting.
Unfortunately, the underlying library hasn’t been updated to maintain support for most of the modern JS syntax, so very few of my files can even use this plugin anymore. That package hasn’t been updated in a long time. But I’m hopeful in projects like this one that seem to be offering a new path forward, so maybe there will be a new plugin I can use someday.
Markdown Preview lets you preview rendered markdown from what you’re writing, and it does so by using the Github markdown rendering API and then displaying the results in a browser instance.
I use this all the time when writing prose in markdown, such as this very article you’re reading, to check the look and layout.
I prefer using ESLint for linting, so I looked for various plugins that can run that inline while I’m coding in Sublime.
I eventually settled on Sublime Linter along with the Sublime Linter – eslint additional adapter package. This worked fine for me for many years while on Mac. I have had some issues with getting it to work with my WSL setup on windows, but I think we may be close to fixing that, so I’m hopeful to get that resolved soon so I can get back to linting in-editor instead of only on the command line.
Sync View Scroll allows you to synchronize the scrolling of multiple panes of side-by-side open files. I use this mostly when teaching, and I open up a “before” and “after” of a changed file, and walk through the changes with both file versions shown next to each other.
TabNine (made by Codota) is an AI-powered autocomplete plugin that semantically analyzes your code and provides more intelligent suggestions.
This is the latest edition to my Sublime setup, but is quickly becoming one of my favorites. Full disclosure: I recently partnered with Codota to help expand their developer empowerment efforts, which is how I came to find out about the plugin and start using it myself. But I am already loving it.
In my next post, I’ll be going in-depth into my first impressions of using the tool while I code, so stay tuned for that!
As you can see, I run Sublime with a minimal set of plugins. I think that keeps with the spirit of the editor, to be honest. It’s designed for those who don’t want all the fanfare and complexity of a full IDE environment.
But with a robust ecosystem of plugins to choose from, there’s a perfectly Sublime configuration for each developer. I hope maybe one or more of the plugins I use has inspired your setup. If you use Sublime as your editor, let me know in the comments what you think of this setup and how your setup looks!