The programming language Go (also known as Golang) may not be the most popular programming language out there. It does, however, offer an evolving approach to development and an active community. Today, Golang is supported by most popular text editors and IDEs through the use of plugins. That said, there are also quite a few less-known Golang IDEs worth checking out.
Before we list the best and most efficient IDEs for developing and debugging Golang applications, it’s worth reviewing (briefly) what Golang is and who uses it.
Developed by Google beginning in 2007 and released in 2009, Golang is an open source procedural programming language. Its developers, Griesemer, Pike & Thompson, took inspiration from other languages like C, Oberon, Pascal, Newsqueak, and Smalltalk to bring to life Go.

One of the main advantages of Golang is that it supports concurrent programming. This allows multiple processes to run concurrently through the use of channels and goroutines. Being a robust programming language, Golang was used to develop Docker and Kubernetes. On the consumer side, Go is the code behind Netflix and Dropbox.

The first Golang IDE on our list is also perhaps the most Golang-centric one that has been targeting Go developers since its inception in 2012. LiteIDE is a simple, open source, cross-platform Go IDE that highly resembles Visual Studio and GCC C++. If you’re feeling nostalgic, you’ll be right (back) at home with LiteIDE.
Since it was designed for Golang, LiteIDE has several useful features for developers right out of the box. These include configurable build commands, an advanced code editor, and (of course) extensive Golang support. Other features include code management, a gdb and Delve debugger, auto-completion and theming with WordApi, a MIME type-based system, and more.
As is to be expected with a FOSS solution, LiteIDE can run on Windows, Mac, and Linux operating systems. In addition, it’s frequently updated and has a loyal community of users.

Another popular code editor with extensive support for Golang is VS Code. Much like other extendable text editors, Visual Studio Code will demand you install a plugin to code, debug, and perform other actions on Go code.
Using the Go extension for Visual Studio Code, you get language code navigation, symbol search, bracket matching, snippets, and many other features to help you write better Go code in your familiar VS Code environment.
The Go plugin for VS Code is developed and maintained by the Go team at Google, so upgrades and fixes are frequent.

Vim is a popular cross-platform open source text editor with a plethora of plugins offering support for most programming languages out there. Golang is no exception. The vim-go plugin is free, easy to install, and well-maintained with frequent updates on GitHub.
Upon installation, vim-go will arm your VIM text editor with Go package compilation, folding and syntax highlighting, integrated delve support, and anything else you may need to write applications in Golang.
Since this is an open source project, you’ll need to turn to the community for support when you come across any trouble. That said, you will find most of what you need in the project documentation.

If Sublime is your choice of text editor, then the GoSublime plugin collection will give you (most of) what you need. GoSublime is an IDE-like plugin for Sublime Text 3 (mainly, but not limited to). According to its description, it provides integration for most of your Go/Golang development tools. Well-maintained and supported financially, the GoSublime plugin boasts 3.4k stars on GitHub alone.
It’s worth noting that you may need some additional plugins to make the most of Sublime as a Golang IDE. One such plugin is the Golang Build package, which is the official Sublime Text package for Go build system integration.
JetBrains is known for Intellij IDEA and its flavors made for specific languages. In this case, GoLand is the JetBrains solution for GoLang developers.
GoLand is a cross-platform IDE built specially for Go developers. It’s a commercial IDE, and as such comes with a (modest) price tag and a rich feature set. It includes on-the-fly error detection with suggestions for fixes, refactorings with one-step undo, intelligent code completion, dead code detection, and documentation hints. In addition, it comes with powerful GoLang debugging capabilities, user-friendly GoLand code navigation, and support for Git, GitHub, and Mercurial out of the box.
For a personal license, you’ll need to pay $89 for the first year (and less later on). For a business license, the annual cost starts at $199 per user.

Zeus is a language-neutral programmer’s IDE for the Windows platform that is known by a few. Claiming to be “an IDE letting you code like Mozart rather than coding nursery rhymes,” Zeus has quite a bit to offer to Go developers.
Among others, Zeus IDE supports Go tools like gocode for autocompletion, documentation, and code navigation, as well as tools like gofmt and goimports for automatic code formatting. There are also macros for Go Guru, fix, vet, gorename, and gobuild. Last but not least, Zeus also works with the Delve debugger.

You may be wondering why Eclipse and its Go plugin, Goclipse, are not included in the list of top 7 GoLang IDEs. Goclipse was abandoned by its developer in 2017 and so no updates have been made to the project since. The user community was also quick to follow, so support for Golang on Eclipse is limited at best.
Choosing the IDE for your next Golang project will usually be influenced by the usual criteria for IDE selection. If you’re already familiar with VS Code or can operate a JetBrains IDE in your sleep, there’s really no reason for you to seek out an alternative. All you need to do is install Golang on your machine and add a plugin to your IDE or text editor of choice. But if you’re feeling adventurous? Go ahead and take this opportunity to discover a new IDE like LiteIDE or Zeus IDE to add to your Goland development toolbelt.
Tabnine is the pioneer in AI-powered software development. With more than one million monthly users and hundreds of thousands of daily active users, Tabnine boosts code quality and developer happiness using generative AI technology to automate the coding workflow. With privacy and community at the forefront, Tabnine never stores or shares users’ code and relies only on open source code with permissive licenses for its Public Code-trained AI model. Tabnine Enterprise has been built to help software engineering teams write high-quality code faster and more efficiently, accelerating the entire SDLC.
[cta_btn url=”https://www.tabnine.com/pricing/landing” label=”Start a free trial”]
We just released a new feature that should significantly reduce the Tabnine memory footprint on your machine if you are using Tabnine with multiple project windows or multiple different IDEs.
Our deep model is trained on millions of open-source projects in various programming languages, providing the magic that is Tabnine.
The deep model can be used through our cloud service or can be downloaded and run locally on your machine. As deep models go, the model itself (with over 355M parameters) can require as much as 1GB of memory on your machine.
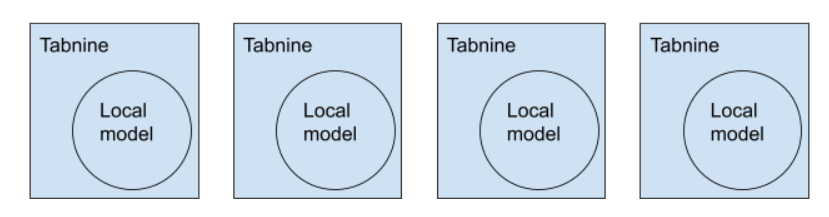
Prior to this release, IDEs such as VScode, which use a separate extension host process for each project, had a separate Tabnine instance for each open project. With many of our users (including ourselves) constantly working with multiple open projects, this often led to massive overall memory consumption by Tabnine.
It became very clear that this is something we needed to fix. Running a single deep model is heavy enough, but loading multiple instances of the same model into memory simply does not make sense.
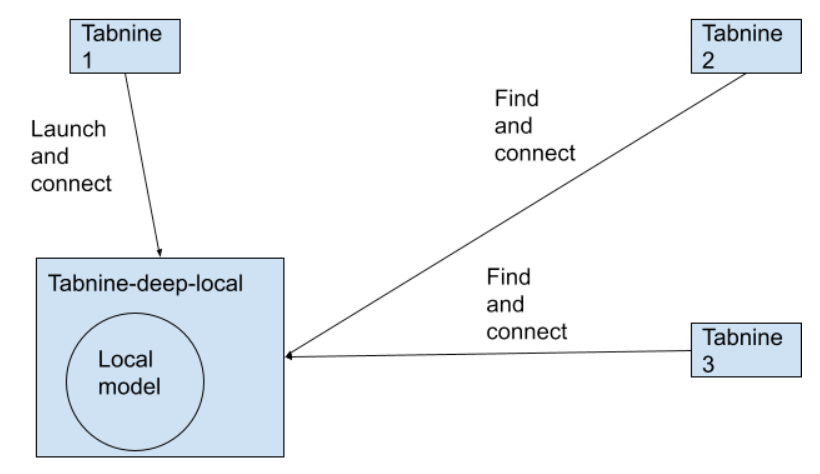
We refactored out the entire module of downloading and evaluating our deep model into its own process, named TabNine-deep-local. This process had a TCP endpoint that the main Tabine binary can communicate with in order to do local model predictions.
Before:
After:
The way there
We transformed the deep local handling module into a “microservice”. This included transforming function calls into message passing, but also getting rid of shared state. One example of a shared state was the model download state object, which was essentially a global object that was used both inside local model handling, but also outside, in the UI, to display the download state to the user.

Once refactoring was done and everything was message passing, it was pretty straightforward to transform this in-memory message passing into a tcp based message passing. The last step was to make sure we only ever had one TabNine-deep-local process running and there was a way for TabNine processes to find it and-reuse it if it was already running, instead of running their own.
Aside from that, there were many other issues that needed to be handled.
Two big ones were:
The auto-update mechanism: Before we only had one binary to download. Now we had two, and plans for other binaries as well (more on that later), so we needed to transform the automatic updates mechanism to download bundles of binaries instead of a single binary.
The watchdog: Tabnine already had a watchdog process that made sure Tabnine did not consume excessive resources. Now it needed to watch multiple processes instead of just one, some of which were not child processes. This ended up being a complete rewrite of the TabNine watchdog, and moving it into its own binary (WD-TabNine).
To accelerate our development processes, we split the system into multiple “services”. Each such service is completely decoupled from the rest of the system, and only accessible via a well defined, versioned protocol.
Splitting the system into “microservices” allows developers on the team to work on smaller discrete services that are easier to reason about, and easier to test and maintain. It also allows us to introduce certain components in languages other than Rust. While we love Rust, certain system components do not require its power and complexity.
With the current release of Tabnine, we distribute three service binaries in addition to the main Tabnine binary – TabNine-deep-local, TabNine-deep-cloud and WD-TabNine.
In the coming months, we expect additional parts of Tabnine to be delivered as separate services.
Flutter is an interesting piece of tech released by Google. It is open-sourced by nature and was released in mid-2017. In terms of tech age, it’s on the verge of being a teenager. Over the past year, the Flutter community has grown significantly with more developers considering it as an option to other multi-platform mobile development.
Under the hood, Flutter runs on a language called Dart. Rather than sticking with Kotlin or Java, Google’s decision to go with Dart makes it more accessible to programmers coming into mobile development via the web route.
For the uninitiated, Dart is a language that looks like Java and JavaScript had a child. It takes the best of both worlds (along with some other programming languages) and puts it into Dart. This resulted in a programming language that is lighter, cleaner, and better at handling things like interfaces, mixins, and abstracted classes.
While this is nice to know, it’s not really why we’re here. We’re here because Flutter is a UI software development kit. This means that it’s a system of organizing your Dart code in a particular way that results in an ideal mobile interface, complete with data service connections and the ability to compile to Android, iOS, Google Fuchsia, and JavaScript-based app.
If you’re still a bit sketchy on this, the easiest way to think about is to see Flutter to Dart as your Angular, React, or Vue app to JavaScript – with the addition to compile into mobile apps.
In contrast to other SDKs and frameworks currently available, Flutter has a UI first approach. The widget system lets you structure and organizes your UI elements in a nested tree manner.
The easiest way to explain this is for you to see all the parts together. In code, it looks something like this:
import 'package:flutter/material.dart';
void main() => runApp(MaterialApp(
home: SquirrelCard(),
));
class SquirrelCard extends StatelessWidget {
@override
Widget build(BuildContext context) {
return Scaffold(
backgroundColor: Colors.grey[900],
appBar: AppBar(
title: Text('Random Little Mobile App'),
centerTitle: true,
backgroundColor: Colors.grey[850],
elevation: 0.0,
),
body: Padding(
padding: EdgeInsets.fromLTRB(30.0,40.0,30.0,0),
child: Column(
crossAxisAlignment: CrossAxisAlignment.start,
children: <Widget>[
Text(
'Website',
style: TextStyle(
color: Colors.grey,
letterSpacing: 2.0
)
),
Text(
'tabnine.com',
style: TextStyle(
color: Colors.amberAccent[200],
letterSpacing: 2.0,
fontSize: 18.0,
)
),
Text(
'Name',
style: TextStyle(
color: Colors.grey,
letterSpacing: 2.0
)
),
Text(
'Aphinya Dechalert',
style: TextStyle(
color: Colors.amberAccent[200],
letterSpacing: 2.0,
fontSize: 18.0,
)
),
Text(
'Description',
style: TextStyle(
color: Colors.grey,
letterSpacing: 2.0
)
),
Text(
'I read. I write. I code. #devLife',
style: TextStyle(
color: Colors.amberAccent[200],
letterSpacing: 2.0,
fontSize: 18.0
)
)
],
)
),
);
}
}
On an abstracted structural level, it looks something like this:

Excluding void main(), every box is a widget. appBar is a stand-alone widget while body has a child widget that has six other widgets. Each parent widget can be seen as a representation of the structure, while the innermost children widgets are the actual elements themselves.
What it actually looks like as a mobile app:

This is basically Flutter’s widget system in a nutshell. But why does it matter?
The UI first design flips the usual coding flow from a data-first perspective into one that allows you to compose the UI first and worry about structure and data connections later. Flutter is a UI kit, which means that it comes with a large set of predefined features that take into consideration what a mobile app might need. We’re talking about things like text boxes, text, images, buttons, and toggles.
This allows you to compose your app’s elements and then systematically define their visual uniqueness in a CSS-esque manner. This way of thinking is different and important to developers because it rearranges the separation of concerns into a view-centric system, in contrast to a code-type system.
Here is a generalized diagram to help you visualize the differences.
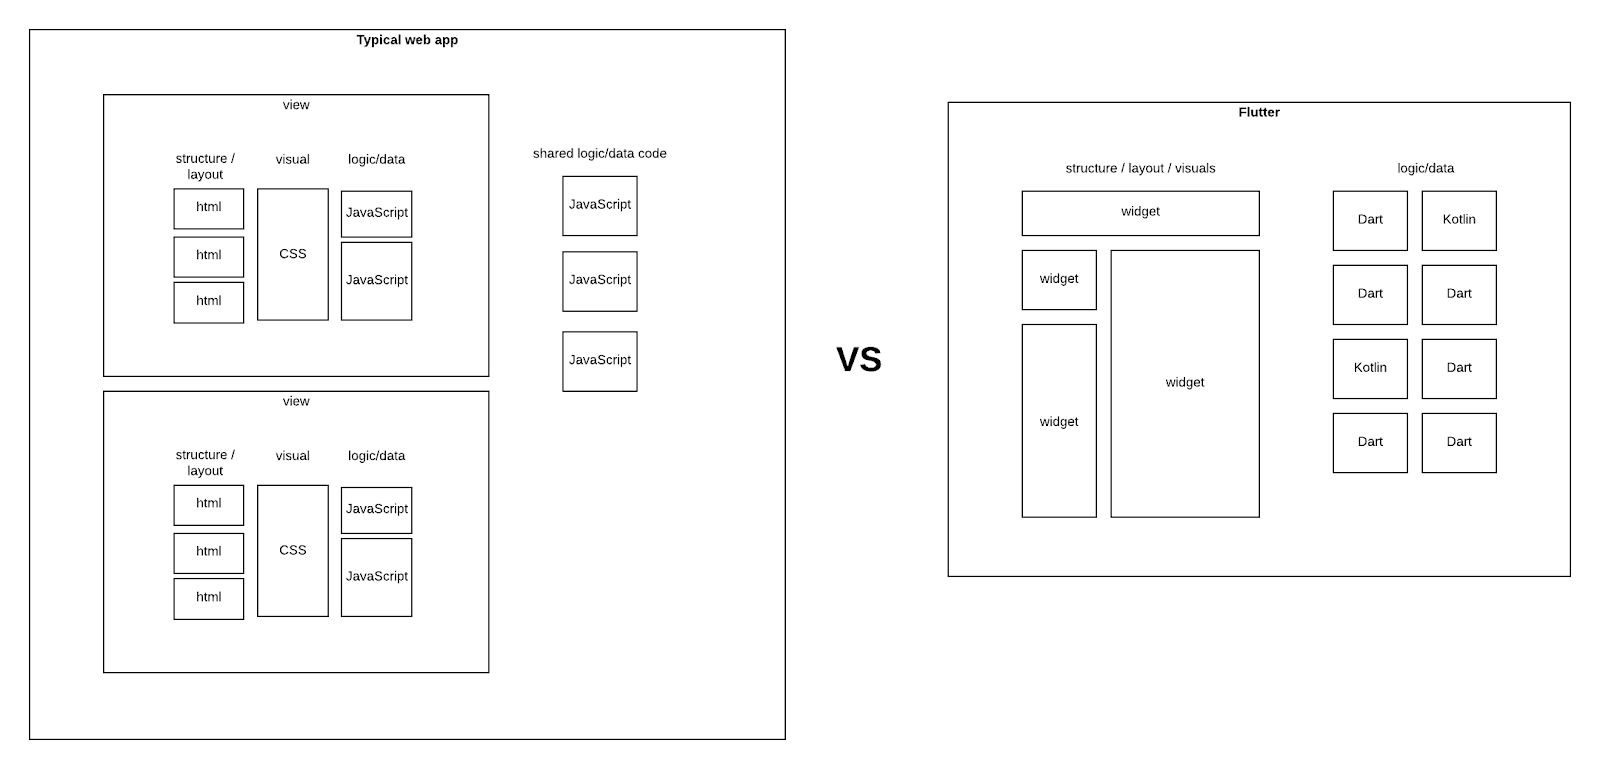
If you look at the Flutter code above, it may seem like there is a lot of nesting. While it might feel off-putting at first, it works if you switch your brain to think of the UI from a designer’s perspective. If you really look at it, you’ll find that it’s like looking at nested HTML code but without the stray or missing closing tags.
The widget works by abstracting down to a primitive UI element. Much like string, boolean, and int in code, a primitive UI element is something that is simple and one dimensional in nature. It holds a single value, or in our case, a single UI value.
For example, a piece of text is a primitive UI element, along with text inputs, labels, radio buttons, and checkboxes. The way you dress it up with styling is akin to setting a value to it. You might have a single type of value through styling. Or you might have two types – the styling and the value of the primitive UI element such as text displayed or the current state like the boolean against a checkbox.
That’s basically Flutter widgets in a nutshell. But how do you construct a Flutter widget?
By default, when you create your first Flutter project in Android Studio, you’ll get given some starter code. While this is nice, the issue with this code is that it doesn’t do hot reload. This means that if you make a change in your code, you also need to recompile.
To achieve hot reloading, you just need to start with this structure:
void main() => runApp(MaterialApp(
  home: YourWidget()
  ));
class YourWidget extends StatelessWidget{
  //the rest of your code here
}
The major difference between the above code and the starter code is that your widget is abstracted out and restructured. So rather than extending your base class, you just add additional widgets after the home list. MaterialApp() wraps your widgets in Google’s Material Design default styling.
Now that we’ve got the gist of the basics, the next part is creating the widget itself. To do this, you wrap the widget’s contents inside Widget build(BuildContext context){}
So your code looks something like this:
class YourWidget extends StatelessWidget{
  @override
  Widget build(BuildContext context){
  return Scaffold(
  // your structure/grouping here
    // your primative UI
  //your structure/grouping here
    // your primative UI
  )
  }
}
Inside the Scaffold, you have the ability to place a primitive UI widget directly or create a group of primitive UI widgets through a wrapper widget.
For a list of available widgets in Flutter and how to specifically use them, you can check it out at Flutter’s official documentation at Flutter Widget Index.
Flutter can feel a little weird at first, especially if you come from a siloed code type background. Siloed code type is basically how every other framework is structured. The power of Flutter lies in its design-first approach, meaning that you focus on creating the UI. This is a big contrast to the task of trying to create everything else first before you can have a semi-functional UI.
In comparison to traditional mobile development, Flutter’s widget system merges what could have easily been at least three files into one. As a result, Flutter is more succinct to mentally digest and write.
Flutter starts with the frontend from the get-go and assumes that you’ll eventually get to the data and logical layers. There is no need to mock data to get your front end to work. Flutter’s widget system is another way of arranging your frontend code. It works through abstraction until you can no longer abstract any further. In a way, this implements the idea of atomic design – which is a collection of components.
Or in Flutter’s case, it’s a collection of widgets.