Python for frontend seems a bit counter-intuitive for anyone who has ever developed the frontend of applications. Traditionally, Python is considered a backend language. Anything web and frontend is predominantly HTML, CSS, and JavaScript.
When we say Python, we do not always think of frontend web. More like never. However, Python can be used for either front-end or back-end development. That said, JavaScript is the default language of the web.
Frontend web development deals with building web interfaces that a user can use and interact with. Everything we see in the browser is run through a coordination of HTML, CSS, and JavaScript. So how can Python be used for the front end?
Well, there’s a big little Python library called Brython that makes it all possible.
Brython stands for ‘Browser Python’ and is Python’s implementation of JavaScript. In a way, Brython is a Python-to-JavaScript compiler. It lets you write client-side code in native Python and compiles it out to HTML, CSS, and JavaScript for you.
To work with Brython, you don’t need to know JavaScript. However, you still need a proficient understanding of HTML, CSS, and Python.
There are two ways to include Brython into your Python project. The first is through pip:
pip install brython
Then in an empty folder, run the following command:
brython-cli --install
This will give you the following folder structure:
 brython_stdlib.js
 byrthon.js
 demo.html
 index.html
 README.txt
 unicode.txt
To run a web server locally, you can use the following command:
python -m http.server
Or alternatively,
python - http.server 8001
Every now and then Brython releases an update. To update your related packages, use the following commands:
 pip install brython --upgrade
 brython-cli --update
You can also add Brython to your HTML page via CDN.
 https://cdn.jsdelivr.net/npm/brython@3.8.10/brython.min.js
 https://cdn.jsdelivr.net/npm/brython@3.8.10/brython_stdlib.js
This will allow you to use Python syntax within your HTML page. If you’re familiar with Angular and React, the concept is similar when it comes to building a frontend with a library or framework. But instead of it all boiling down to JavaScript, we are dealing with Python with HTML and CSS instead.
The perks of using Brython for frontend Python instead of JavaScript is that you might already have a strong background in Python. Whilst JavaScript is easy to pick up, it does tend to have a lot of side quirks that only show up during trial and error experiences.
The other perk of using Python for your frontend is that you can unify your project under a Python umbrella, rather than spread it across multiple technologies. The more languages you have to support, the more time you’re going to need for long-term maintenance and upgrades.
Frontend Python through Brython will need you to execute Python code both in the server and the browser, give you the same access to browser APIs, manipulate the DOM, whilst letting you interact with existing JavaScript libraries — making Python for the frontend a flexible implementation.
To use Python in your HTML page, you need to load the function brython() . Here’s an example:
 <body onload="brython()" >
    <script type="text/python">
    Your python code here
    </script>
 </body>
To link in your python script into the frontend, you can do so like this:
http://main.py
For example, you might have a button that does something when clicked. You want the click event logic to sit inside your main.py file while the view is your HTML.
 <body onload="brython()">
  <form class="pure-form" onsubmit="return false;">
         <button
           type="submit" id="submit">Ok</button>
     </form>
 </body>
Here is an example of binding your logic to the click event in Python.
from browser import document, prompt, html, alert
def clickedOk(_):
alert("Hello there!")
return
document["submit"].bind("click", clickedOk)
The above will run the alert() function when the button is clicked.
While Brython is Python under the hood, it is an implementation of JavaScript. You cannot have a pure Python frontend application. Why? Because the web runs on JavaScript. Nevertheless, Brython still lets you leverage your Python knowledge for rapid front-end development.
Brython works by running a JavaScript translator on Python and executing it in the browser. This is done through brython.js and brython_stdlib.js, where brython() is invoked to compile the Python code contained in the script tag within text/python type.
brython() is the main JavaScript function that exposes the JavaScript namespace. It allows for any Python code to execute and is the only JavaScript function that you need to call explicitly for Python to work properly in the frontend. __BRYTHON__ is your JavaScript global object that holds all internal objects for your Python scripts. While we don’t use this object directly, anything Python-related will be held here.
Brython’s browser module lets you access various browser-related functionalities. It also lets you bind your values to different targets and events, allowing your frontend to be dynamically driven by data and any changes that get detected.
Here is a list of the different browser methods and what they do.
browser.alert(message) — this is a function that prints a message in a pop-up window and returns None.browser.bind(target, event) — this function lets you event bind to a decoratorbrowser.confirm(message) — this function prints a message in a window. It will show two buttons (ok/cancel). It will return true if ok, and false if cancel is selected.browser.console — the equivalent of console.log()browser.document — this is an object that represents the HTML document that’s currently displayed in the browser windowbrowser.DOMEvent — Lets you access DOM eventsbrowser.DOMNode — Lets you access DOM nodesbrowser.load(script_url) — Lets you load JavaScript librariesbrowser.prompt(message[,default]) — Lets you create a prompt via a pop up window. If your value is entered, it will return the default empty string.browser.run_script(src[, name]) — Lets you execute Python codebrowser.window — Lets you access the browser windowHere’s an example of how you can use one of the above browser methods.
 <script type="text/python">
    import browser
    browser.alert("Hello Frontend Python!")
 </script>
Or alternatively, if you want to split out your Python code from the HTML:
 <head>
     http://main.py
 </head>
Here is main.py example:
 import browser
 browser.alert("Hello Frontend Python!")
Brython is only one library of many others out there that are currently supporting Python in the frontend. Other major libraries include Skulpt, Transcrypt, Pyodide, and PyPy.js.
They all work as Python compilers, meaning that whatever you end up writing as your Python code is still valid. There might be a few differences, but overall, the general concepts introduced here are mostly the same.
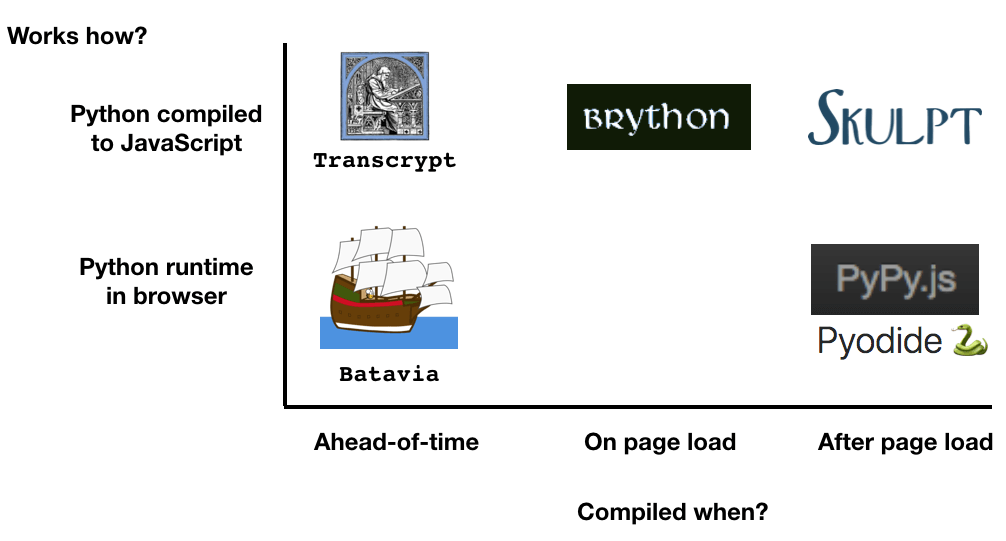
For example, Skulpt compiles Python code into JavaScript, in a similar fashion as Brython. However, it doesn’t have built-in functions that let you manipulate the DOM.
Transcrypt includes a command-line tool that lets you compile Python code into JavaScript, allowing for ahead-of-time (AOT) processes. The perk of Transcrypt is that it’s small. We’re talking 100KB kind of small, which makes it super fast to load. However, a compiler needs to be downloaded by the browser for it to work, making it an extra step for the user.
Pyodide is based on WebAssembly compilation and interprets Python code in the browser. There is no JavaScript compilation like the others, but it is often used with education-related spaces and libraries such as NumPy, Pandas, and Matplotlib.
PyPy.js is Python interpreter that compiles into JavaScript, making it compatible for ‘normal’ web development uses. However, PyPy.js is rather large, especially when compared to the others mentioned here. It is 10MB in size and therefore not practical for common web development uses. PyPy.js is also currently inactive with no updates or new release since 2019.
Whatever you end up using, Python for the frontend is not just a myth. While it all eventually turns into a form of JavaScript, it lets you leverage your current knowledge and skills without the need to start digging extensively into JavaScript.
Switch statements are one of the building blocks of logic in code. It’s a way to create selection control in a standardized format that is much more condensed than your typical if-else option. In most cases, a switch statement is faster to code and run when compared to if-else, when pitched in contrast against a switch statement.
Unlike every other popular programming language, Python doesn’t have a switch or case statement functionality available. However, all this changed with Python 3.10. Anything older than Python 3.10 does not support switch statements and therefore the contents of this article will not work on a majority of versions.
For context, at the time of writing, Python 3.10 is still in the testing phase and remains in an early developer preview release. Nevertheless, the ability to use switch statements is an exciting and major development for Python and Python developers.
Without further ado, let’s get right into it.
A switch statement is a set of conditional tests that allows the developer to direct the course of the program based on a set of scenarios and variables.
On the surface, a switch statement looks somewhat similar to an if statement, but with structural and syntax differences. For example, an if statement in Python looks something like this:
 a = 10
 b = 20
 if a > b:
 print("a is greater than b")
The equivalent of else-if in Python looks something like this:
 a = 10
 b = 20
 if a > b:
  print("a is greater than b")
 elif a == b:
  print("a is equal to b")
And finally, the default final else to provide a catch all clause for when none of the cases match:
 a = 10
 b = 20
 if a > b:
  print("a is greater than b")
 elif a == b:
  print("a is equal to b")
 else:
  print("b is greater than a")
The shorthand of if-else in Python looks something like this:
 a = 10
 b = 20
 print("a is greater than b") if a > b else print("a is equal to b") elif a == b else print("b is greater than a")
As you can see, things are already starting to get complicated. On the surface, everything looks quite simple. But if you look at it from an ease of readership and comprehension, having more than one or two sets of if statements can already begin to clog up our code.
When there are too many if-else statements in a block of code, it can feel like reading a run-on sentence. The longer the sentence, the harder it is to keep all the information in your mind and comprehend what it’s trying to tell you.
This is where switch statements in Python come in.
Switch statements in Python are defined by two things: match and case. match sets up the scene and tells Python that the following block of code will be a switch statement. case sets up Python with what to do if the conditions are met.
Here is an example:
localhost = "3000"
match localhost:
case "80":
print("localhost:80")
do_something_http()
case "8080":
print("localhost:8080")
do_something_httpalt()
case "443":
print("localhost:443")
do_something_secure()
case "3000":
print("localhost:3000")
do_something_localhost()
case "80":
print("localhost:4200")
do_something_webpack()
case _:
print("localhost not found")
What’s happening here is that each block gets evaluated. If the case matches exactly, then the following block of code gets executed. While this can be achieved in the same manner with a series of if-else statements, the removal of comparison conditionals (e.g. if localhost == "80" etc.) repeated on multiple instances makes it “cleaner”.
An underscore _ is used to signify the default, catch-all case when nothing satisfies the given parameters. If no case _: is given, you will run into an error if nothing matches.
Here is another example of improved code readability with Python switch statement:
 match (product, category):
     case ("milk", "dairy"):
         print("15% discount today only!")
     case ("lettuce", "vegetables")
         print("veggies are good for you")
     case ("beef", "butchery")
         print("mmmm iron")
     case _:
         print("you didn't add anything")
You can pass multiple arguments into the switch to be compared against the cases. The sequence and length of these arguments is entirely up to you and there is no restriction in Python.
In addition to arguments, you can also pass in objects like this:
 match user:
     case User(admin=False):
         print("You are not authorized")
     case User(region="NA"):
         print("You are from the North America!")
     case User():
         print("This is a customer somewhere else")
     case _:
         print("Error: Not a user!")
User() is an object with data attached to it. For example, by adding admin=False and region="US" in between the parenthesis, you are creating a condition for the switch statement to evaluate.
The examples so far have been based on static values. What if we wanted to make our switch statements a bit more dynamic in Python?
Here is the syntax example of how to write it:
REGION = "NA"
match user:
case User(admin=False):
print("You are not authorized")
case User(region=REGION):
print("You are from the {REGION}")
case User():
print("This is a customer somewhere else")
case _:
print("Error: Not a user!")
In the example above, {REGION} is dynamically pulled into the print() statement, while also being a parameter for matching in User(region=REGION).
Based on the above Python switch patterns, we can also increase the complexity of the condition by adding more parameters. Here is another example:
class Region(str, Enum):
AFRICA = "AF"
ASIA = "AS"
EUROPE = "EU"
NORTH_AMERICA = "NA"
OCEANIA = "OC"
SOUTH_AND_CENTRAL_AMERICA = "SA"
match user:
case User(admin=False, region=region):
print(f"This is a customer in {region}")
case _:
print("Error: Not a user!")
Now that we’ve got the basics down, what about conditionals in Python switch statements?
The same match and case structure still applies. The only main difference is how you write your conditional after the case keyword.
Here is a quick example of what this looks like:
 match items:
     case [Item() as i1, Item() as i2] if i1.name == i2.name:
         print(f"Discount applied: x2 {i1.name}")
     case [Item(), Item()]:
         print(f"No 2 for 1 deal. Item not the same.")
     case _:
         print("Received something else")
The first part of the conditional is encased around [] to set up the arguments of the conditional. The second part is an if statement that allows you to compare the arguments against each other. If the if condition is met, then the case is executed.
While this may seem like you’re just writing another if-else statement, a switch case structure in Python is much easier to debug in the long run, while also giving you the flexibility to match other cases without the need of an explicit conditional.
While switch statements in Python are still in its experimental testing phase, the expected release date is October 10 2021 — so not too far off. Everyone is expected to migrate out of version 3.9 by mid 2022 as full support for that version is being discontinued.
Overall, pattern matching in Python switch statements is quite easy to understand once you have the syntax and general structure of how it works.
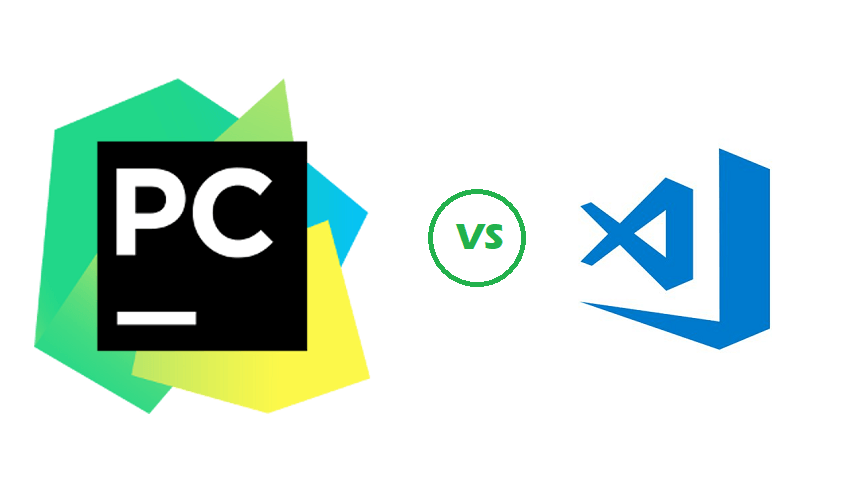
Python is one of the most popular programming languages in the world in 2020 and many developers call it home. As such, it has a broad selection of tools, code editing apps and IDEs to match the needs of different Python developers and project types.
The list of code editing tools is long, but the top two contestants for the crown, JetBrains’ PyCharm and Microsoft’s Visual Studio code, are by far the most popular homes for Python developers. Where should you be living in 2020 – VS Code or PyCharm?
For an experienced Python developer (or any language for that matter), swapping IDEs is akin to moving to a new home in a different country. Even if you speak the local language, there are differences in things like currency, as well as local customs, and laws you will need to learn. Not to mention your new house, where you may even find yourself sleepily looking for the toilet (for God knows what time) in the middle of the night. At least for the first few weeks.
Is it worth it? Perhaps you will discover that migrating to a different state makes your life objectively better. Once you remember where the bathroom is, of course. Alternatively, you may find yourself hurrying back to your place of birth, kissing the proverbial ground as soon as you land.
Few dare to take the leap, pack their code and move to a new IDE or code editing software. For many, there’s no place like home even if the alternative promises to save them time and headaches. But loyalties aside, it’s always a good idea to take a peek over the borders.
It’s worth noting that this article is not a “conversion piece” for neither PyCharm nor VSCode. We’re not recommending you choose one over the other (especially since you can make use of TabNine), but rather than you choose correctly for your needs.
Whether you currently use Visual Studio Code or Jetbrains’ PyCharm for Python development, this article aims to give you a better understanding of the difference, and uncover how each may contribute to your productivity.
Before we dive into the advantages and disadvantages of PyCharm and VSCode for Python development, it’s worth taking a moment to organize your criteria for selection. Among the topics to consider are license costs (if you have no budget) and system requirements (if your lack of budget is evident in your hardware setup).
We’ve used the terms IDE and code editor in this article rather interchangeably. However, they’re not the same.
Jetbrains’ PyCharm is a full-featured Integrated Development Environment (IDE) for Python development. As such, it includes everything you need in order to code, build, test, and debug Python applications.
In addition to a code editor, an IDE such as PyCharm typically includes a compiler and/or interpreter, a debugger and code profiler, version control integration, and plugin support. All available on-install out of the box.
This does mean, however, that PyCharm is a heavy beast with high system demands along with advanced capabilities aimed specifically at professional Python developers.
VS code is a lightweight code editor with basic features like syntax highlighting and code formatting included out of the box. VSCode can be customized heavily with extensions to do pretty much anything and everything with most commonly used programming languages and frameworks.
This makes VSCode perfect for code polyglots who develop in multiple languages. But it also means you will spend more time customizing it to your Python coding needs with extensions that will (hopefully) not clash with one another.
PyCharm is one of the highest rated Python IDEs today, and it has earned its spot at the top with its suite of productivity tools and out-of-the-box features. But not all PyCharms are the same, and different licenses offer different degrees of functionality.
There are currently three types of licenses for PyCharm. The first is the Apache-licensed Pycharm community edition, aimed mostly at data scientists. It is open sourced and free, and offers features like syntax highlighting and some autocompletion. The second is the Education edition, offered for free to students and teachers.

It too offers a limited feature-set and is intended for learning and not so much development of software products. The third type of license, and the version we refer to in this article is the Professional edition of PyCharm, that carries a hefty price tag starting between $ 199 and $ 159 for an annual subscription for businesses.
The full and paid version of PyCharm offers advanced features and capabilities geared toward streamlining all aspects of professional Python software development. This includes full built-in database management (like Oracle and MySQL) and support for multiple popular frameworks (like Django, Flask and others) that are not supported in the free versions.
What it doesn’t include is extensibility to other languages and frameworks. So if you need to visit the land of COBOL (for some reason) or venture into the woods of .NET – you will need to upgrade to Intellij IDEA or install an additional IDE for that language.
Visual Studio Code is a lightweight solution that can be expanded, extended and modified through plugins and extensions. A kind of Lego board upon which you can construct the development environment you want and need.
Being a modular solution, VSCode demands that you download and install extensions to compile, debug, lint and deploy code. It may sound like a bit of a hassle, but you can do that for pretty much any popular language or framework out-there. Need to code in Python? It just so happens that the Python support extension is the most downloaded plugin in the Visual Studio Code Marketplace. Need to write some C++ and don’t want to install yet another code editor? Then you should download the second most popular extension for VSCode – C/C++ support.
The VSCode community and Microsoft themselves are not blind to the rising popularity of VSCode with Python developers. In the recently published update to the Python extension for VSCode, Microsoft addressed 42 issues, and added the ability to browse for or enter an interpreter path on selection.
The choice between PyCharm and Visual Studio is similar to a choice between a fancy cake knife and a Swiss army knife to cut a cake. The first may produce artfully cut and even slices, while the second may not be perfect for cutting a cake, but can do a lot more. And fits nicely in your pocket.
It’s so lonely at the top of Olympus.
Zeus, the eternal king of the gods, faced some hard times while trying to maintain his reign. Hades nearly usurped his brother, Zeus, in a battle for control. As the battle raged, most of the the Gods took Zeus’s side, because who wants to mess a guy that shoots lightning, but some of the more disgruntled Gods took Hades’ side and the battle raged.
The back-end programming world is not unlike Mount Olympus. There is always a battle raging for supremacy, and in 2020, the battle still rages between Java and Python. And, like the ancient Greeks, most developers choose to “worship” one or two commonly used programming languages. However, unlike Ancient Greece, modern programmers are (slightly) more flexible.
There are coding polyglots out there who dabble in more than one back-end programming language, and do it using a single IDE. Some might call them blasphemers, we prefer to think of them as peacemakers.
If you happen to be one of those, and now looking to effectively program in Python (or Jython – a kind of mixture of both Java and Python) in Intellij IDEA – this post is for you! We’ve assembled a list of plugins that add Python coding functionality, and also to help you do it more efficiently.
Before we dive into Python support on Intellij IDEA, it’s worth mentioning JetBrains’ standalone IDE for Python and Django – PyCharm. With a free community edition of PyCharm available for download (much like Intellij IDEA Community Edition for Java development) it’s no wonder PyCharm is the most popular standalone Python IDE and is widely favored by the pros. It offers a simpler UI for project management, IDE settings and other features.
The main advantage of the Intellij IDEA Python plugin over PyCharm is its full range of Jython support features (cross-language navigation, completion and refactoring). PyCharm only supports Jython as the runtime for running applications. So if you’re using Java/Python integration in your project, PyCharm alone won’t get the job done.
Another reason why this relationship between JetBrains IDEs is relevant is the fact that the plugins supported in PyCharm are usually compatible with Intellij IDEA. This makes perfect sense as it is based on the same IDE framework by Intellij.
So let’s start with the basics: installing the plugin to enable Python support in Intellij IDEA.
To give your Intellij IDEA all the functionality of the popular PyCharm flavor of the JetBrains IDE all you need to do is install the official Python plugin by JetBrains.
The only thing to check before you download and install the Python plugin is the type of Intellij IDEA license you have. The Python plugin (that comes packaged in PyCharm) is compatible with the paid versions of Intellij IDEA (rather than the free community edition).
The basic plugin will give you smart editing for Python scripts, effectively expanding the functionality of Intellij IDEA to match that of PyCharm for all Python-related concerns and purposes. However, software professionals such as yourself have a few extra plugins up their sleeve to make you Python development on Intellij IDEA even more effective and productive.
As the name suggests, this plugin is a Python linter. It provides both real-time and on-demand scanning of Python files with Pylint from within you Intellij IDEA. Pylint is an open source project so it can be fully customized for your needs. In addition, Pylint has extensive documentation on the plugin website.

This handy little plugin is a smart alternative to the “Execute Line in Console” command. It automatically determines the number of lines to be sent to the Python console and is easy to access with a keyboard shortcut: alt shift A.
It’s worth noting that this plugin may become obsolete in the upcoming version of Intellij IDEA and PyCharm, as a request to implement it in JetBrains IDEs has been submitted in late 2019.
Not a Python plugin in the strict sense, Tabnine is programming productivity tool that helps you write better code faster.
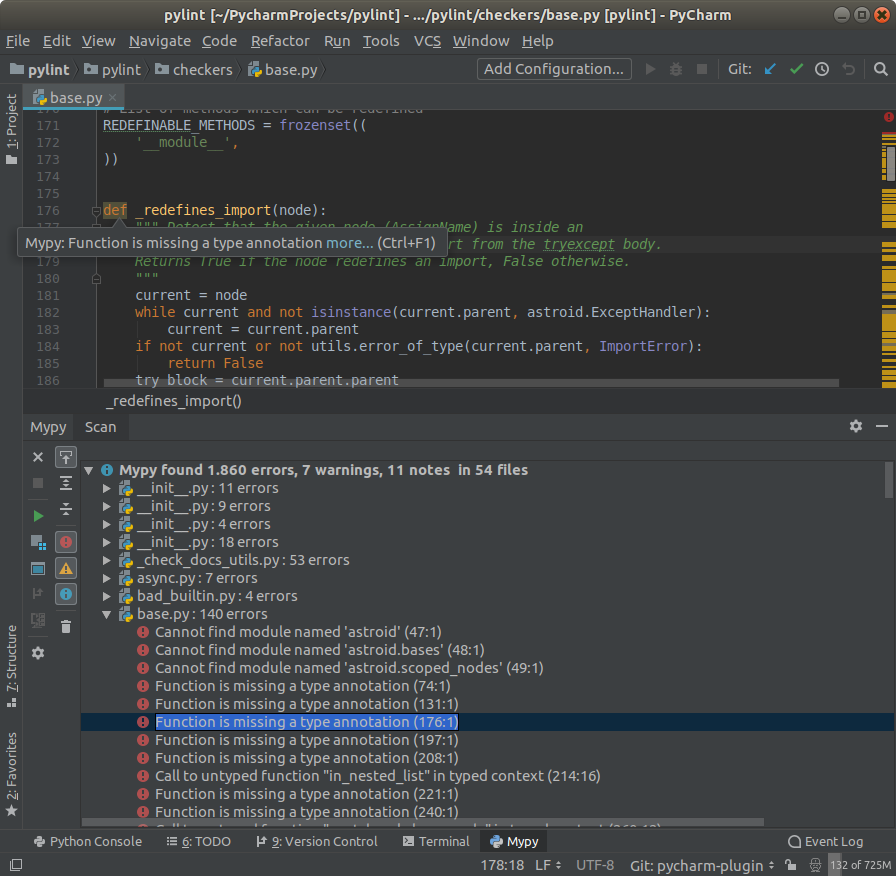
Mypy is an optional static type checker and source code analyzer for Python that aims to combine the benefits of dynamic (or “duck”) typing and static typing. Among others, it looks for programming errors, helps enforce a coding standard and sniffs for some code smells.
This plugin from the JetBrains plugin marketplace integrates MyPy into your Intellij IDEA. If you need some guidance, the MyPy website features extensive documentation to help you install and use MyPy to improve your Python code.
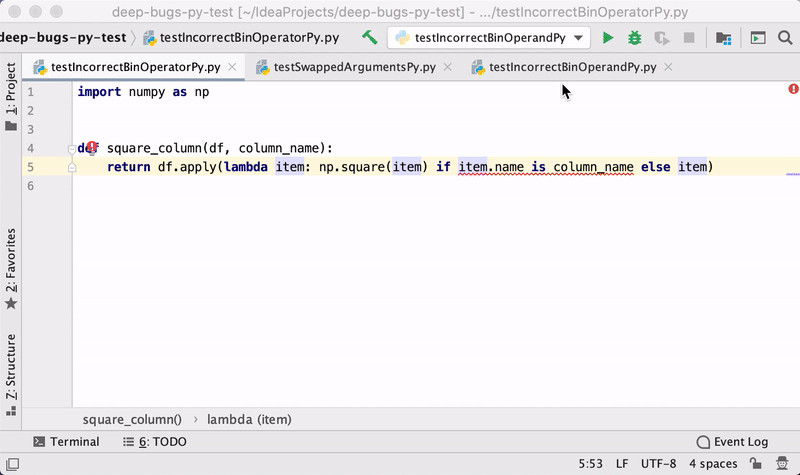
Developed by the JetBrains research division, this plugin promises to seek out potential bugs and quality issues in your Python code by using deep learning models. DeepBugs can detect bugs like incorrect function arguments, incorrect comparison, and others, based on extracted code semantics.

Why wait to run the program to see the magic happen? This plugin lets you run your Python code as you type it. It will display variable values, matplotlib, Pyglet, or turtle graphics in a dedicated panel on the right of your Intellij IDEA workspace.
This last plugin in our list is a handy collection of three inspections you can run on your Python code to attempt to detect potentially dead code and intentions for generating boilerplate code. This plugin will seek out potentially unused classes, functions (including methods) and names (in global and class-level assignments) in your code.
If you’re an experienced Intellij IDEA user, then you probably already have your favorite IDE plugins and theme installed. Just in case you don’t (or if you’re looking to expand your collection with a few time-saving productivity-improving gems), we’ve collected the top 21 plugins for Intellij IDEA. Our extensive list includes all you need to make the most of Intellij IDEA as a development environment – from AI coding assistants (like our own Tabnine plugin) to fun additions like the Nyan Cat progress bar.