Python dictionaries — or dict in Python — is a way of storing elements similar to a Python list. However, rather than accessing elements through an index, accessibility is achieved through a pre-assigned fixed key. In a way, a dictionary is like a mini on-site database that can be queried using a “key-value” pair. This method of structuring data lets you create more complex structures and may be more suitable to your needs than a simple, flat, and potentially mutable list.
Dictionaries are something that comes up in spaces like data science, due to their ability to hold multiple dimensions and nested data. In this tutorial, we will go over the following:
Without further ado, let’s get started.
A Python dictionary is a collection of items that’s accessible by a specific key rather than an index. This key can be one of the following types:
This is because a Python dictionary key needs to be hashable. Hashing is a process of putting a specific variable through a type of function called a “hash function” to return a unique output.
Here is an example of how to initialize a Python dictionary:
a = {'Luxembourg': 'Western Europe', 'Norway': 'Northern Europe', 'United States': 'North America', 'Ireland': 'Northern Europe'}
To add to the Python dictionary:
a['Denmark'] = 'Northern Europe'
Now, if we print it out:
print(a['Luxembourg'])
This will return:
Western Europe
However, if it was a list, we’d use the following syntax:
print(a[0])
But this will not work and will return a KeyError. This is because the key 0 doesn’t exist. Querying Python dictionaries is done through the key rather than an index.
Each item in the dictionary can have any data type and isn’t confined to a string as per the example above. It is also good to note that the key has to be unique in a Python dictionary. This means that no duplicates are allowed. However, if there are duplicate keys, Python will not throw an error. Instead, the last instance of the key will be the valid value.
For example:
a = {'Luxembourg': 'Western Europe', 'Norway': 'Northern Europe', 'United States': 'North America', 'Ireland': 'Northern Europe', 'Luxembourg': 'Luxembourg City'}
So when you run print(a['Luxembourg']), the returned result will be Luxembourg City rather than Western Europe.
And that’s basically creating a Python dictionary in a nutshell.
Dictionary comprehension is a process of transforming one dictionary into another. The items in the original dictionary can be conditionally included and each item transformed as necessary.
In a way, it’s like copying your original dictionary and doing what you need to do with the values before your final dictionary is set. To do this, you will need to be able to access the key and the value within each dictionary object. This is achievable using .keys() and .values().
.keys() will return a list of keys contained in your dictionary. For example:
a = {'Luxembourg': 'Western Europe', 'Norway': 'Northern Europe', 'United States': 'North America', 'Ireland': 'Northern Europe'}
a.keys()
This will return:
dict_keys(['Luxembourg', 'Norway', 'United States', 'Ireland'])
The same is applied to .values(). Here is an example of what it looks like:
a.values()
This will return:
dict_values(['Western Europe', 'Northern Europe', 'North America', 'Northern Europe'])
Now that you’ve created these lists, you can now pair them up using items(). This will give you access to each key-value pair. Here is an example:
a.items()
This will return:
dict_items([('Luxembourg','Western Europe'), ('Norway','Northern Europe'), ('United States','North America'), ('Ireland','Northern Europe')])
Using keys(), values() and items() sets you up with the ability to create dictionary comprehensions in Python. The general syntax structure for creating a new dictionary is as follows:
new_dictionary_name_here = {key: value for (key,value) in origianl_dictionary.items()}
For a direct copy of the dictionary through Python dictionary comprehension, here is an example of the syntax:
a_copy = {k:v for (k,v) in a.items()}
The first v is representative of any transformations you may want your values to be. You can also make transformations to the key as well by modifying the first instance of the k.
For example:
 alpha_dictionary = {'z': 26, 'y': 25, 'x': 24, 'w': 23}
 double_dictionary = {k*2:v*2 for (k,v) in alpha_dictionary.items()}
So when we use print(double_dictionary), we will get the following results:
{'zz': 52, 'yy': 50, 'xx': 48, 'ww': 46}
As shown in the process above, we don’t have to loop or use lambda functions in order to create copies of a dictionary. During the copying process, dictionary comprehension also lets us create transformations easily.
The thing with loops is that they are used to repeat a block of instructions for a given number of iterations. But things can get complicated for nested loops, which can create confusion and unnecessary complexity.
Dictionary comprehensions are a better alternative to writing loops due to simplification of the ‘looping’ process and therefore readability. For example, rather than writing something like this:
alpha_dictionary = {'z': 26, 'y': 25, 'x': 24, 'w': 23}
double_dictionary = {}
# Add values to `alpha_dictionary` using for loop
for n in numbers:
if n%2==0:
new_dict_for[n] = n**2
print(double_dictionary)
You can simply write the following using Python dictionary comprehension:
alpha_dictionary = {'z': 26, 'y': 25, 'x': 24, 'w': 23}
double_dictionary = {n:n**2 for n in numbers if n%2 == 0}
print(double_dictionary)
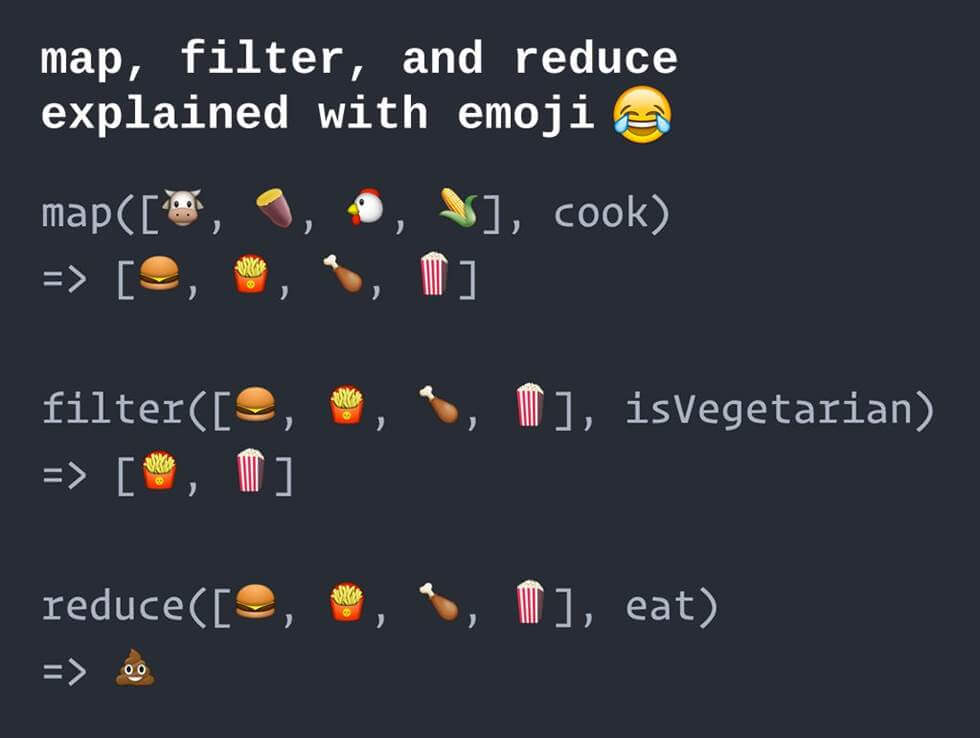
Python dictionary comprehension is also a good alternative to lambda functions. A lambda function is a way of creating small anonymous functions. They are considered throwaway functions and are nameless. Their existence only lasts as long as they are needed. lambda functions tend to also include other functions such as filter(), map(), and reduce() to achieve its desired outcome.
For example, let’s create a new dictionary using lambda and map() function.
fahrenheit = {'t1':0, 't2':10, 't3':20, 't4':30}
celsius = list(map(lambda x: (float(5)/9)*(x-32), fahrenheit.values()))
celsius_dict = dict(zip(fahrenheit.keys(), celsius))
However, converting Fahrenheit to Celsius is much simpler using a dictionary comprehension. Here is the refactored code:
 fahrenheit = {'t1':0, 't2':10, 't3':20, 't4':30}
 celsius = {k:(float(5)/9)*(v-32) for (k,v) in fahrenheit.items()}
Overall, there are less lines involved with a dictionary comprehension and informs the developer exactly what the expected end result is to be — another dictionary with the values translated and transformed from the original dictionary.

This is the barebones basics of python dictionary comprehension. The next step is to explore conditions, such as if conditions and using multiple if conditions. Beyond this is nested dictionary comprehension — which poses its challenges due to the nested nature. This is where loops can come into play and help.
Overall, dictionary comprehension is the easiest way to work with sets of data concisely and succinctly. It’s not hard once you get your head around the idea and the techniques above are more than enough to get you started.
GraphQL has grown in popularity since its release in 2015. With the prevalence of JSON and its usage in API development, GraphQL takes it one step further. It does so by creating a standardized query framework that gives you only the data you need — thus increasing your REST API’s flexibility and can significantly reduce the data transfer loads.
It sits on top of what you currently have and supports a range of languages, including but not limited to Haskell, JavaScript, Perl, Python, Ruby, Java, C++, C#, Scala, Go, Rust, Elixir, Erlang, PHP, and Clojure.
The syntax for writing GraphQL is simple to understand and adaptable by various layers of the software development stack.
In this article, we will go over the fundamentals of searching and filtering queries for GraphQL.
Do you stay updated with the latest advancements and trends in software development?
It’s essential to remain informed about new technologies and practices to excel in this constantly evolving industry. Learn how you can leverage AI to optimize your software engineering in 2023.

Before we can kickstart a query in GraphQL, we need to be able to get a single object. To do this, you need to generate a single list of objects for a type. What this means is that you list out all the things you want returned from that particular object.

Traditionally, an API would just give back a standard format based on what’s been preconfigured in the backend. With GraphQL, you can list out only the fields you require for your needs.
For example:
 query{
    getCart(id: "UUID938204") {
      cartItems
      totalPrice
      VAT
      priceBeforeVat
      numberOfItems
      discountCode
    }
 }
Here’s an example of nested linked objects in GraphQL.
query{
    getCart(id: "UUID938204") {
      cartItems {
        itemSKU
        itemName
        itemPrice
        itemQuantity
        itemDescription
        itemDiscountApplied
      }
      totalPrice
      VAT
      priceBeforeVat
      numberOfItems
      discountCode
    }
 }
There may be other key-pair values available for your query. By limiting the data to only what you need, this is the most basic form of filtering in GraphQL.
You can also add the filter keyword to your query to limit the values returned based on the given parameters. Here is a syntax example of a nested query filter:
 query{
    getCart(id: "UUID938204") {
      cartItems {
        itemDiscountApplied(filter: {
        status: true
        })
      }
      totalPrice
      VAT
      priceBeforeVat
      numberOfItems
      discountCode
    }
 }
It’s also good to note that for this structure you work, your GraphQL scheme needs to have @id in its type. For example:
 type Cart {
    cartUUID: String! @id
    totalPrice: Double
    VAT: Double
    priceBeforeVat: Double
    numberOfItems: Double
    discountCode: String
 }
The @id becomes a filter parameter for your GraphQL query.
To query a list of objects, you can just add an array as part of your id filter parameters. For example:
 query {
    queryCart(filter{
      id: ["UUID2098", "UUID92083", "UUID98332", "UUID2833"]
    }){
      id
      totalPrice
      numberOfItems
    }
 }
To create a multi-parameter filter, you can use the and keyword to concatenate the filter requirements onto your query. In the query below, we are looking at a list of completed carts where the total purchase order is over $150.00.
 query {
    queryCart(filter{
      id: ["UUID2098", "UUID92083", "UUID98332", "UUID2833"]
    },
    and: {
      totalPrice: {
        gt: 150.00
      }
    }){
      id
      totalPrice
      numberOfItems
    }
 }
But what if you have a list of objects under a parent item that you want to filter? That is, filter down the nested values to only what you want.
To do this, you can create a nested filter in GraphQL to get to your required results.
In the example below, we want to query a specific completed cart based on the UUID and filter the cart to return items that have a greater price than $15 and have a discounted status of true. Here is the example syntax:
 query {
    queryCart(filter{
      id: "UUID2098"
    }){
      id
      totalPrice
      numberOfItems
      cartItems(filter: {
        price: {
            gt: 15.00
        }, and: {
          discount: true
        }
      })
    }
 }
In the previous examples, we’ve been filtering based on a definite value. What if we want to filter in GraphQL based on a range? To do this, you can use the between keyword.
In the example below, we want to query all our completed orders based on the number of items ordered. The filter parameters here are any that are ordered between 5 to 15 items per order. Here is an example of the GraphQL between syntax:
 queryCart(filter {numberOfItems: between: {min: 5, max:15}}){
    id
    userId
    totalPrice
 }
It’s also good to note that for this to work, you need to implement @search on your schema. For example, based on the above query, you’ll need the following schema:
type Cart{
 numberOfItems: Int @search
 id: String
 userId: String
 TotalPrice: Double
}
max and min values also work for alphabet-based filtering. It works based on alphabetical ordering.
In the example below, we have created a GraphQL query filter that will return all customers that have last names that begin with ‘Ca’ all the way to ‘Co’. For example:
queryCustomer(filter: {lastName: between: {min: 'Ca', max: 'Co'}}){
 firstName
 LastName
}
Another scenario for filtering in GraphQL that can come in useful is when you need to find objects that have one or more specified values. For example, you might want to filter your customer orders based on a specific postal code area.
Here is an example for the query’s syntax:
query{
  postalCode(filter: {code: {in: ["0600", "0601", "0602"]}}){
     code
     orderId
     customerDetails
  }
}
How is this different from just conducting a normal filter query? This is because the above filter aims to return data based on a parameter that is not usually the main id item such as cartId or customerId. Also attached to the postalCode parameter may also include other details such as suburb and city . The postalCode value is its own ‘parent’ value that’s being used as a child in a nested data object.
Finally, how do we filter non-null fields? The GraphQL trick is to use has. This will exclude values that are null. For example, you might have orders with no contact phone number attached to them. You want to be able to see only orders with phone numbers because there is a higher chance of it being a higher value order.
Here is the syntax for using has in GraphQL:
queryOrder(filter: {has: contactNumber}){
  orderId
  shippingAddress
  contactNumber
}
For the above query to work, you need to omit ! from your schema. In the example below, orderId, and shippingAddress cannot be empty as indicated by the ! after the value’s type. contactNumber however, has the option to be empty and not filled out by the user, and therefore contains the value null.
type Order{
  orderId: ID!
  shippingAddress: String!
  contactNumber: Int
}
Filtering is one way to get the query results you want in GraphQL. This leads to the question: where to from here? Getting comfortable with filtering in GraphQL is a good starting point, but there is more to it than just creating such queries.
Beyond searching and creating queries through filtering, there are also the following types of queries in GraphQL:
The above-suggested topics make a good Google checklist to help you find your way around the different parts of querying in GraphQL. While it is only the tip of what GraphQL can do, it is more than enough to get you started and give you all the things you need to achieve your querying needs.
Writing maps and filters in Haskell can feel daunting. With Haskell being a strictly functional programming language, the process of thinking and implementing ideas and logic can feel a little strange — especially if you are coming in from an object-oriented background.
In this article, we are going to go over what maps and filters are, and how to write them in Haskell.
The first question we need to answer is: what is a map?
A map is a higher-order function that requires an array and another function. The other function is applied to the array and returns a new array, based on the application.

Mapping, in programming, can be considered as a process of transforming a set of data into something else based on what that something else defines.
A higher-order function is a function that operates another function. In Haskell, and a lot of other programming languages, mapping is a process of applying the map higher-order function on an array to transform it.
This brings us to the second question: why do maps matter?
When you’ve got a collection of things that you need to transform into something else, the process of doing each transformation individually can be time-consuming and repetitive. The process of mapping automates this process and condenses it down to a repeatable pattern that gets applied in a function and predictable manner.
So how do you write a map in Haskell?
When it comes to writing maps, Haskell takes a function and a list, then applies that function to every element in the list to produce a new list. Here is the syntax example of how it works:
map :: (a -> b) -> [a] -> [b]
Looks a bit confusing? Let’s take it one part at a time. The line starts with a function (a -> b), followed by a list [a] that this function is going to apply to. [b] is the new list, after it has been transformed by the function.
The function (a -> b) is an exact copy transformation from a to b, which means that the mapped array of [b] is going to be exactly the same as [a].
If we wanted our map to produce something else, we would transform our function (a -> b) to match our intention.
So what does this look like? Here is an example map in Haskell:
 module MapCube where
 mapcube a = map (^3) a
mapcube takes in the parameter of a , where it is then used by the map function against the function declared. So when we run our module, we will get our returned array as cubed results.
 :l MapCube
 mapcube [1,2,3,4]
mapcube[1,2,3,4] will return [1,8,27,64] as the new mapped array. This is because the function (^3) is applied to each value in the array.
Let’s take a look at another example of a Haskell map.
 module MapTax where
 maptax price = map (*1.15) price
In this example, the tax rate is 15% on top of the given value. So when we run it:
 :l MapTax
 maptax [12.45, 13.00, 45.65]
maptax [12.45, 13.00, 45.65] will return [14.32, 14.95, 52.50] because the function (*1.15) is applied to each individual array item that got passed in.
This is the general syntax for writing maps in Haskell. You can abstract the function out into another function like this:
module MapTax where taxrate n = n * 1.15 maptax price = map taxrate price
Writing it like this makes it easier to read, especially if your mapping conditions start to get longer and complicated. Based on the above, we know exactly what maptax is trying to achieve and how it’s going to achieve it.
It’s easy to get lost in our own code, which makes it even more important to name our functions in the most descriptive way possible. This allows the code to be naturally self-documenting and highly informative for the developer that comes after you.
Now that we understand how maps work in Haskell, let’s move onto filters. Before we start, we need to understand what a filter is in a programming context.
The point of a filter in programming is to take a section of code that matches against a certain criteria and return it. Unlike map, where the map function is applied to all items in the array and returned accordingly, filters in Haskell work by observing all the values it is given and deciding if it qualifies to be a returned value or not.
If the parameters of the qualification are not met, the value is not returned. Unlike mapping, when you filter something, the returned value cannot be reversed. This is because it omits the unqualified values from the original list, meaning that the data is lost once the filter has completed its iteration over the data set.
Like maps in Haskell, a filter is also another type of higher-order function that you can employ for your purposes.
Here is what a filter looks like according to Haskell’s documentation.
filter :: (a -> Bool) -> [a] -> [a]
Notice here that the filtered value doesn’t create a new array. In map, we see that [a] transforms into [b] via the syntax [a] -> [b]. However, in a filter function, [a] -> [a], which means that it replaces the original dataset completely.
So what does writing a filter in Haskell look like? Here is an example with an abstracted function:
module FilterExample where isEven n = n `mod` 2 == 0 filterme a = filter isEven a
isEven is the function that we pass into our filterme function. So when we run it:
 :l FilterExample
 filterme [1,2,3,4,5,6]
filterme [1,2,3,4,5,6] will return [2,4,6]. The function isEven sets up the filter condition and is applied accordingly against the given values.
Let us take a look at another filter function:
module FilterExample2 where filterme a = filter (==3) a
This filterme function takes one parameter and applies the conditional check of (==3) against every value that gets passed through. So when we run the following:
 :l FilterExample2
 filterme [1,2,3,4,5,6,5,4,3,2,1]
The expected return result of filterme [1,2,3,4,5,6,5,4,3,2,1] will be [3,3].
The main takeaway from how filtering works in Haskell is that it needs to evaluate to true in order to be passed into the returned result. This means that the filter function must evaluate to a Boolean.
If you look at it, you can use map and filter almost interchangeably. Why? Because they both produce an array based on the parameters of the applying function. However, in map, the function is applied with an expected returned result, regardless of the outcome. In contrast, filter relies on a Boolean outcome.
Writing Haskell maps and filters isn’t hard once you get the general syntax down. Figuring out what you want as the end result and the steps to get you there is most likely the hardest part. You can create multiple levels of maps and filters, based on your required conditions. This means that you can mix and match maps and filters, as many times as you want.
Visual Scripting — it’s one of the rising ways to learn how to code. Kids are doing it. Aspiring developers are using it. Artists, animators, and game designers are picking it up en masse. But what is it? How does it compare to real programming? And where is it used in real life?
These are the questions we’re going to focus on and explore in this piece.
Visual Scripting is a tool that uses a graphical interface to help the developer create programs based on visual representations of logic rather than writing it out in the required language syntax. In a way, visual scripting can be seen as a translation bridge that sits on top of a programming language like C++.

The most common usage of visual scripting is by people who do not code natives and may be experts in other fields such as visual arts and design. The graphical nature of visual scripting lowers the barriers to entry into programming, making it easier and faster to quickly prototype or create simple applications.
Most of the time, these applications are game-based and have clearly defined patterns of expected behavior such as platform and simulation games.
The major perk of visual scripting is that it allows the designer or developer to quickly and visually see the connected relationships between each logical piece without the need to dig into the actual code. As visual scripting sits on top of its supporting programming language, the developer can also drill down into the actual code and make modifications as necessary.
The scaffold nature of visual scripting also makes it easy to create vast code structures through boilerplate code and pre-configured architectures for specific situations.
While it is an evolution in the way code, learning to code, and acts of creating code are performed, visual scripting is not a threat to traditional approaches to programming itself. This is because, under the hood, there is still coding involved. Visual scripting merely sits on top and assists with the code creation process, catering its strengths over to people who are more visually inclined.
Two major visual scripting engines are run by game-based engine editors – Unity and Unreal. These visual scripting engines are mainly targeted at artists who want to create their own games but are limited by their programming knowledge. Visual scripting makes the process of getting a product from concept to production much faster and easier.
Visual scripting may lower the bar to entry, but programming will always remain more flexible in the long run. This is because the developer has full control over what is happening, while visual scripting is restricted to what the scripting program allows.
Programming lets the developer fine-tune the code generated by the visual scripting engine and refine any hard edges that the tool cannot do.
Bolt started as a visual scripting tool that plugs into Unity. In 2020, Unity acquired Bolt and the tool became part of the game engine’s official toolset release that is available to all users for free.

Here’s a quick overview of how Bolt works and how visual scripting in general works.
At the root of all programming are basic variables. If you already know a programming language, then the concept of floats, strings, and booleans should be very familiar to you.
There are 11 basic types in Bolt visual scripting. Float, integer, boolean, string, char, Object, enums, and lists are general programming staples. However, here is a quick summary of the other basic types that are more specific to Bolt.
Vectors in visual programming are a set of float coordinates used to create positioning.
For 2d games, only X and Y coordinates are required. For 3D games, three coordinates, X, Y, and Z are required. 4D is supported under X, Y, Z, and W coordinates but is rarely used.
GameObjects are a collection of Unity scenes that contains position, rotation, and a list of components. GameObjects are unique to Unity. Other visual scripting engines may have something similar but under a different name.
A dictionary is a collection of mapped key-value pairs. It can be seen as a mini-database for the game that keeps track of things like age, lives, names, and various other in-game-related data. You can retrieve and assign elements based on keys.
A flow graph lets you connect the individual pieces of your game together in a specific order.
If you think about it, a game is made up of a series of logical steps that forks out into different paths depending on the situation and other game elements. This is what flow graph essentially lets you do — configure the path of the next action based on a specific set of conditions.
Perks of flow graphs include:
A state is considered a self-contained behavior that tells an object how it should behave. There are two types of states in Unity Bolt: flow states and super states.
A flow state is a contained nest of flow graphs. For example, you might have a clear tree structure created by your flow graph. This tree represents the flow state of that particular flow graph group.
A super state is the parent state that contains another nested graph. So a super state can have multiple nested flow states inside.
A transition allows for the connection of different states together. This can be done through a trigger from idle to active states. The difference between a transition and a state is that a transition acts as a bridge between states. This means that each state or state graph group is a stand-alone feature. The transition only gets the user or player from one state to the next. If not, the user or player remains looped inside the state or reaches the end of the flow graph.
In Unity, scripting is a process of writing your won C# code. You can import custom types into Bolt as unit options. To do this, navigate to Tools > Bolt > Unit Options Wizard and follow the import walkthrough.
Scripting also lets you dig down into the C# code using variable and events API. To access the variables API, you’ll need to import it through using.
using Ludiq;
using Bolt;
To call on the variable API, you just have to access via the Variables class like this:
Variables.Application.Set("Lives", 9);
If you create a graph reference, you can access variables on the axis. To do this, you need to create a root graph on your game machine like this:
var graphReference = GraphReference.New(flowMachine, new IGraphParentElement[] { superUnit });
Now you can pass in your graph as a variable reference:
variables.Graph(graphReference)
Other things you can pass in as a variable includes objects, scenes, and applications.
Variables.Object(someGameObject)
Variables.Scene(scene)
Variables.Application
To access your saved variables looks something like this:
Variables.Saved
The events API lets you create triggered custom events. To write one looks something like this:
SomeCustomEvent.Trigger(enemy, "Life Steal", 10)
And that is the bits and pieces basics of Unity Bolt in a nutshell.
Getting into Bolt is a process of creating the units and connecting them up to form a series of actions, reactions, and interaction decision trees.
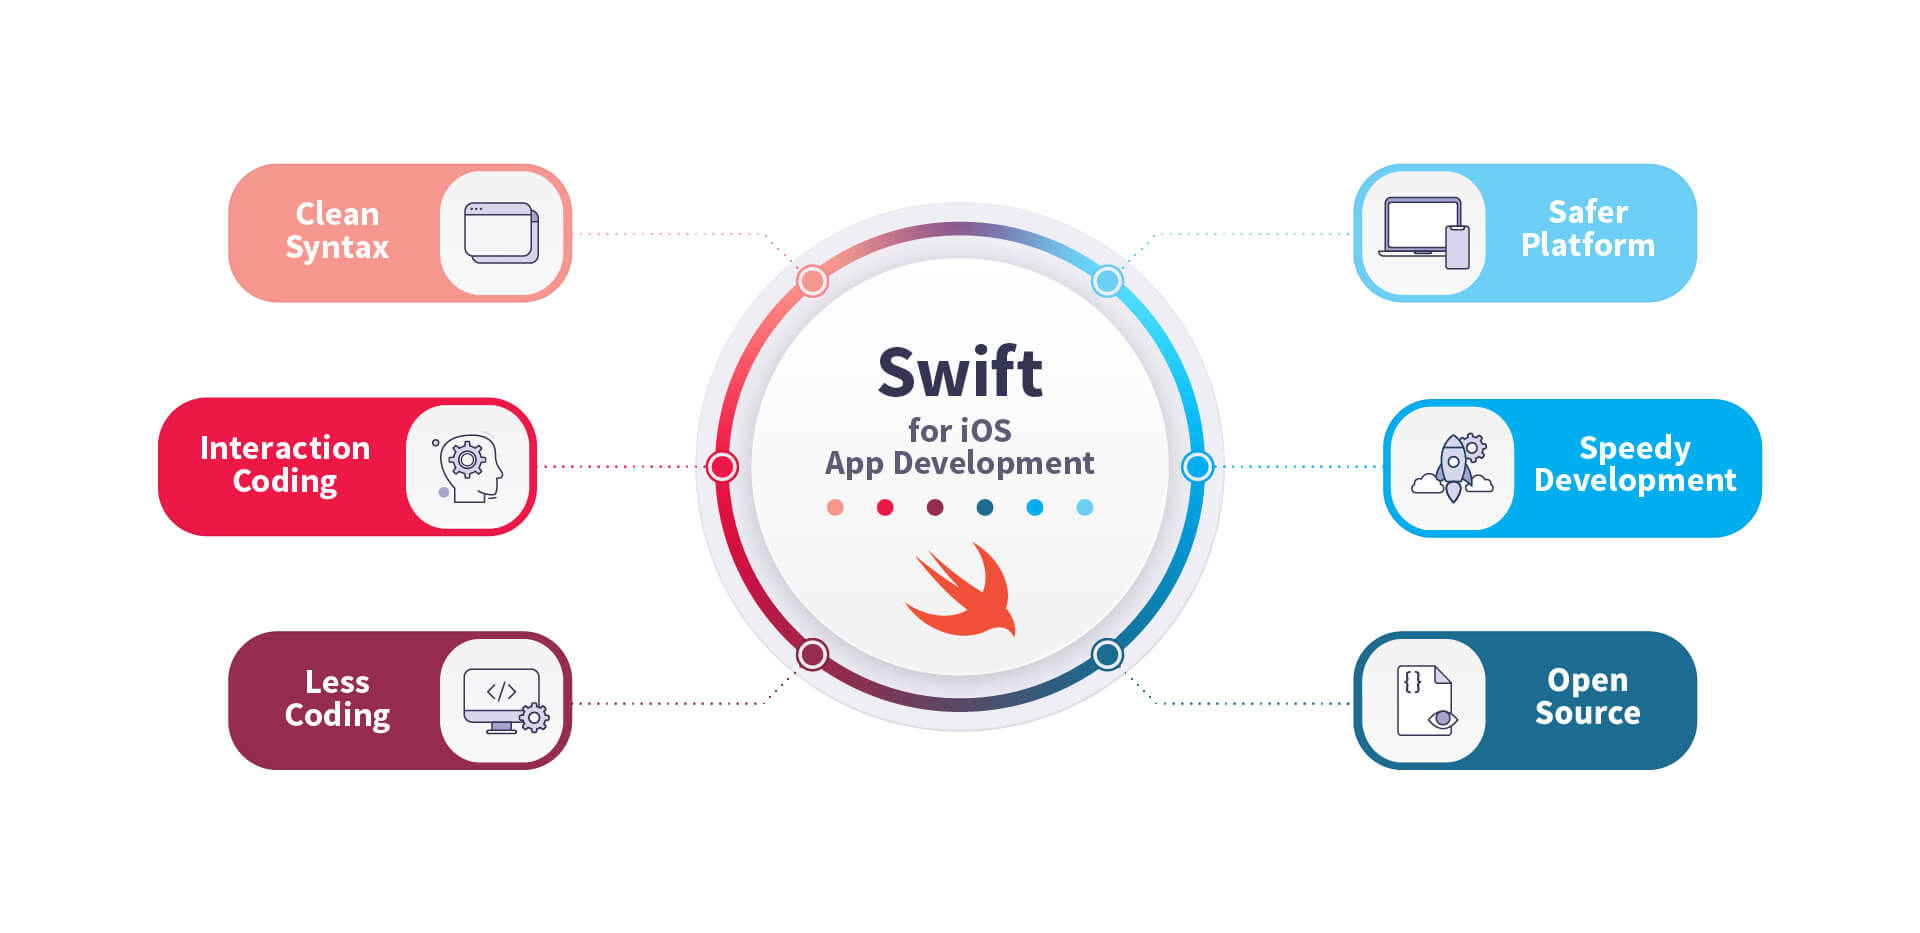
When Swift made its first appearance back in 2014, many developers went berserk thinking that what they’ve spent their time learning for iOS development just went down the drain.
Despite the initial confusion and general fear that what they know is now redundant? Swift is rather solid in its concepts and boldly takes the best bits of programming to make it their own. With 6 years of experience under its belt, Swift has grown into a mature language that’s well respected by the community.
If you’ve already got some programming knowledge, learning Swift should be a breeze. In part, this is because it contains the same ideas that govern C-based languages, Rust, Haskell, Ruby, and Python, just to name a few. So if you already know one of these languages, then Swift should feel familiar to you.
However, if you’re new to coding and you’re learning Swift as your first programming language — don’t feel like you’re disadvantaged by this. Everyone starts somewhere and Swift is a good place.
Here is a quick on the basics of Swift to get you started.
At the foundation of all programming languages are the constants, variables, and data types. Swift is no exception to this. A variable in Swift looks like the standard variable declaration in any other programming language.
var name = "Just another variable"
Changing the assigned variable is a matter of reassignment.
 var name = "Just another variable"
 name = "this variable has changed"
If you use the let keyword instead of var, it becomes a constant and cannot be changed.
There are eight main basic data types and they are int, float, Double, Bool, String, Character, Optional, and Tuples. You can use type annotations to specifically set the type.
 var name: String
 name = "This is a string"
In Swift, there are the basic math operators that do exactly what we expect them to do such as addition +- , multiplication * and division /.
In addition to this, there are also comparison operators that let you compare two or more variables based on their assigned values such as greater than >, greater than or equal >=, and less than <.
The resulting value returned will always be a Boolean because the answer can only be true or false.
To check equality, == rather than a single = is used. A single = tells Swift to assign a value, while a == tells the program that it is comparing two values to determine the truthiness of the statement. You can also use != to check if something is not equal to each other.
In Swift, a function is defined by using the func keyword. Each function has the ability to take in parameters, followed by -> and the expected returned type.
So the skeleton of a function in Swift looks something like this:
 func functionNameHere(ParametersHere) -> returntype {
  //some code here
 }
If we translate this into a real function, it can look something like this:
funct course(name: String) -> String {
return name
}
print(course(name: "Learning Swift 101"))
And that’s the basics of writing functions in Swift.
A loop is a set of statements that repeats until a certain condition is met. Like other programming languages, Swift supports the following:
A for-in loop iterates over a collection of times such as range of numbers or items in an array. The condition is the length of the item, tracked by the index. In Swift syntax, a for-in loop looks something like this:
 for index in variableName {
    statements here
 }
If we translate this to an example, it would look something like this:
var someStrings:[String] = ["Hello", "my name is", "a loop"]
for index in someStrings {
print ( index )
}
In contrast to a for-in loop, a while loop in Swift repeatedly executes a target statement as long as the condition is true.
 while condition {
    statements here
 }
When transposing this into actual code, it can look something like this:
var lifeCounter = 10
while lifeCounter > 0 {
print( "You have (lifeCounter) lives left")
lifeCounter = lifeCounter - 1
}
A repeat…while loop is similar to a while loop. However, the check happens at the end at the executed statements.
 repeat {
    statement(s)
 }
 while( condition )
So in code, it can look something like this:
var lifeCounter = 10
repeat {
print( "You have (lifeCounter) lives left")
index = lifeCounter - 1
}
while lifeCounter > 0
Enumerations in Swift are similar to C and Objective C enumerations. An enumeration is a set of user-defined data types with an attached set of related values. Here is the syntax for enumeration in Swift:
 enum enumname {
    // enumeration values here
 }
When we put this into code, it looks something like this:
enum DaysOfTheWeek{
case Monday
case Tuesday
}
var days = DaysOfTheWeek.Monday
days = .Monday
switch days {
case .Monday:
print("Hello, Monday")
case .Tuesday:
print("Hello, Tuesday")
default:
print("just hello")
}
What’s happening here is that DaysOfTheWeek is defining the enumeration name. Each of the members inside DaysOfTheWeek can be assigned to a variable. In our case, Monday is assigned to the days variable. The switch case allows us to branch into the different outcomes and the corresponding member is matched against the case.
This is just an introduction to the syntax of Swift. There are more to explore in the official iOS development language. Apart from translating the syntax of what you already know over, there are a number of other things such as structures, options, collections, protocols, closures, extensions, and interface builders.
At the base of Swift is the syntax. Once you have that figured out, the next step would be to unravel the visual layer of Swift development. This includes digging into the auto layout and stacking views for building precise user interfaces.
Segues and navigation controllers are also important as it is the thing that lets us define relationships between view controllers and navigation. A good branch off from this would be to dig into tab bar controllers and how the view controller life cycle works.
The next step is to figure out how to create HTTP and URL sessions, in addition to JSON consumption and dealing with concurrency. These topics are extensively addressed by the official Apple iOS development guides available on Apple’s official Books app.

Or if you’re a more interactive learner, Apple also has a Swift Playgrounds app that can teach you an end-to-end approach to iOS development through a gamified approach. The app is primarily aimed at non-coders picking up coding for the first time, but can also be a valuable resource for developers who are looking to not get stuck in tutorial hell. It mostly consists of different modules that can build on different parts and features that are available for iOS devices such as camera accessibility, augmented reality, and the various sensors available.
C++ has been around a long time — since the 70s to be more precise. C++ is especially popular in the game industry because it gives the developer high levels of control over performance, memory, and resource allocations.
The C++ language is part of the C-language family, which means that if you learn C++, there’s a high chance of transferring that knowledge over to niche programming projects that uses C.
This article will give you an introduction to the fundamentals of C++ to help you on your learning journey. If you already know a programming language, most of the concepts introduced here will be familiar. This is because C++ is a partial object-oriented language. So if you’re already familiar with Java and C#? C++ should be a breeze.
A statement is the foundation and building block of all programming. It’s like a code-based sentence that has a specific instruction that causes the program to perform an action.
In C++, a statement often ends in a semicolon. Here is an example of a statement:
#include <iostream> int main()
{
std::cout << "Meow! Meow!";
return 0;
}
Lines 5 and 6 are statements. If you miss out the ;, you will get a syntax error syntax can be viewed as the grammar rules for programming. If your C++ syntax doesn’t follow the established rules, it will be considered invalid.
main() function acts as an entry point for our application. Every C++ program will have one main() function. Programs work in a linear manner. It is a set of instructions executed in turn. If there are multiple main(), you will get a console error because the program doesn’t know which main() is the true starting point.
Commenting in C++ is the same as other major programming languages. // represents a single-line comment. This includes text that may wrap but is technically on the same line because it hasn’t been escaped.
For multi-lined comments are anything that sits in between the /* and */ pair.
For example:
std::cout << "Hello there!n" //std::count is part of the iostream library std::cout << "Just printing another line.n" /* This is a multi-line comment. */ /* For formatting purposes, * it is convention to have a space and * preceding * to give your multi-line text alignment */
Using multi-line comments inside another multi-line comment won’t work and will cause syntax errors because how the * and * are paired up.
The general reason behind using a comment is usually to describe what the library, function, or program does. The purpose of this is to act as a guide to new developers dealing with the code. It is a way to help document your code and make it easier to understand its purpose without needing to go diving into the actual code.
Writing a good comment should inform the developer what the code after it is supposed to represent. This means writing description rich comments.
For example, here is a bad comment:
// Set height range to 0
height = 0;
This doesn’t tell the developer much except what he can already see. Here is an example of a better description.
// The block's height is set to 0 because the game has just started.
height = 0;
In the above example, the comment is description rich and gives the developer context.
In C++, we can access saved variables in memory via an object. A named object is called a variable and the name of that variable is called an identifier. Declaring a variable for the first time (i.e. when you create the variable) is called writing a definition. Once the definition is written, it is called instantiation — that is the moment when the object is first created and assigned a memory space.
Here is an example of a variable definition being instantiated.
int x;
In the above example, the data type is int. There are 7 primary or primitive data types in C++. They are:
int integerchar characterbool booleanfloat floating pointdouble double floating pointvoid valueless or voidwchar_t wide characterYou can also declare multiple variables at once using ,. For example:
int x, y;
Is the same as writing the following:
int x;
int y;
The declared values need to have the same type, or else you’d end up with a syntax error.
To assign a value to a variable, you can do so using the = operator. Once you’ve already declared and initialized the value with a type, you don’t need to do it again.
Here is an example of a variable assignment:
int x; x = 5; int y = 7; //this will also work
Do note that = is an assignment while == is an equality operator used for testing values. This method of using = to assign value is called a copy initialization.
An alternative to this is to perform a direct initialization using a pair of parenthesis ()
int x(5); //example of direct initialization
To initialize multiple variables at once, you can follow the , pattern with assignments. For example:
int x = 5, y = 7;
int a(1), b(2);
Uninitialized variables will not be set as empty but will take on whatever garbage value that previously existed in the memory allocated spot. For example, if you print out an uninitialized value, you’ll get some strange return.
#include <iostream>
int main()
{
int x;
std::cout << x;
return 0;
}
The output will be whatever used to exist where x is currently allocated. No value returned will be the same.
In the first example for this piece, we encountered #include <iostream>. This is the C++ way of importing libraries for you to access their preconfigured functionalities, settings, and methods. In this case, the iostream refers to the input/output library — or io library.
Inside the iostream library, there are several predefined variables that we can use. std::cout is something that you can use to send data to the console as a text output. cout, as strange as it initially looks, actually stands for “character output”.
Here is an example of std::cout in action:
#include <iostream>
int main()
{
std::cout << "How now brown cow!";
return 0;
}
<< is called an insertion operator and allows you to insert your value into the std::cout function.
std::cout can take several printed and calculated parameters, in addition to variables. For example:
#include <iostream>
int main()
{
int x('hello');
std::cout << x;
return 0;
}
hello will be printed in the console as a result. You can have more than one thing printed on the same line. Just add another insertion operator << to create the link. For example:
#include <iostream>
int main()
{
int x('hello');
int y(' brown cow');
std::cout << x << y;
return 0;
}
This will result in the output hello brown cow.
It is good to note that if you have several std::cout, it will still print everything on the same line. std::endl acts as a line break for your console output. Here is how you can use it:
#include <iostream>
int main()
{
int x('hello');
int y(' brown cow');
std::cout << x << y << std::endl;
std::cout << x << y << std::endl;
return 0;
}
Without std::endl, you’d end up with hello brown cowhello brown cow as a single line.
Lastly for this section, there is std::cin — which stands for character input. This lets your console become a little bit more interactive by allowing you to assign user input to a variable. For example:
#include <iostream>
int main()
{
std::cout << "What's your name? ";
int name{ };
std::cin >> name;
std::cout << "Hello, " << name << 'n';
return 0;
}
Note the direction of >> for std::cin. This is because >> is an extraction operator and the input is stored in the variable referenced. n is also another way to create a line break in the console output.
That’s the initial basic syntax for C++. If you already know a programming language like Java, moving forward works on almost the same theoretical foundations. The only major difference that you might need to explore further is how advanced syntax is structured.
If you’re new to programming in general and have a foundational understanding? The next steps from here would be exploring how arrays, functions and files work, object scope, conversions, bit manipulation, and control flows.

Arrays are one of the foundations of data in almost every programming language. The idea of what an array is in C++ is not that much different from arrays in other languages such as Swift, Java, and JavaScript.
But what is an array? How does it work? And what does it look like in a C++ context?
Imagine you had a piece of data. Under some circumstances, this data is a single piece of information. It can be assigned to a primitive type like a string if it is a set of letters, or an int if it is a number.
For example:
string car = "Tesla";
int phone = 8374827888;
However, some pieces of data can be complex. What if you wanted to hold more than just one piece of information against a single variable? What if you wanted a list?
This is essentially what an array is – a list. An array is a data type that can hold multiple values against a single variable. An array is identifiable through a pair of [] and looks something like this:
string cats[4] = {"tuxedo", "ginger", "black", "striped"};
The number inside [] signifies how many items there are in the list. The string declares the list as a list of string typed values.
But what if you don’t know the size of your array? Can you create an array without specifying how many items there are in the list? The answer is yes.
You don’t have to specify the array size and can write it with a pair of empty []. The array will only be as big as the number of items assigned.
For example:
string cats[] = {"tuxedo", "ginger", "black"};
//the size of the array is 3
On the surface, this just seems so much easier. However, in C++, if you specify the array size, it won’t be able to accommodate future values. In the above example, there is only enough space for three items. You can’t add any more to it easily without overwriting the original values.
When you specify the array size, you are preserving memory space for it. This means that you insert more items into the arrays as needed without being required to overwrite the entire array.
For example:
//when writing arrays with an unspecified number
string cats[] = {"tuxedo", "ginger", "black"};
//doing this won't work
cats[3] = "striped";
//but this will
cats[] = {"tuxedo", "ginger", "black", "striped"};
//however, when space is reserved, this will work
string cats[5] = {"tuxedo", "ginger", "black"};
cats[3] = "striped";
When you declare an array with the size attached, it also allows you to create an array without any values attached. This can come in useful if you want to add values later.
For example:
string cats[4];
cats[0] = "tuxedo";
cats[1] = "ginger";
It is good to note that in C++, you can’t create mixed type arrays. So, a piece of information that looks something like this cannot be assigned to an array.
{"tuxedo", 1, "banana", 1.34}
An array in C++ can be assigned against any primitive types available.
To access a specific value inside an array, you need to match its position in the list by signifying it inside the [].
For example:
string cats[4] = {"tuxedo", "ginger", "black", "striped"}
count << cats[0];
//outputs "tuxedo"
To change a value inside an array, you can just do it via the = assignment operator and matching it with the position inside the [].
For example:
cats[1] = "Ginger";
//ginger will now be Ginger
Looping through an array can be done through a for loop and looks something like this:
string cats[4] = {"tuxedo", "ginger", "black", "striped"}
for(int i = 0; i < 4; i++){
  cout << cats[i] << "n";
}
The i is representative of the index value and for every cats[i], the associated value will be printed.
So that’s the syntax basics of arrays. But surely, there’s more to it than that. To quench your curiosity – you are very much correct.
When it comes to arrays in C++, it is a collection of items stored inside contiguous memory locations. This is why the array size needs to be declared, especially if you’ve got plans for it in the future.
Every time an array is created, memory is reserved for it. C++ is a highly efficient and strict language, meaning that it will only reserve as much memory as it needs and does not automatically scale.
The major advantage of arrays in C++ is that it allows random access of elements via the array’s index. It uses less code and can assign multiple elements at once. Running through an array is as simple as using a loop.
However, the drawback of arrays in C++ is that it works on a fixed number of elements. This means that once it’s created, you cannot add any more. This is because an array in C-based languages is not dynamically typed like it is in JavaScript.
A multidimensional array is when there are more than one value inside a value. This sounds a little confusing, so let’s look at an example.
int x[2][4];
The above is declaring a data matrix that looks something like this:
        col 1   col 2   col 3   col 4
row 1 x[0][0] x[0][1] x[0][2] x[0][3]
row 2 x[1][0] x[1][1] x[1][2] x[1][3]
The actual data can look something like this:
int x[2][4] = {
  {1, 2, 3, 4},
  {5, 6, 7, 8}
}
As you can see, there are two rows of data with four columns inside each row.
For example, if you had something like this:
int x[2][3][4];
Your data would look something like this:
int x[2][3][4] = {
  {{1, 2, 3, 4},{5, 6, 7, 8},{9, 10, 11, 12}},
  {{13, 14, 15, 16},{17, 18, 19, 20},{21,22,23,24}}
}
To decrypt the above declaration, x[2][3][4] can be read as the following:
It also means that the maximum value that x[2][3][4] can hold is 24 values. To loop through the array to get to a specific value, you’ll need to create loops with matching depths.
That’s basically arrays in a nutshell for C++.
If you’re new to the concept, just think of it as a list, and to access a specific value, you only need the associated coordinates. The maximum number of values you can store inside an array is based on the multiplication of all its dimensions.
For example, x[3] will have a maximum of 3 values attached to it. x[3][3] will have a maximum of 9 values inside its array. x[3][4][5] will have 60 spaces available and provisioned storage associated with it.
It’s hard to understate the importance of testing in software development. In fact, testing products before release is critical no matter what type of product you’re developing. No one wants a defective product, no matter how feature-rich or innovative. And no one wants to be woken in the middle of the night to fix a line of code that just cost the organization thousands.
So it’s no wonder that there are countless methodologies and approaches to testing and quality assurance of products and services. When it comes to software testing, having a well-planned and thorough testing strategy throughout the software development cycle is important.
Though many prefer the “code fast, break things” approach, having a testing strategy and process are something you should develop and adopt long before your software meets the clumsy hands of end-users. This is especially true when the development of a single piece of software is divided among numerous developers or teams of developers.
Making sure it all works in tandem without any components breaking the functionality of others apart is no easy task. It requires different kinds of tests, performed by different stake-holders in the process at different stages of development.

Two of the most commonly used types of tests used in software development today are unit tests and integration tests.
In this post, we’ll define what each is, who is responsible for it, how it is performed and when. In addition, we’ll compare the two side-by-side and discuss the importance of using both.
Unit testing is a type of software testing that is applied to individual units of code, also known as modules or components. Unit tests are usually written and conducted by developers to ensure the code functions as expected and is ready to be included in the project codebase. They are the first tests to be run on any code throughout the development lifecycle.
Fairly basic and narrow, unit tests do not take into account any dependencies like database, network or other software components. Since unit testing only checks for basic functionality, then nonfunctional and coverage issues, bugs are never logged. Instead, they are fixed by the developer before ever getting near the codebase.

Testing each function, procedure, component and method individually may sound like a hassle. However, it helps to reduce the costs of bug fixes later on. Not only does it help prevent bugs in the software codebase, but it also promotes good coding hygiene. By running unit tests, developers can learn from their mistakes almost immediately.
Moreover, since it is the very first level of testing? Having good unit tests leads to a significant reduction in time and effort needed from developers and testers to find and fix bugs down the road to production. The sooner you catch bugs – the better. And this is the earliest test that can.
Integration testing is a type of software testing that is intended to check and verify that different modules and components of the software work together as expected when combined. Integration tests are traditionally performed by testers using test stubs and test drivers.
Complex and fairly difficult to set up (in most cases), integration tests aim to locate and expose errors and issues in the interaction and integration of code modules. These modules, that were individually tested through unit tests previously, are then checked for faults in integration between them.
In integration testing, the code is tested using real dependencies like hardware, network, database and others. Issues encountered are then logged as bugs.

Being as complex and tricky as it is to test compatibility between multiple components, it’s almost unavoidable. The product you deliver is not just a collection of functions and variable names that compile. You’re creating a system or application that needs to work in a holistic way, without any hidden hindrances.
A single function or component may work just fine as a unit in testing. However, running integration tests can help you uncover numerous bugs that result from incompatibility between components that work just fine on their own. Such issues include data exchange bottlenecks, erroneous function calling and unexpected hardware issues on user devices.
To better understand the similarities and differences, let’s look at unit testing and integration testing side by side.
| Unit testing | Integration testing | |
| Functionality | Testing a single component (unit) for bugs | Testing interoperability between multiple components (units) |
| Target | Modules | Interfaces |
| Owner / conductor | Developer writing the code | Tester |
| Speed | Quick | Slow |
| Complexity | Low | High |
| Scope & dependencies | Narrow scope, ignoring external dependencies | Broad scope, considering all relevant external dependencies |
| Maintenance | Low | High |
| Stage in development lifecycle | Early – as soon as a piece of code is completed | Performed after individual units are tested, and before testing the system in full (system testing) |
| Code proficiency required | High | Medium |
| Cost | Low | High |
| Types | Single type | Divided into different types: Top-down Integration, Bottom-Up Integration, etc. |
Consider a puzzle. No matter how perfectly polished and accurately cut each piece is, if they don’t fit together as expected and intended, they are worthless. On the other hand, poorly printed or cut (or missing) pieces will leave you with an incomplete creation as well.

When it comes to software development operations? Understanding and employing the various tests in the development lifecycle is key to an efficient and headache-free DevOps experience.
So as you orchestrate the phases of testing and quality assurance through your CI/CD pipelines, remember that at the end of the day, you’re the one putting the puzzle together for deployment to end users.
Object-oriented programming (OOP) is something that’s been around for so long that everyone has kind of accepted its existence. However, there is a growing anti-sentiment among certain programming groups against OOP, citing organizational inefficiencies and potential growth of code debt.
The natural alternative to OOP is functional programming (FP). Functional Programming follows the idea that a piece of code is stateless and works in a declarative manner. This means that the program exists to solve a specific problem through transforming the input.
In programming, there are two specific ways to transform an input. The first is via an imperative method, meaning that it focuses on describing how the program works through a list of sequential steps to arrive at a specific outcome. You can’t mix and switch out the sequence without some side effect consequence.
For example, here is a pseudo imperative program:
Start.
Check initial status of socks.
If no socks on feet, locate socks and put it on.
Remember new state, otherwise continue.
Put shoes on.
End.
In the above example, you have to put socks on before shoes. If you change the order of the command, the outcome would produce an error.
In contrast, declarative programming is a little more flexible. There is no order needed to achieve a particular outcome. Mathematical rules are a good example of declarative programming.
For example, regardless of order, the result will remain the same.
1 + 2 + 3 = 6
2 + 3 + 1 = 6
Functional programming is declarative in nature. It’s not concerned with states and will return the correct output if it follows the entire program.

On the whole, functional programming just seems so much easier to deal with in the long run. No more trying to figure out states, where your program is at and how it might fall over if your state isn’t right.
A good portion of OOP relies on states and that state can blimp out if something went wrong at a particular step. By design, OOP thinking works around things and doing things to these things in a particular order. It sounds imperative on the surface, but OOP itself is not 100% imperative.
By default, OOP is the default thinking method taught in programming courses. In the growing age of self taught, many new developers are starting with OOP and ended at OOP.
However, many senior developers are hitting up against OOP. In part, it’s because many developers fail to keep their states exclusively separated and mutations occur through the shared relationship between objects.
The bigger the object grows, the harder it becomes to keep that object maintained and concise. Over time, the pattern that simplified the thinking process takes up more time than its actual modification.
If object oriented programming is like a house, extending an object is like adding another room. When the house is small, it’s easy to see where everything is and the structure is generally sound. However, when you start adding levels and layers, if the foundations are not made with the extension in mind, it can become unstable and collapse.
In the code, when things get too big, it turns into one big glob of a global state – which is never a good thing and often a last resort. When the last resort becomes a frequent resort, then you know that your code has fallen over itself and requires more time to clean up than to add something meaningful to it.
At that point, your entire program becomes more cumbersome to maintain, costly to sustain, and a general hindrance to your general output.
Functional programming, as a result, has been gaining traction in awareness and general application. This is because functional programming is the polar opposite of what object-oriented tries to be. It discards the concepts of states completely and prevents unwanted relationships from forming.
Despite solid arguments for functional programming, object-oriented is often etched deeply into the actual programming language itself. JavaScript, for example, is a multi-paradigm with prototypal OOP foundations. In JavaScript, everything is an object – no matter how hard you want to deny it through a functional approach.
Java allows for a purely functional approach, but it requires a mindset shift that limits your ability to use things like primitives, classes, mutables, and loops. The idea that all you need is a function like a big step backwards when you suddenly discard all your potential tools in your programming language.
However, what most people don’t realize is that when it comes to functional programming, there’s more to it than just writing straight forward functions. The thinking behind FP is that your code is no longer a list of instructions anymore – something which object-oriented programming often find themselves trapped in. Rather, with functional programming, you have a collection of functions that you can ‘compose’ with.
The idea behind composition is that relationships are established via an interface link that allows the function to remain separated and reused in other places. In an OOP class inheritance based system, the created object is tightly coupled with the parent or superclass.
This means that if something in the parent or superclass changes, it may have an undesirable impact on the children. The effects of change can also flow upwards, where children classes are able to mutate certain things that are contained within the parent or superclass.
The issue with inheritance is that it can cause unnecessary two-way mutations. Functional programming, however, is a one way street and any change created is flowed through in a unidirectional manner.
Here’s an example to help you distinguish between a functional composition approach vs OOP class instance inheritance.
Imagine you have a car. Under OOP class instance inheritance, your car would look something like this:
class Vehicle {
// vehicle definition here
}
class Car extends Vehicle {
// car is now a child of vehicle
}
With OOP, the vehicle is a car.
However, with a functional composition approach, the idea of vehicle is discarded completely. Rather, the functionalities, bits and pieces are broken up like lego and then reassembled to form a car.
So rather than saying that the vehicle is a car. You change your thinking to the car has a door, wheels and steering wheel.
With a functional approach, you are composing what your car looks like rather than pre-defining it and hoping that it doesn’t change.
The major perk in composition is that it makes your program more flexible towards change. While it creates an object-like result, the process of assembly differs greatly from an OOP inheritance methodology.
As more developers work to ship code in a rapid fire manner, they will eventually encounter the issue of the object growing too big and complex to properly maintain. That’s when functional programming will start to take over their workflow and thinking processes.
What we need to acknowledge is that object oriented isn’t bad. Over the years, we’ve seen development in the balance between OOP and FP. The thing about object oriented and functional approaches is that they are just implementation ideologies.
These ideas were initially created to solve a specific type of problem. for OOP, it was to try to encapsulate the world in a diecast style. However, the thing with diecast is that you can’t easily change them. They might be modular, but as the complexity grows, that modularity needs to also be flexible to accommodate.
Functional programming is a much more modular approach – but it also contains many small parts that need to be coordinated in an efficient manner. It’s easy to lose track of things, especially in a team setting. With objects, you can see the shape right away.
It’s the functionality extensions that’s becoming an issue. Functional programming has an equivalent issue where the shape can get lost in the sea of modular pieces.
So is object-oriented dead or alive?
That question is too black and white.
In part, it’s because OOP is evolving as languages that support it come out with hybrid solutions. JavaScript, for example, is OOP by design but strongly supports functional programming based ideas. This gives the opportunity to mix and match ideas based on the required situation.
The point of programming is to translate ideas. What the programmer ends up using is a judgement call that’s marked by the demands of the project, what the boss wants and how much time they’ve got to work on the code. Nothing is ever a clean sandbox and sometimes, entrenched implementations of OOP may be the thing that’s holding the project back. But as new ways of thinking about OOP with a functional approach emerges in the community, the programming idea moves along in time with what the language of choice has decided to support.
In short, object oriented is neither dead, nor is it truly alive. Rather, it’s an evolving creature that’s absorbing other abstraction ideas in order to be more effective as an ideological implementation.
Over the past decade, the web and its data requirements have changed dramatically. When REST APIs came out, SOAP was the predominant methodology for obtaining data from a database. The main thing that allowed REST to take off was its ability to easily communicate data for the frontend to consume.
However, over the years, data requirement complexity has increased. This is increasingly complicated by the different views and user experience requirements for different types of devices and interfaces.
Why is that?
In part, it’s because REST APIs are intricately linked to the frontend views. As frameworks, libraries and platforms come out with new ways to quickly prototype, the backend’s ability to keep up with the speed of changes required is simply not working out with REST.
This is where GraphQL comes in. But what exactly is GraphQL? How does it work? And what’s the difference between REST and GraphQL?
GraphQL has its origins at Facebook. During the time of its development, Coursera and Netflix were also developing something similar. Why is this important? Because it signifies a problem that REST doesn’t address – the need for APIs to be able to adapt to the rapid changes required by the frontend.
While REST is a robust methodology of creating APIs, it’s not elastic in nature. With increased frontend scopes, along with the growing need for iterations and expectations for rapid feature development, an application stack with REST APIs requires time for coding. Why? Because REST requires individual creation of each API.
For example, let’s take a look at a hypothetical set of endpoints requirements for changing an item in the cart.
v1/get/item/{id}
 v1/post/removeItem/{id}
 v1/post/item/quantity/{quantity}
 v1/post/item/setVariation/{id}
 v1/post/item/removeVariation/{id}
This is just a quick rundown of what APIs could be made. There’s still the cart management itself, shipping details, promotion codes, special user features, cross sells, upsells and whatever else marketing and UX designers can think up to increase sales.
With REST APIs, you need your backend developers to create an endpoint for all your data requirements. But what if you’re still a bit fuzzy on what you want? What if the business decides to change the requirements midway and come up with a new design? What if the design requires a completely different way of thinking about the data?
All these questions need to be addressed by both frontend and backend developers, resulting in a longer time to production and potentially making work completed a sunk cost to the team.
GraphQL addresses these issues by giving the frontend more power when it comes to data needs.

In a nutshell, GraphQL is a data query language. It lets you interface with a backend implementation that connects up with the database. The backend is still responsible for access controls and deals with how data gets passed between the frontend and the database.
However, GraphQL removes the backend requirement of needing to create specific endpoints for each type of data needed. With GraphpQL, a developer only needs to call a single endpoint and go from there.
This simplifies the process of moving data through APIs and significantly cuts down on the work required every time something new or changes crop up in the specifications.
While GraphQL has been predominantly associated with React, it can be used anywhere and not limited to the library. The association came about due to it being created by Facebook and its initial launched with React.js in 2015 at React.js Conf.
GraphQL allows the frontend to dynamically iterate and design data based on their needs. The frontend developer own needs to send a single request.
While a REST API may be stateless and creates a structured methodology for accessing resources, its major drawback is the high possibility of over or under fetching.
Why is this a problem?
When it comes to mobile-based devices, data size is crucial to the speed of the application. Unlike desktop-based environments where internet connection is generally more stable, mobile network speeds can vary depending on location, service providers, and service areas. The smaller the dataset, the better chances of your user remaining calm and not get frustrated by the slow load time.
Over fetching data results in unnecessary data being transferred. Under fetching can end up with a n + 1 issue – that is, for every additional piece of data required, an additional call API call is needed. So your API calls can result in a tree of calls, which can slow down the responsiveness of your application because of the wait time in between each API.

In contrast, GraphQL lets a developer create dynamic data based on the view’s requirements and only call what’s needed. The query is based on an understanding of how data is structured. In contrast, a REST endpoint will have specific requirements, meaning that documentation is required for every single endpoint.
GraphQL in the backend is implemented based on the schema called Schema Definition Language (SDL). The schema sets the general structure for accessing data. For example, to access the item’s table, a backend developer can set the SDL for GraphQL to something like this:
 type Item{
     name: String!
     quantity: Int!
     availability: Boolean!
     variations: Boolean!
     variationList: Array!
     maximumPerCustomer: Int!
     unitPrice: Double!
     shippingClass: String!
 }
All the data above will be accessible by the frontend. However, unlike a REST API, where you’ll end up getting everything, including things may not need for your view, GraphQL lets you create queries and filter a return of data based on what your view needs.
For example, a query for just the name and unitPrice might be required for one view, and only name and shipping class is required for another. Rather than the backend needing to create two REST APIs, the frontend developer can create two queries to the same endpoint.
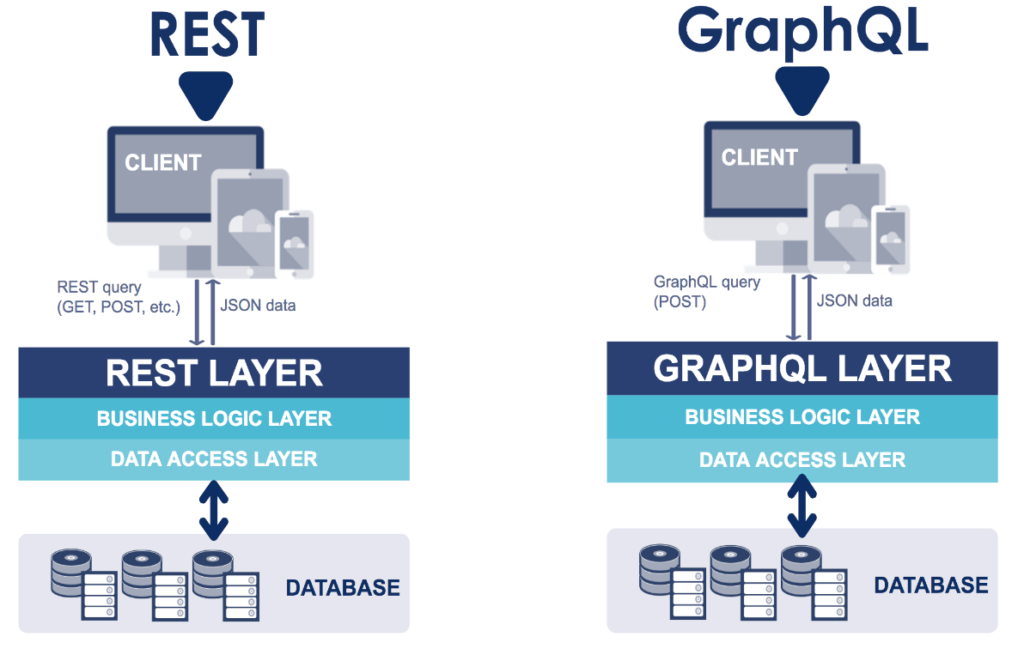
REST
GraphQL
REST APIs are still relevant and aren’t going to become obsolete when you wake up tomorrow. A majority of the web is still structured in a RESTful manner. However, GraphQL is making headway into the development world as more and more developers adopt it into their application building process.
GraphQL has been around since 2012 but just started to gain traction in the past few years as developers look for ways to increase their output and overall productivity. REST will still be around, but the space of data access and controls is being shared with GraphQL as the query language becomes more mainstream.
More cloud-based providers are also taking up support for GraphQL as part of their product offering. This reduces the overall time required to get an application built by reducing the task of creating a backend to control data access.