//
Subscribe to the Tabnine newsletter
//
Get news and updates about AI, software development, and more.
Unit testing is a method of testing that breaks down software into the smallest possible units of code, which are then tested individually for correctness. In the context of C#, a unit would typically be a single method within a class. This method of testing is essential to ensure that each individual piece of your application is performing as expected.
One of the significant benefits of unit testing in C# is that it promotes the creation of modular and independent code. By focusing on testing individual units of code, developers are encouraged to write methods that are self-contained, and thus, easier to manage. Unit tests also serve as a form of documentation, providing insights into how certain methods in your application are intended to behave.
Unit testing is not just about finding bugs early and fixing them. It’s also about design. When you write a unit test, you’re thinking about how it should work and how it can be improved. In essence, unit testing in C# encourages better design principles and leads to more maintainable code.
Learn more in our detailed guide to Unit Testing in C#.
A test fixture is a set of preconditions or baselines that must be met before a test case can run. In C#, a test fixture might be a class or a method annotated with the [TestFixture] attribute.
Test cases are individual units of testing. They represent a single scenario that the unit of code should be able to handle.
The importance of test fixtures and test cases lies in their repeatability. Once a test fixture is set up, it can be used to run multiple test cases, ensuring that each test case starts with the same initial conditions. This reduces the possibility of tests affecting each other, allowing for more reliable testing.
In unit testing, setup and teardown are two critical concepts. The setup phase is where you prepare the conditions for your test, while the teardown phase is where you clean up after your test. In C#, this is typically done by creating methods annotated with [SetUp] and [TearDown] attributes, respectively.
The setup method runs before each test case and is where you would initialize any objects or variables needed for the test. The teardown method, on the other hand, runs after each test case. This method is used to clean up any resources that were used during the test, ensuring that no unwanted side effects linger after the test is completed.
Data-driven tests are a technique where the test data is separated from the test logic. Instead of hard-coding values into your tests, you can use this technique to feed a variety of data into your tests at runtime.
In C#, you can create data-driven tests using the [TestCase]attribute. This attribute allows you to specify different sets of input for your test method, effectively allowing you to run the same test multiple times with different data. This technique is particularly useful when you want to test a method against a wide range of inputs.
Sometimes, it’s not enough to test that your code works under normal conditions. You also need to test how it behaves when things go wrong. That’s where exception testing comes in. In C#, you can test for expected exceptions using the[ExpectedException] attribute.
This attribute allows you to specify an exception type that you expect your test method to throw. If the method throws the expected exception, then the test passes. If it doesn’t, the test fails. This allows you to ensure that your code is correctly handling error conditions.
Related content: Read our guide to Unit Testing with Python.
MSTest is Microsoft’s unit testing framework for all .NET languages and it comes built in with Visual Studio.
MSTest provides a set of attributes that you can use to define your test fixtures, test cases, setup and teardown methods, and more. It also includes a test runner that you can use to run your tests and view the results. The framework is straightforward to use and integrates seamlessly with Visual Studio, making it a popular choice among C# developers.
In addition to the basics, MSTest also supports more advanced features like data-driven tests, ordered tests, and asynchronous tests, making it a versatile tool for all your unit testing needs.
What are attributes in MSTest?
Attributes are used to control and manipulate how tests are run. They can be applied at the method, class, or assembly level. Here are some of the main attributes you’ll use when unit testing in C#:
TestClass: This attribute is used to denote a class that contains test methods.TestMethod: This attribute is used to mark a method as a unit test method.TestInitialize: Methods marked with this attribute run before each test method in the test class.TestCleanup: Methods marked with this attribute run after each test method in the test class.Learn more in our detailed guide to Unit Testing Vs Integration Testing.
Here are the basic steps for creating unit tests with the MSTest framework.
If you have Visual Studio installed, you already have MSTest as it comes bundled. However, to create and run tests, you need to create a test project.
To create a new test project, open Visual Studio, click on File > New > Project, type Unit Test into the search box and MSTest Test Project. Name your project and click Create. A new project with a sample test class will automatically be created for you.
Now that we have our environment set up, let’s write our first unit test. In your test class, you can create a new test method with the [TestMethod] attribute above it. This attribute tells MSTest that this is a unit test method.
For instance, if we want to test a method that adds two numbers, our test can be as simple as this:
[TestMethod]
public void Add_TwoNumbers_ReturnsSum()
{
    // Arrange
    var calculator = new Calculator();

    // Act
    var result = calculator.Add(2, 3);

    // Assert
    Assert.AreEqual(5, result);
}
This test checks whether the Add Addin the Calculatorclass returns the correct sum of two numbers.
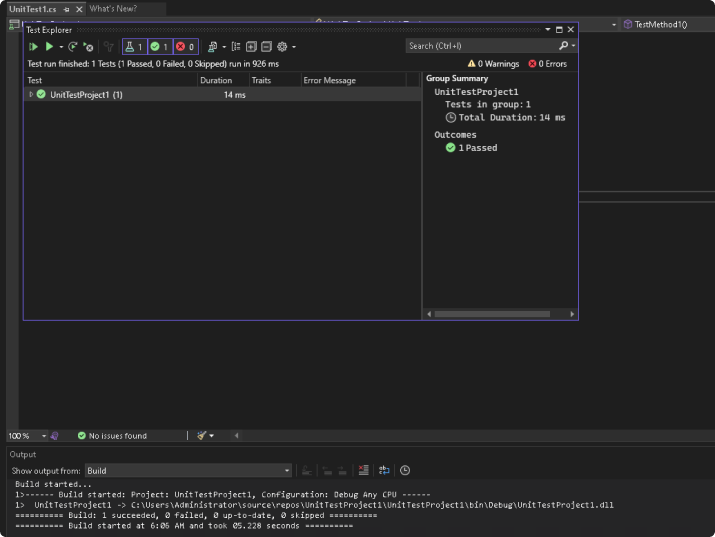
Once you have written your tests, you can run them to see if your code is working as expected. To run your tests, from the top menu in Visual Studio, click Tests > Test Explorer > Run All. The Test Explorer window will show the progress of the tests and display the results once all tests have been completed.

Each test method is run independently of the others. This isolation ensures that the state of one test cannot affect the outcome of another test. If a test fails, it means that there’s a bug in the code that needs to be fixed.
Assertions are the heart of unit tests. They are used to verify that the result of a test is as expected. MSTest provides a wide range of assertion methods in the Assertclass.
For example, Assert.AreEqual(expected, actual)verifies that two specified values are equal. If they’re not, the test fails. Assert.IsTrue(condition)verifies that a specified condition is true. If it’s not, the test fails. There are many more assertion methods available in MSTest, each designed for specific types of assertions. Mastering these assertions is key to writing effective unit tests in C#.
Related content: Read our guide to Unit Testing with Java.
Tabnine is the AI code assistant that helps development teams of every size use AI to accelerate and simplify the software development process without sacrificing privacy, security, or compliance. Tabnine boosts engineering velocity, code quality, and developer happiness by automating the coding workflow through AI tools customized to your team. Tabnine supports more than one million developers across companies in every industry.
Tabnine Chat can help with every stage of development, right in your IDE:
Unlike generic coding assistants, Tabnine is the AI that you control:
It’s private. You choose where and how to deploy Tabnine (SaaS, VPC, or on-premises) to maximize control over your intellectual property. Rest easy knowing that Tabnine never stores or shares your company’s code.
It’s personalized. Tabnine delivers an optimized experience for each development team. It’s context-aware and can be tuned to recommend based on your standards. You can also create a bespoke model trained on your codebases.
It’s protected. Tabnine is built with enterprise-grade security and compliance at its core. It’s trained exclusively on open source code with permissive licenses, ensuring that our customers are never exposed to legal liability.
Read more about AI for software development in our guide for AI coding tools.
Watch this video to learn more:
Get started with Tabnine for free today, or contact us to learn how we can help your engineering team be happier and more productive.
Explore recent posts
//Explore recent posts
//
5 -min read

5 -min read

3 -min read
More How-to's
//3 -min read
3 -min read
3 -min read