//
Subscribe to the Tabnine newsletter
//
Get news and updates about AI, software development, and more.
Flutter is an interesting piece of tech released by Google. It is open-sourced by nature and was released in mid-2017. In terms of tech age, it’s on the verge of being a teenager. Over the past year, the Flutter community has grown significantly with more developers considering it as an option to other multi-platform mobile development.
Under the hood, Flutter runs on a language called Dart. Rather than sticking with Kotlin or Java, Google’s decision to go with Dart makes it more accessible to programmers coming into mobile development via the web route.
For the uninitiated, Dart is a language that looks like Java and JavaScript had a child. It takes the best of both worlds (along with some other programming languages) and puts it into Dart. This resulted in a programming language that is lighter, cleaner, and better at handling things like interfaces, mixins, and abstracted classes.
While this is nice to know, it’s not really why we’re here. We’re here because Flutter is a UI software development kit. This means that it’s a system of organizing your Dart code in a particular way that results in an ideal mobile interface, complete with data service connections and the ability to compile to Android, iOS, Google Fuchsia, and JavaScript-based app.
If you’re still a bit sketchy on this, the easiest way to think about is to see Flutter to Dart as your Angular, React, or Vue app to JavaScript – with the addition to compile into mobile apps.
In contrast to other SDKs and frameworks currently available, Flutter has a UI first approach. The widget system lets you structure and organizes your UI elements in a nested tree manner.
The easiest way to explain this is for you to see all the parts together. In code, it looks something like this:
import 'package:flutter/material.dart';
void main() => runApp(MaterialApp(
home: SquirrelCard(),
));
class SquirrelCard extends StatelessWidget {
@override
Widget build(BuildContext context) {
return Scaffold(
backgroundColor: Colors.grey[900],
appBar: AppBar(
title: Text('Random Little Mobile App'),
centerTitle: true,
backgroundColor: Colors.grey[850],
elevation: 0.0,
),
body: Padding(
padding: EdgeInsets.fromLTRB(30.0,40.0,30.0,0),
child: Column(
crossAxisAlignment: CrossAxisAlignment.start,
children: <Widget>[
Text(
'Website',
style: TextStyle(
color: Colors.grey,
letterSpacing: 2.0
)
),
Text(
'tabnine.com',
style: TextStyle(
color: Colors.amberAccent[200],
letterSpacing: 2.0,
fontSize: 18.0,
)
),
Text(
'Name',
style: TextStyle(
color: Colors.grey,
letterSpacing: 2.0
)
),
Text(
'Aphinya Dechalert',
style: TextStyle(
color: Colors.amberAccent[200],
letterSpacing: 2.0,
fontSize: 18.0,
)
),
Text(
'Description',
style: TextStyle(
color: Colors.grey,
letterSpacing: 2.0
)
),
Text(
'I read. I write. I code. #devLife',
style: TextStyle(
color: Colors.amberAccent[200],
letterSpacing: 2.0,
fontSize: 18.0
)
)
],
)
),
);
}
}
On an abstracted structural level, it looks something like this:

Excluding void main(), every box is a widget. appBar is a stand-alone widget while body has a child widget that has six other widgets. Each parent widget can be seen as a representation of the structure, while the innermost children widgets are the actual elements themselves.
What it actually looks like as a mobile app:

This is basically Flutter’s widget system in a nutshell. But why does it matter?
The UI first design flips the usual coding flow from a data-first perspective into one that allows you to compose the UI first and worry about structure and data connections later. Flutter is a UI kit, which means that it comes with a large set of predefined features that take into consideration what a mobile app might need. We’re talking about things like text boxes, text, images, buttons, and toggles.
This allows you to compose your app’s elements and then systematically define their visual uniqueness in a CSS-esque manner. This way of thinking is different and important to developers because it rearranges the separation of concerns into a view-centric system, in contrast to a code-type system.
Here is a generalized diagram to help you visualize the differences.
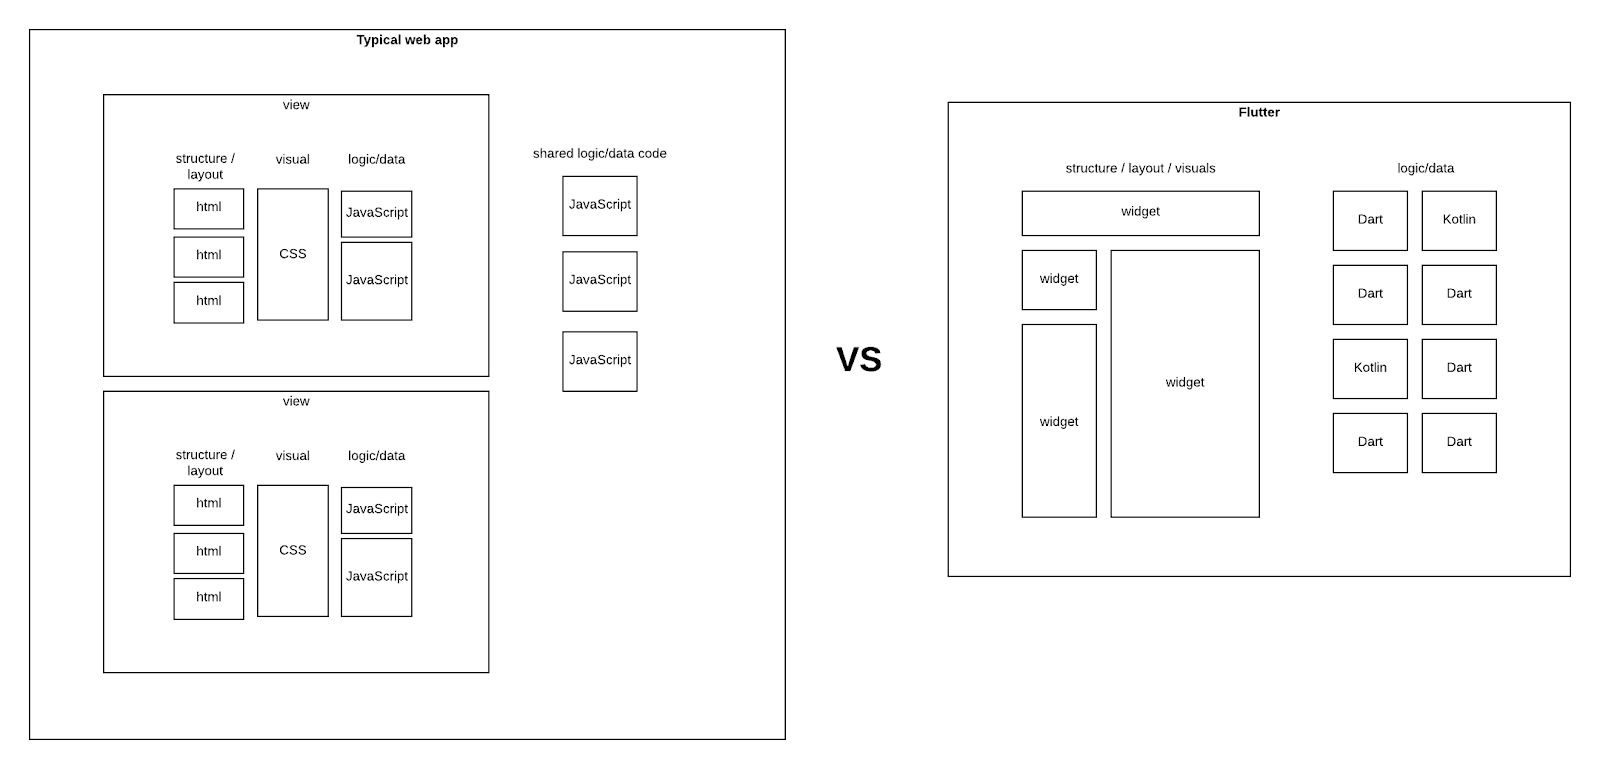
If you look at the Flutter code above, it may seem like there is a lot of nesting. While it might feel off-putting at first, it works if you switch your brain to think of the UI from a designer’s perspective. If you really look at it, you’ll find that it’s like looking at nested HTML code but without the stray or missing closing tags.
The widget works by abstracting down to a primitive UI element. Much like string, boolean, and int in code, a primitive UI element is something that is simple and one dimensional in nature. It holds a single value, or in our case, a single UI value.
For example, a piece of text is a primitive UI element, along with text inputs, labels, radio buttons, and checkboxes. The way you dress it up with styling is akin to setting a value to it. You might have a single type of value through styling. Or you might have two types – the styling and the value of the primitive UI element such as text displayed or the current state like the boolean against a checkbox.
That’s basically Flutter widgets in a nutshell. But how do you construct a Flutter widget?
By default, when you create your first Flutter project in Android Studio, you’ll get given some starter code. While this is nice, the issue with this code is that it doesn’t do hot reload. This means that if you make a change in your code, you also need to recompile.
To achieve hot reloading, you just need to start with this structure:
void main() => runApp(MaterialApp(
  home: YourWidget()
  ));
class YourWidget extends StatelessWidget{
  //the rest of your code here
}
The major difference between the above code and the starter code is that your widget is abstracted out and restructured. So rather than extending your base class, you just add additional widgets after the home list. MaterialApp() wraps your widgets in Google’s Material Design default styling.
Now that we’ve got the gist of the basics, the next part is creating the widget itself. To do this, you wrap the widget’s contents inside Widget build(BuildContext context){}
So your code looks something like this:
class YourWidget extends StatelessWidget{
  @override
  Widget build(BuildContext context){
  return Scaffold(
  // your structure/grouping here
    // your primative UI
  //your structure/grouping here
    // your primative UI
  )
  }
}
Inside the Scaffold, you have the ability to place a primitive UI widget directly or create a group of primitive UI widgets through a wrapper widget.
For a list of available widgets in Flutter and how to specifically use them, you can check it out at Flutter’s official documentation at Flutter Widget Index.
Flutter can feel a little weird at first, especially if you come from a siloed code type background. Siloed code type is basically how every other framework is structured. The power of Flutter lies in its design-first approach, meaning that you focus on creating the UI. This is a big contrast to the task of trying to create everything else first before you can have a semi-functional UI.
In comparison to traditional mobile development, Flutter’s widget system merges what could have easily been at least three files into one. As a result, Flutter is more succinct to mentally digest and write.
Flutter starts with the frontend from the get-go and assumes that you’ll eventually get to the data and logical layers. There is no need to mock data to get your front end to work. Flutter’s widget system is another way of arranging your frontend code. It works through abstraction until you can no longer abstract any further. In a way, this implements the idea of atomic design – which is a collection of components.
Or in Flutter’s case, it’s a collection of widgets.
Explore recent posts
//Explore recent posts
//
3 -min read

6 -min read

5 -min read
More Guides
//7 -min read
3 -min read
11 -min read